This tutorial will walk you through the process of creating an Event in CircuiTree. An Event is what you offer your customers, be it summer camp, family camp or a weekend retreat. It is one of the core concepts in CircuiTree.
Events take place over a specific time period at a particular location. They also can have resources [like lodging, activities, and transportation] associated with them. You can configure the information that you collect as well from Medical Forms to custom questions.
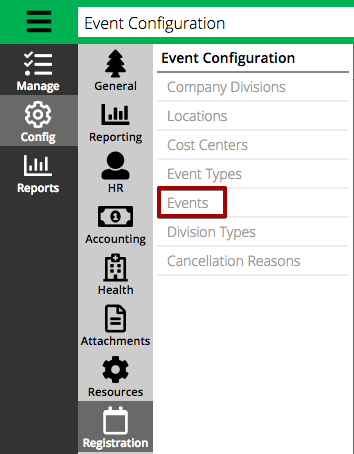
- Go to Menu > Config > Registration > Events.
- To view existing Events, use the Criteria to filter and then select Find.
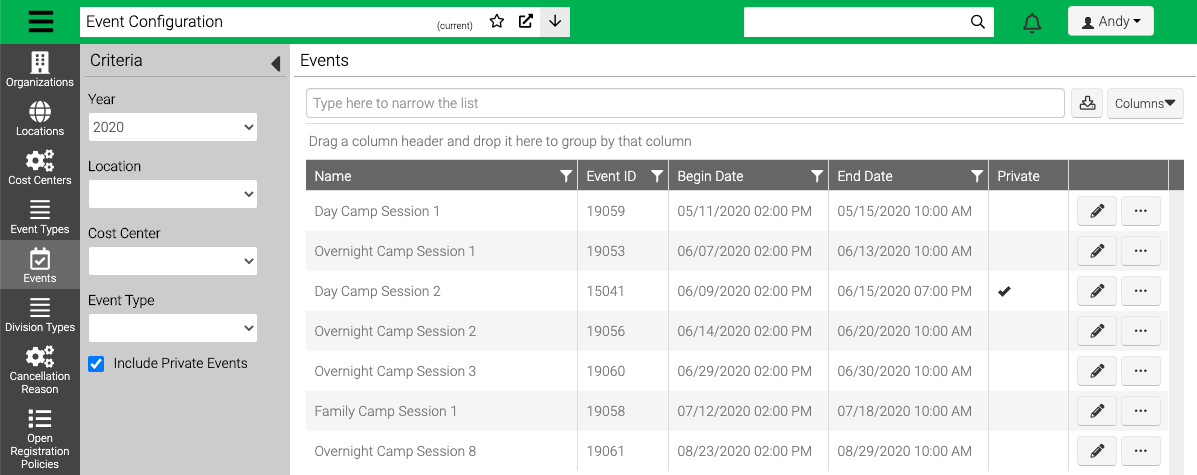
- Select
 to edit an Event.
 - Select
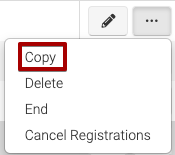
 for more options.
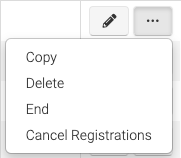
- Copy – Select to copy the Event.
- Delete – If there are no Registrations, you can delete the Event.
- End – Runs End of Event process.
- Cancel Registrations – Select to cancel all the Registrations for the Event.
Copy Event
When copying an Event, select Copy and then update the following for the new Event and select Copy.
- Select and then select Copy.
- Fill out the information.
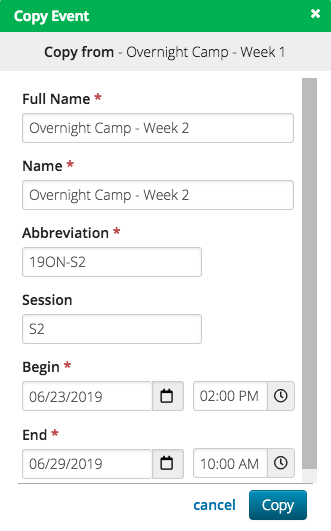
- Select Copy.
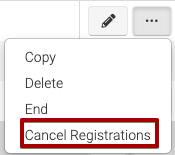
Cancel Registrations
- Select and then select Cancel Registrations.
- Fill out the information.
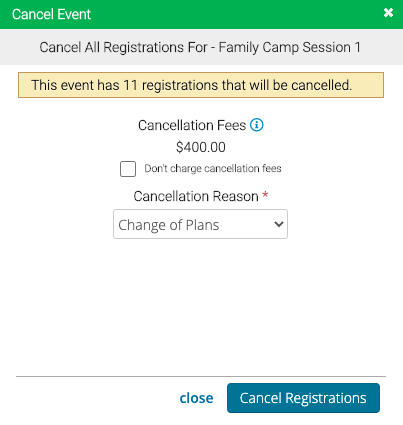
- Cancellation Fees – Displays the Cancellation Fee for the Event.
- Don’t charge cancellation fees – Check box to not charge a Cancellation Fee.
- Cancellation Reason – Select a Cancellation Reason from the list.
- Select Cancel Registrations.
New Event
- From the Events list, select Add Event.
Event Details
Naming
The Event Name is used to identify the Event in various parts of CircuiTree.
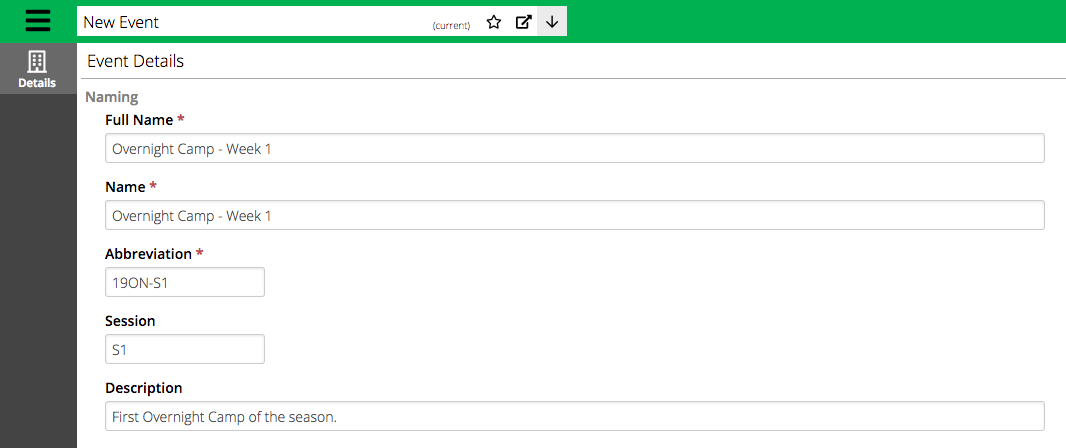
- Full Name – Mostly used internally to reference the Event.
- Name – Often used on the Registration Site to identify the Event. Where do Event Names display?
- Abbreviation – Used as shorthand to reference the Event internally. Will be used for reference when the Name can not be used due to lack of space.
- Session – Enter a code that can be used to compare different Events year over year.
- Description – Add a description of the Event. By default this is not show on the Event Selection screen on the Registration Site.
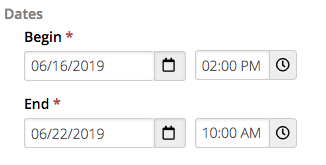
Dates
Enter the begin and end date for the Event.
Availability
Determine who is able to register for the Event.
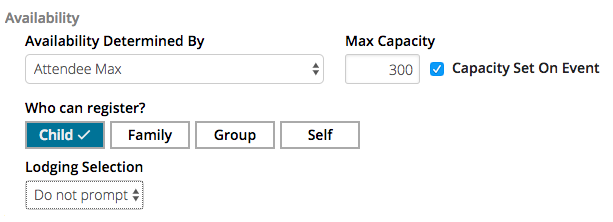
- Availability Determined By – Select between the following options:
- Attendee Max – Set a maximum capacity. Once that number is reached, the Event will follow Waitlist rules.
- Housing Resources – Allocate Housing Resources to the Event, and then once all of those Resources have been reserved, follow Waitlist rules.
- Both Attendee Max and Housing Resources – Set both a maximum capacity and allocate Housing Resources. Once either the maximum capacity is reached or all of the Housing Resources are reserved, then follow Waitlist rules.
- Max Capacity – Set the maximum number of Registrations. Select Capacity Set On Event or uncheck to set Capacity on each Event Division.
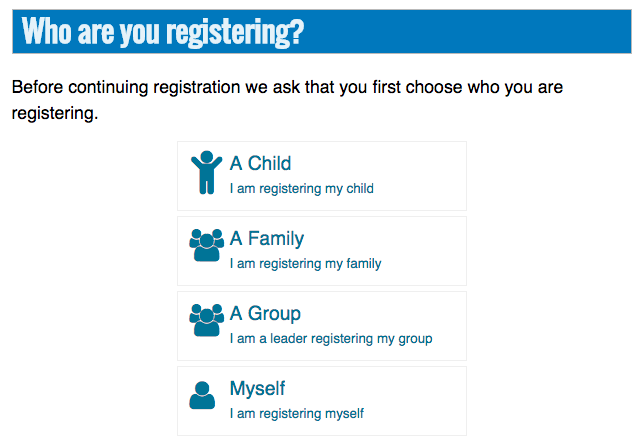
- Who can register? – Select the Registration Types that are available for the Event.
- Child – Allow a parent to register a child for an Event. A child is determined to be anyone with an age less than the global Administrator Age [by default 18].
- Family – Allow a family member to register multiple people for an Event.
- Group – Allow a group leader to register multiple people for an Event.
- Self – Allow one person to register themself for an Event. Only the person who has the account can register for an Event with Self selected.
The following options will appear on the Registration Site to filter the Event Selection page by Registration Type. An option for each Registration Type will display if there is any future Event with that option selected.
- Lodging Selection – If Housing Resources are allocated determine if a step should be added during Registration to select Housing.
- Do Not Prompt – Do not add a step during Registration. If Availability Determined By is set to either Housing Resources or Both Attendee Max and Housing Resources, then Housing will be automatically reserved on Registration. Can be updated through Housing Assignments in the future if needed, and Attendee won’t see change.
- Optional – Adds a step during Registration, but does not require any Housing Resources to be reserved. If Availability Determined By is set to either Housing Resources or Both Attendee Max and Housing Resources, then Housing will be automatically reserved to Registration if nothing selected.
- Required – Adds a step during Registration that is required to reserve Housing before activation.
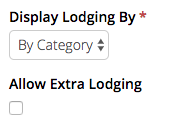
- Display Lodging By – If under Lodging Selection, either Optional or Required are selected, then select from the following options:
- By Category – Displays Resource Category and reserves first available Resource automatically.
- By Room – Displays a list of rooms available for selection.
- Allow Extra Lodging – Check to allow customer to select more lodging than needed. For example a family of 6 could select 2 rooms with capacities of 6.
Settings
Determine the Accounting Settings for the Event.
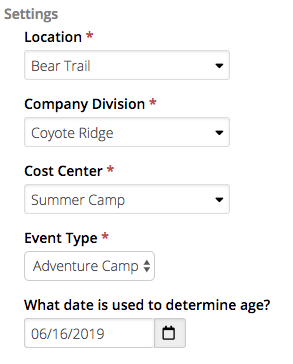
- Location – Select from the list of available Locations. If new Location is needed, select Add Location from drop down menu.
- Company Division – Select from the list of available Company Divisions. If new Company Division is needed, select Add Company Division from drop down menu.
- Cost Center – Select from the list of available Cost Centers. If new Cost Center is needed, select Add Cost Center from drop down menu.
- Event Type – Select from the list of available Event Types.
- What date is used to determine age? – Used for Events with Event Divisions that are restricted by Age. By default this is set to the Begin Date of the Event, but can be changed if needed.
More Options
Select More to see the following list of options.
Display
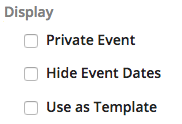
- Private Event – Select to make Event only accessible through a unique link that is created. Once you select Save, the link to the Private Event will appear in the upper right corner of the Summary.
- Hide Event Dates – Select to hide the dates of the Event during Event Selection.
- Use as Template – Select when creating a Template Event to be used with a Guest Group Package. How do I configure Guest Groups?
Projections
These internal fields can be used in Reporting to compare your projections to actuals.
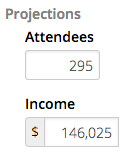
- Attendees – Set the number of projected Attendees for the Event.
- Income – Set the projected Income for the Event.
Roomates
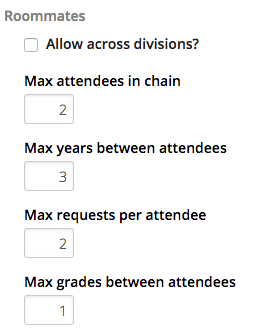
- Allow across divisions? – Select to allow Roommate Requests to be made with someone in a different Event Division than the requestor.
- Max attendees in chain – Set the maximum number of Roommate in a chain.
- Max years between attendees – Set the maximum number of years between Roommates in a chain.
- Max requests per attendee – Set the maximum number of requests that can sent per Attendee.
- Max grades between attendees – Set the maximum number of grades between Roommates in a chain.
Batch Update
After you have created your Event, you can update other Events with the same Event Details Settings if needed.
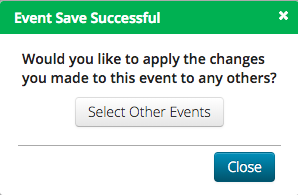
- Either go to Actions > Batch Update, or after you select Save to create a new Event or after editing an Event, an option will appear to apply changes to other Events. Choose Select Other Events.
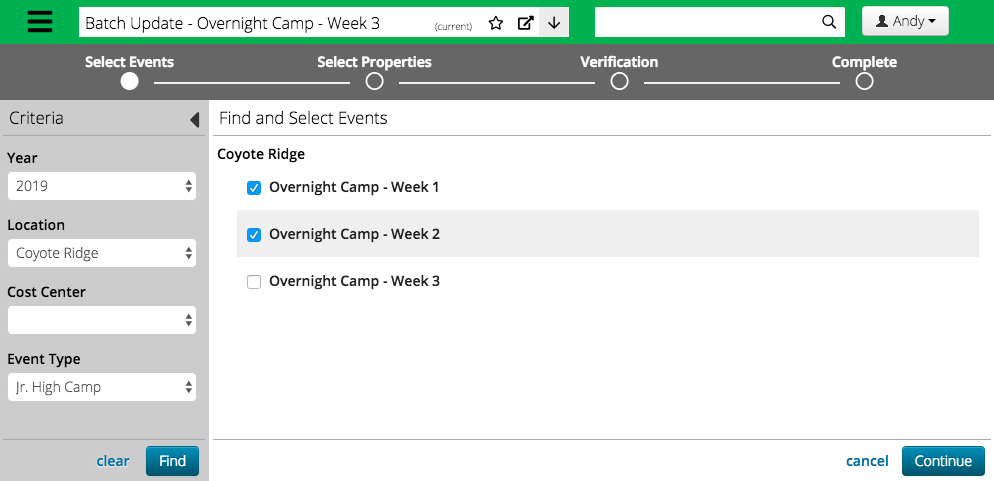
- Under Criteria, filter for the Events that you want to update and select Find. Check the box next to the Events to update and then select Continue.
- Check the box next to the settings that you want to update for the selected Events and then select Continue. By default, the setting that you updated will be checked.
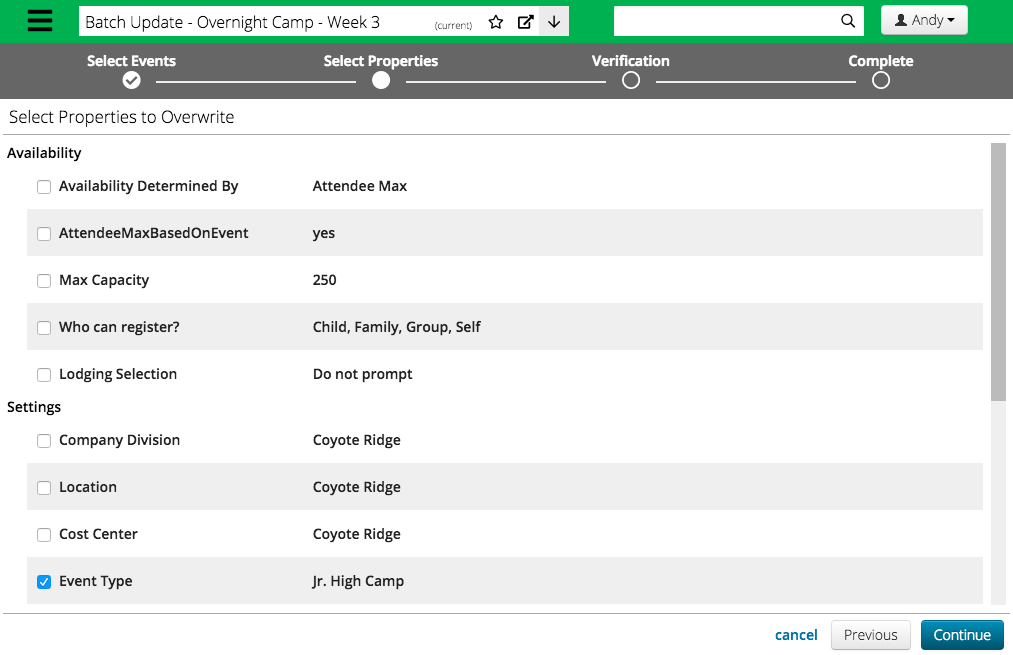
- The following are fields that can be updated:
- Availability
- Availability Determined By
- Attendee Max Based on Event
- Max Capacity
- Who can register?
- Lodging Selection
- Display Lodging By
- Allow Extra Lodging
- Settings
- Company Division
- Location
- Cost Center
- Event Type
- Projections
- Attendees
- Income
- Roommates
- Allow across divisions?
- Max attendees in chain
- Max requests per attendee
- Max years between attendees
- Max grades between attendees
- Display
- Private Event
- Hide Event Dates
- Event Division
- All Settings
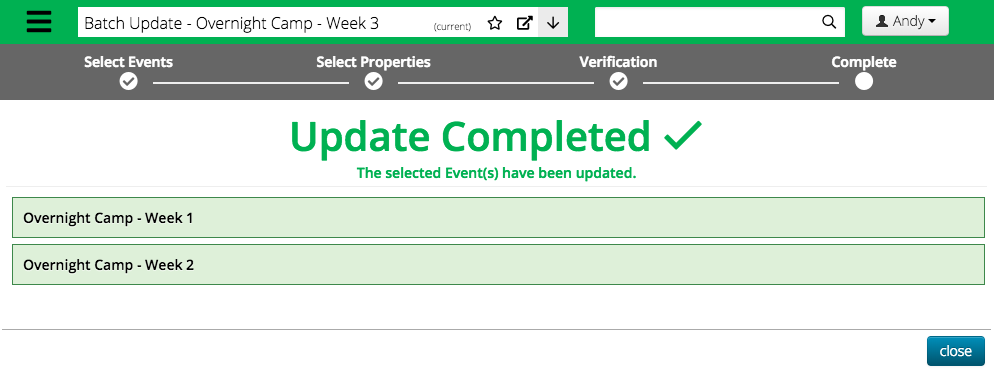
- Verification process will complete, if there are no issues, select Apply Changes.
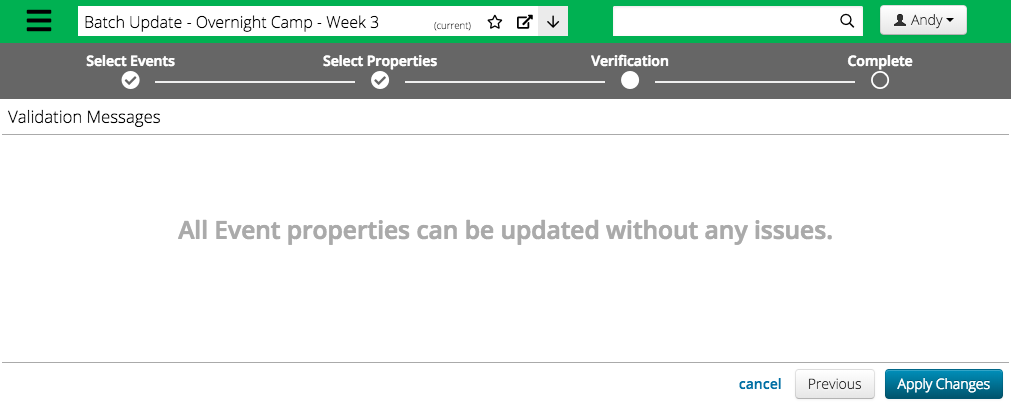
- Results are show of what Events were updated. Select Close to return to Event Details.
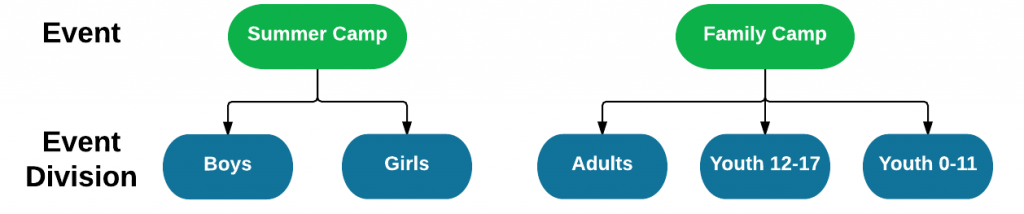
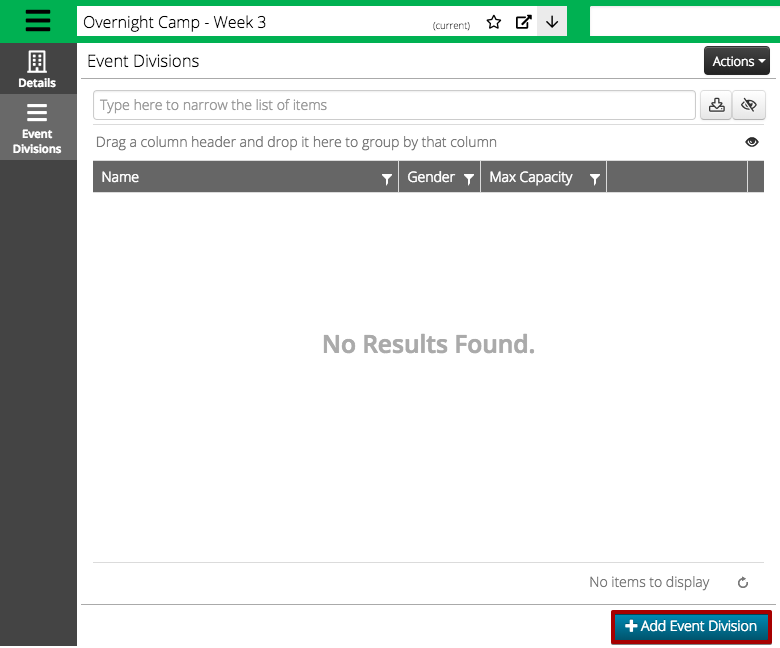
Event Divisions
The next step is to add an Event Division. An Event Division is what a customer registers for. Each Event must have at least one Event Division and they can be used in some different ways.
- Select the Event Divisions tab and In the lower right hand corner, select Add Event Division to create one.
- Fill out the fields and then select Save.
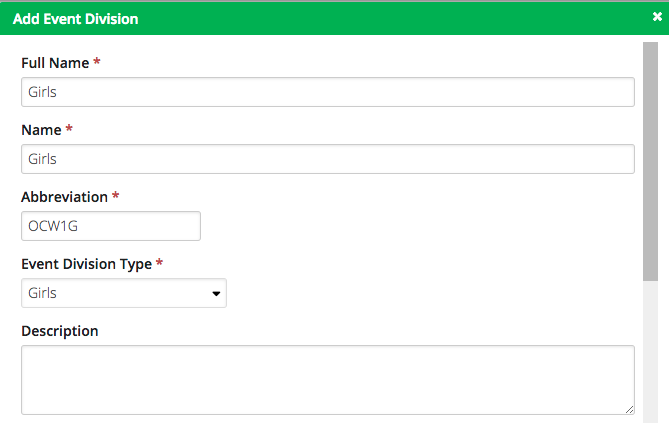
- Full Name – Mostly used internally to reference the Event.
- Name – Often used on the Registration Site to identify the Event. Where do Event Names display?
- Abbreviation – Enter an Abbreviation for the Event Division. Will be used for reference when the Name can not be used due to lack of space.
- Event Division Type – Select an Event Division Type. If new Event Division Type is needed, select Add Division Type from drop down menu.
- Description – Add a description of the Event Division. By default this is not show on the Event Selection screen during Registration.
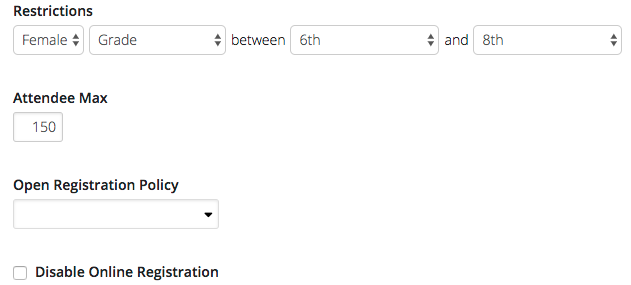
- Restrictions
- Gender – Choose either Any, Male or Female.
- Age / Grade – Choose either Any Age or Grade, Age or Grade.
- Attendee Max – Set the maximum number of Attendees for the Event Division.
- Open Registration Policy – Set a policy for dates when customers are able to register through the Registation Site.
- Disable Online Registration – Check box to remove Event Division from being shown during Event Selection on the Registration Site.
Select More to see a list of other options.
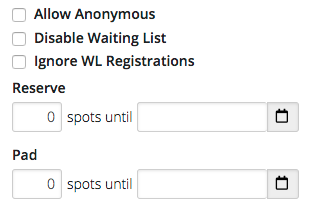
- Allow Anonymous – Check box to not require Registrations to be named during process. Useful for Group Registrations.
- Disable Waiting List – Check box to turn off Waiting List functionality.
- Ignore WL Registrations – Check box to allow Registrations until the Event is full. Will ignore waitlist. How do Ignore waitlist option work?
- Reserve – Set the number of spots that are reserved before a certain date. Number is deducted from Attendee Max.
- Pad – Set the number of additional spots that are available before a certain date. Number is added to Attendee Max.
Open Registration Policy
An Open Registration Policy allows you to determine when different groups of customers can register for an Event Division on the Registration Site. Policies allow you to create one policy and apply it to multiple Event Divisions as needed. This is useful if you want to open registation for multiple Event Divisions at the same time.
- To create a new Open Registration Policy, select the drop down and select Add Open Registration Policy.
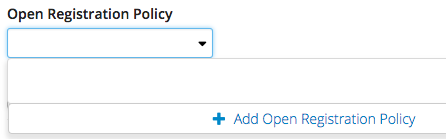
- Enter a name for the policy and then add a rule.
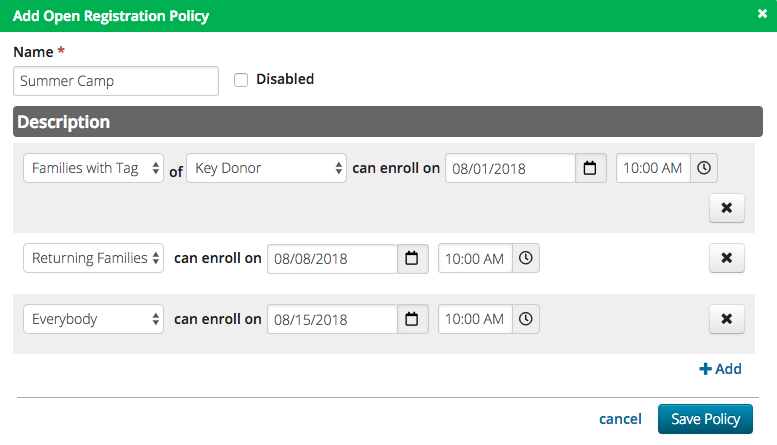
- Families with Tag – Select a Tag and then set a specific time and date when the Event will be available.
- Learn how to configure Tags – How do I use Families with Tags in Open Registration Policy?
- Returning Families – Defined as any family with a previous registration. Set the date and time when the Event will be available.
- Everybody – After this date and time, the Event will be available for everybody.
- Disabled – If you only want the policy to be seen in the Event Division that you are currently in, check the box for Disabled. The policy will then be hidden on other Event Divisions.
- Select Save Policy.
Charges
Once you have created all of your Event Divisions, move on to adding Charges.
- Select the Charges tab and select Edit to update.
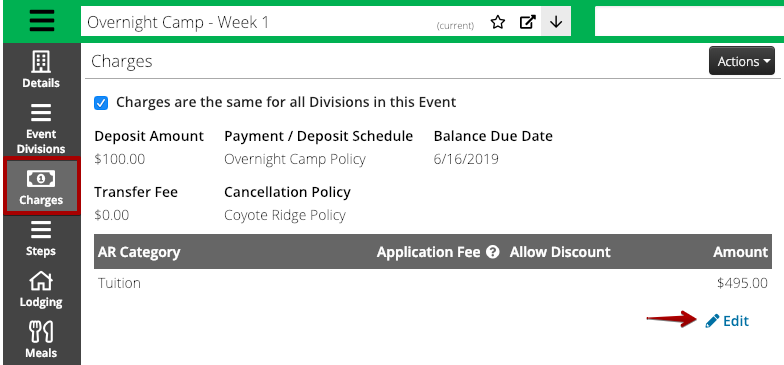
- Fill out the following fields:
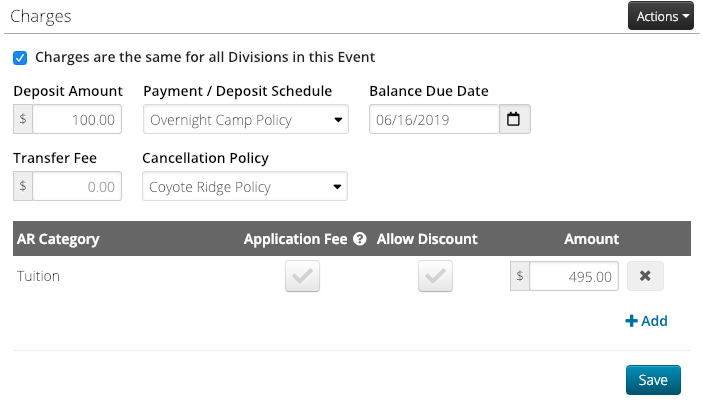
- Charges are the same – If all of the Charges on the Event Divisions are going to be the same for the Event, check the box. If they are different, uncheck the box to set up different charges per Event Division.
- Deposit Amount – Enter the amount required to Activate the Registration.
- Transfer Fee – Set the amount to charge when a transfer occurs.
- Payment / Deposit Schedule – See explanation below.
- Cancellation Policy – See explanation below.
- Balance Due Date – Set the date when the balance is due.
- AR Category – Select an AR Category, choose to Allow Discounts or not and set an Amount. Select
 for multiple charges from different AR Categories.
 - Application Fee – Select to add an Application Fee. The fee will be applied once per Attendee per Itinerary regardless of how many Registrations there are. How do I add an Application Fee?
- Allow Discount – Select to allow a Discount to be applied to the AR Category.
- Once complete, select Save.
Payment / Deposit Schedule
Many times you will have organization registration policies that apply to multiple Events. That is where Payment and Deposit Schedules come in. These schedules allow you to configure one policy and use it for multiple Events. Need to update the policy? Update it in one place and it will show up anywhere that the policy is selected. Here is how you can set up a policy:
- Under Payment / Deposit Schedule, select the drop down arrow.
- Select Add Deposit Schedule Policy.
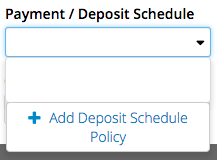
- Enter a name for the policy and then select from one of three options.
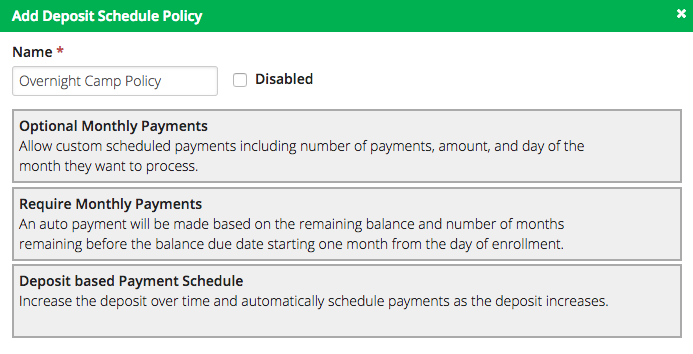
- For each option, you can add multiple rules to the policy by selecting .
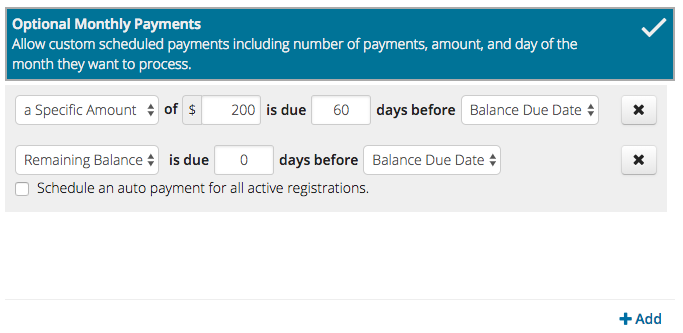
- Select either a Specific Amount or Remaining Balance.
- Enter an amount.
- Enter the number of days before.
- Select either Event Start Date or Balance Due Date.
- Once you have selected an option and added rules, select Save Policy.
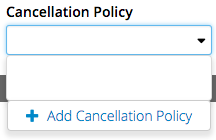
Cancellation Policy
Similar to Payment / Deposit Schedule, you can add create a Cancellation Policy to use with multiple Events. Here is how to create one:
- Under Cancellation Policy, select the drop down arrow.
- Select Add Cancellation Policy.
- Enter a name for the policy and then enter the rules. Select for additional rules.
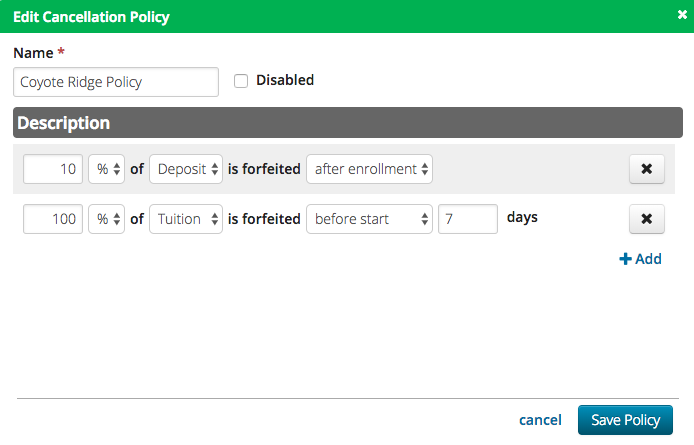
- Enter an amount.
- Choose either a dollar amount [$] or a percentage [%].
- Select either Deposit or Tuition.
- Select the timing of when the policy applies:
- After enrollment – Anytime after the Registration is Activated.
- On date – Select a specific date.
- Before start – Enter the number of days before the Event starts.
- After start – Enter the number of days after the Event starts.
- Once rules are set, select Save Policy.
Steps
Customize the experience for your customer’s during the registration process by adding Steps. Here is how to get started:
- Select the Steps tab.
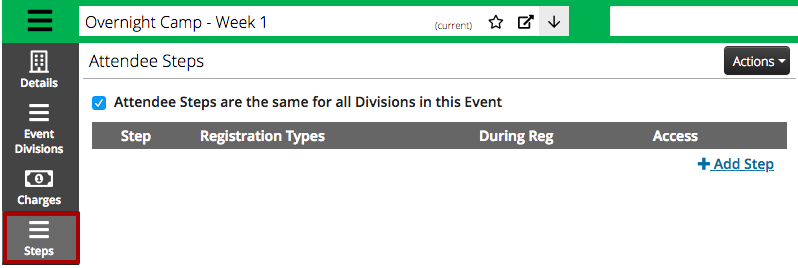
- Attendee Steps are the same – If all of the Steps on the Event Divisions are going to be the same for the Event, check the box. If they are different, uncheck the box to set up different charges per Event Division.
- Select Add Step and fill out the fields.
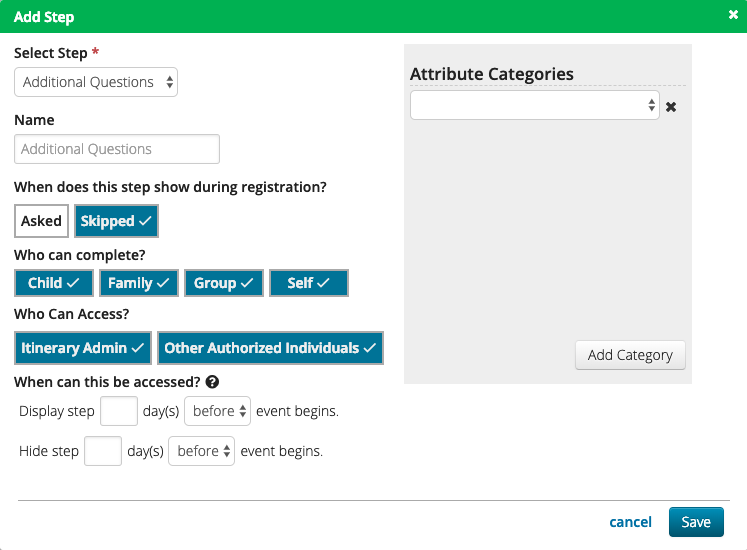
- Select Step – Choose from a list of available steps. What Attendee Steps are available?
- New Site Only Step can be added multiple times.
- New Site Only Name – Enter a name for the Step to display on the Registration Site.
- When does this step show during registration? – Select one of the options.
- Asked – Added as part of the steps that are shown to a customer after an Event is selected and before Checkout.
- Skipped – Step is available to customer after Checkout.
- Who can complete? – Select the Registration Type [Child, Family, Group, Self] that is eligible to complete this step. Not all Steps allow each Registration Type.
- Who Can Access? – Select the types of customers who can access the Step.
- Itinerary Admin – A customer who is an Admin for the Family or Group who registered the Attendee.
- Other Authorized Individuals – A customer who is a Financial Contact for the Family or Group who registered the Attendee.
- When can this be accessed? – Set the number of days before or after to display or hide the step. Leaving both fields blank will result in the step always being visible.
- Additional Information – For certain Steps, select Attributes that will be shown.
- New Site Only Add Attributes to any Step.
- Once complete, select Save.
- Select Add Step to add additional Steps to complete the workflow.
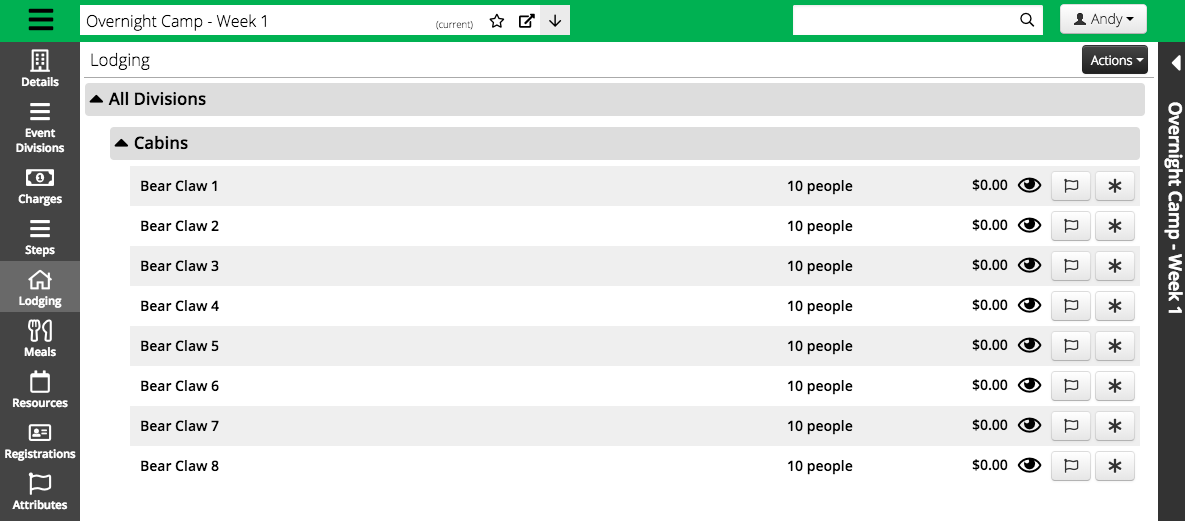
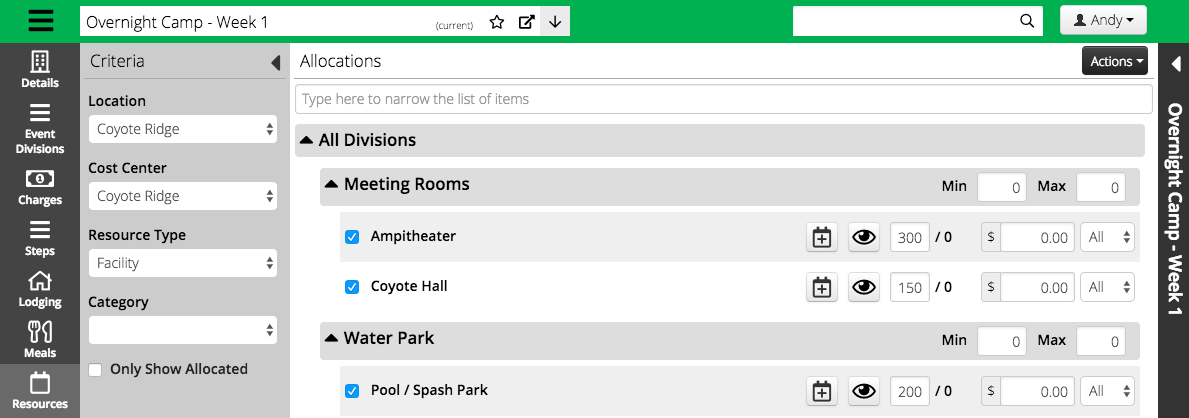
Lodging
Allocate Lodging Resources to your Event to allow for selection during the Registration Process or during Housing Assignment.
- Select the Lodging tab and in the lower right hand corner select Edit Lodging.
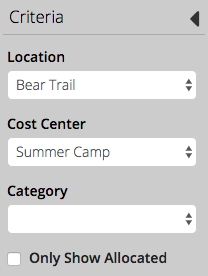
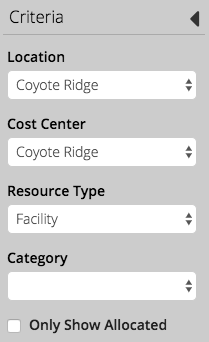
- Use the Criteria to filter what you are looking for and then select Find.
- Check box next to the Lodging to Allocate, fill out the other fields and then select Save.
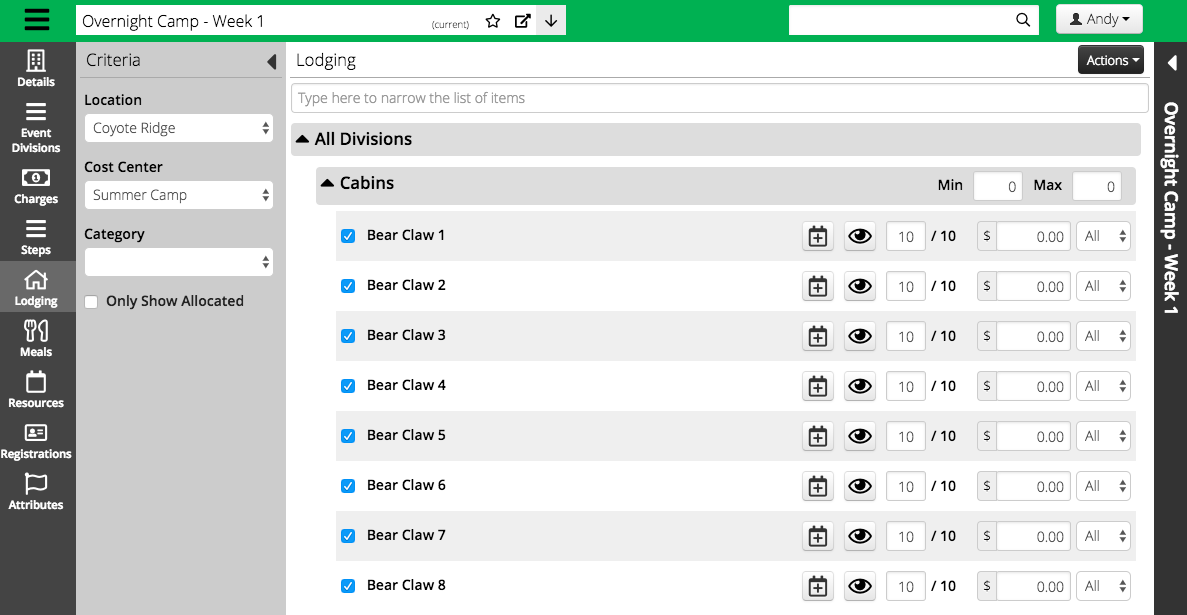
- Min / Max – Set the Resource Category Restriction to limit the number of Reservations that can be made for that Category.
 Modify Dates – Select to change the date and time of the Allocation.
 Visible on Web – Select to display the Resource on the Registration Site.
- Quantity – Enter the quantity to Allocate.
- Cost – Enter the charge for the Allocation.
- Event Division – Select between All or a specific Event Division to allocate the Resource to.
- After saving, you can view the Allocations and complete other actions.
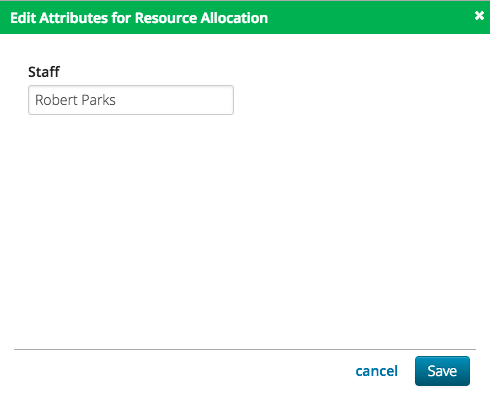
Resource Allocation Attributes
- Select
 to edit Resource Allocation Attribute.
 - Enter the Attribute value and then select Save.
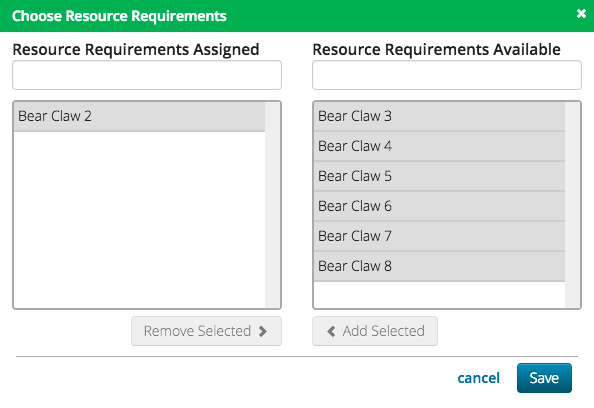
Resource Requirements
Set requirements when you want to require that an Attendee selects one Resource based on another. One example would be to set a Resource Requirement for Lodging for a specific Activity.
- Select
 to edit Resource Requirements.
 - Select the required Resources on the right and then select Add Selected to move them to Assigned. Once finished, select Save.
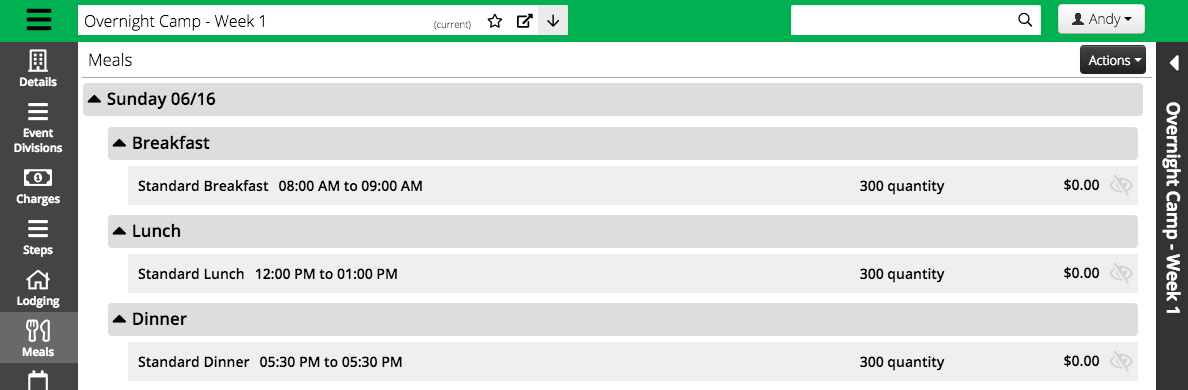
Meals
To assist in meal planning for your Food Service department, allocate Meals to your Event.
- Select the Meals tab and in the lower right hand corner select Edit Meals.
- Use the Criteria to filter what you are looking for and then select Find.
- Check box next to the Meal to Allocate, fill out the other fields and then select Save.
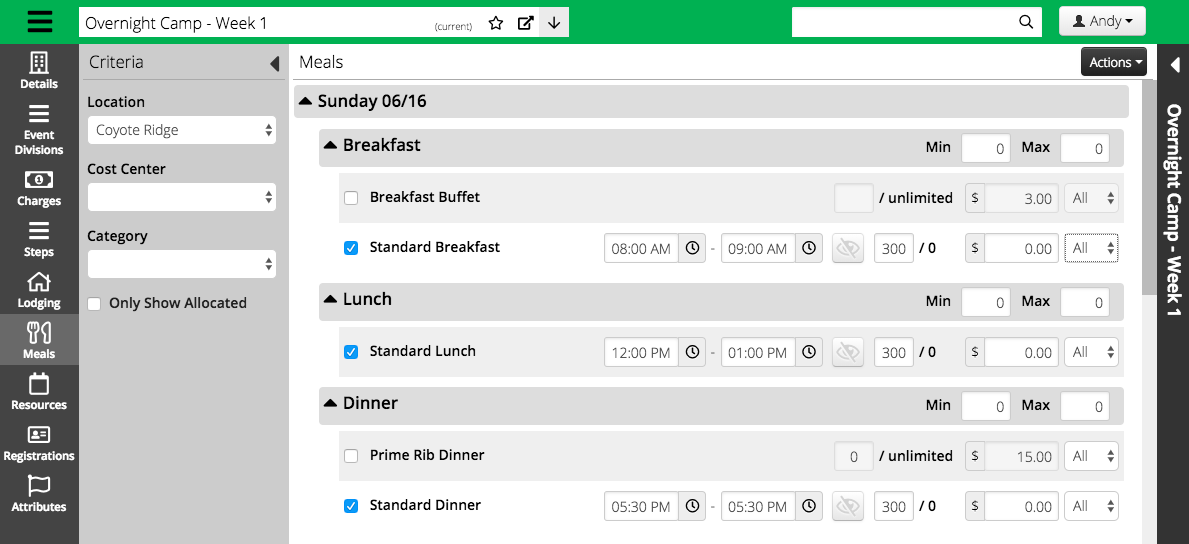
- Min / Max – Set the Resource Category Restriction.
 Start / End Time – Set the start and end time for the meal.
 Visible on Web – Select to display the Resource on the Registration Site.
- Quantity – Enter the quantity to Allocate.
- Cost – Enter the charge for the Allocation.
- Event Division – Select between All or a specific Event Division to allocate the Resource to.
- After you save, you can view the Meal allocations.
Activities
Select Activities that will be offered as part of the Event.
- Select the Activities tab and in the lower right hand corner select Add Activity.
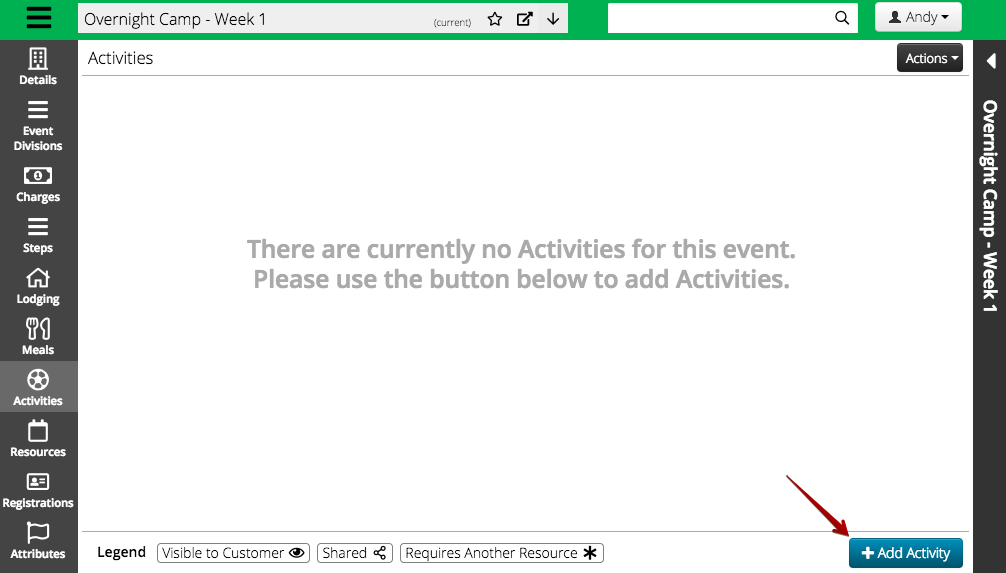
- Select an Activity Type. Only one type of Activity is able to be used per Event.
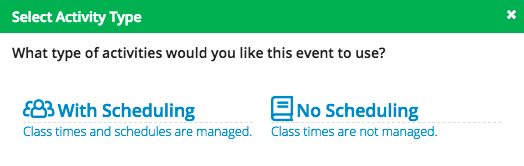
With Scheduling
When selecting this option, Activities will be able to be scheduled at specific times.
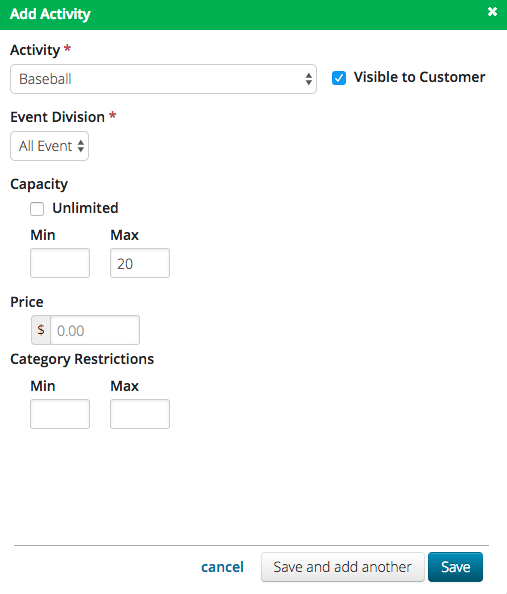
- Fill out the following fields and then select either Save and add another or Save.
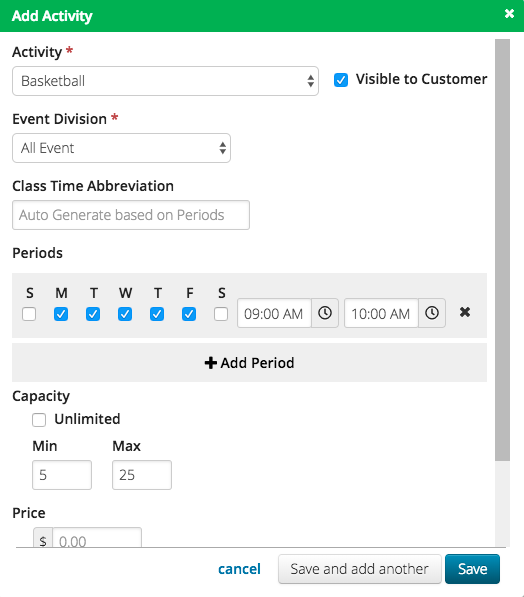
- Activity – Select from a list of available Activities.
- Visible to Customer – Check box to show Activity on Registration Site.
- Event Division – Select either All Event or a specific Event Division that this Activity where this activity is available.
- Class Time Abbreviation – Defaults to Auto Generate based on which Periods are selected. Override if needed.
- Periods – Select the days of the week and the time when this Activity is offered. Select Add Period to add another time when this class meets. Attendees will register for all periods of an Activity.
- Capacity – Check box for Unlimited or leave unchecked to set a Minimum and Maximum number of Reservations for the Activity.
- Price – Set a price to charge for the Activity.
- Category Restrictions – Set the Minimum and Maximum number of Reservations per Resource Category.
No Scheduling
If you do not want to schedule specific times for Activities, select the No Scheduling Activity Type.
- Fill out the following fields and then select either Save and add another or Save.
- Activity – Select from a list of available Activities.
- Visible to Customer – Check box to show Activity on Registration Site.
- Event Division – Select either All Event or a specific Event Division that this Activity where this activity is available.
- Capacity – Check box for Unlimited or leave unchecked to set a Minimum and Maximum number of Reservations for the Activity.
- Price – Set a price to charge for the Activity.
- Category Restrictions – Set the Minimum and Maximum number of Reservations per Resource Category.
More Options
- After adding an Activity, it will display in the list. Select
 for more options.
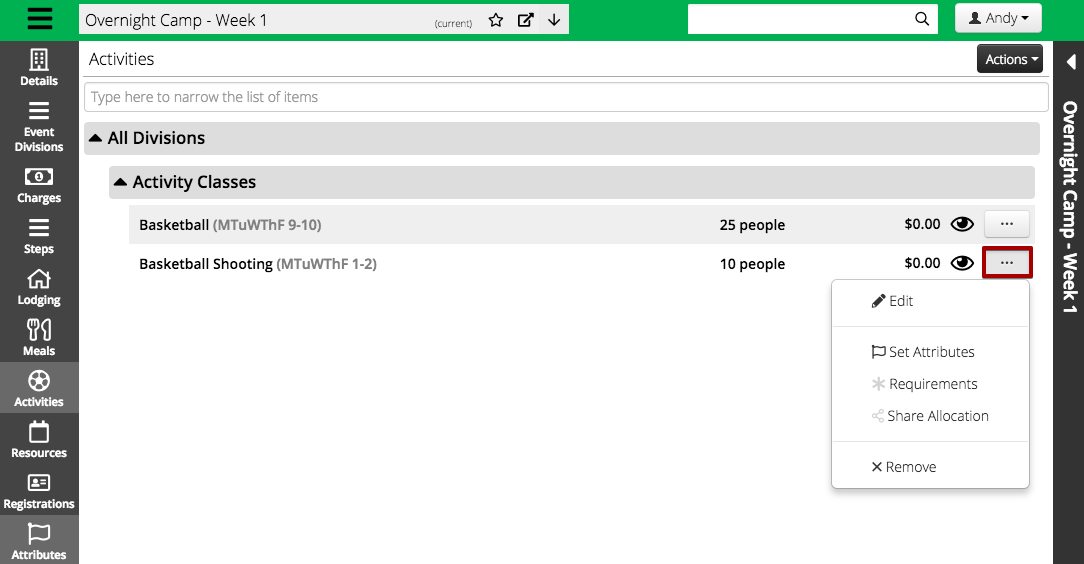
- Edit – Select to change the settings for the Activity.
- Set Attributes – Enter a value for a Resource Allocation Attribute.
- Requirements – If one Activity is required in order to select another Activity, set up a Requirement.
- Share Allocation – Select another Event that overlaps the same date range to share the Activity with.
- Remove – Select to remove the Activity.
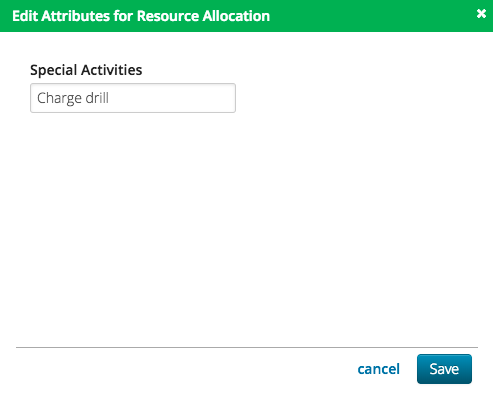
Set Attributes
Need to track an Attribute for an Activity? Set a Resource Allocation Attribute.
- Select Set Attributes.
- Enter a value for the Resource Allocation Attribute and then select Save.
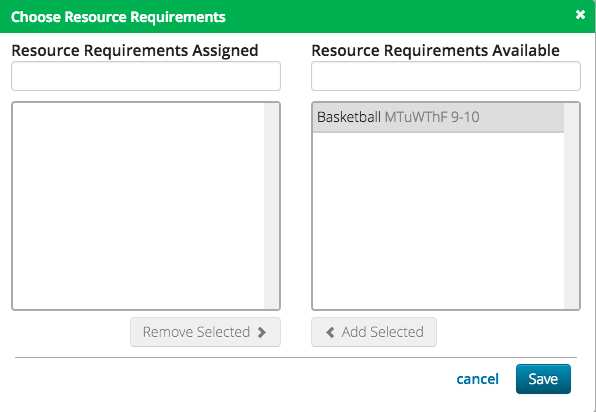
Requirements
Sometimes one Activity is required in order to reserve another Activity. If that is the case, add a Requirement.
- Select Requirements.
- Select the required Resources on the right and then select Add Selected to move them to Assigned. Once finished, select Save.
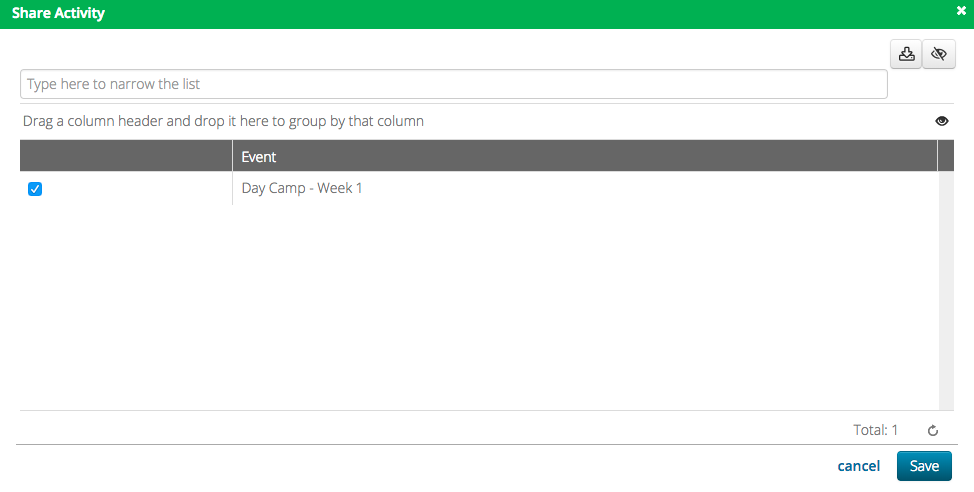
Allow for Activities to be shared amongst a pool of Events with Share Allocation.
- Select Share Allocation.
- Filter the list and then check the box next to the Events you want to share the Activity with and then select Save.
Resources
Allocate Resources to your Event to track what you will be using.
- Select the Resources tab and in the lower right hand corner select Edit Resources.
- Use the Criteria to filter what you are looking for and then select Find.
- Check box next to the Resource to Allocate, fill out the other fields and then select Save.
- Min / Max – Set the Resource Category Restriction.
- Modify Dates – Select to change the date and time of the Allocation.
- Visible on Web – Select to display the Resource on the Registration Site.
- Quantity – Enter the quantity to Allocate.
- Cost – Enter the charge for the Allocation.
- Event Division – Select between All or a specific Event Division to allocate the Resource to.
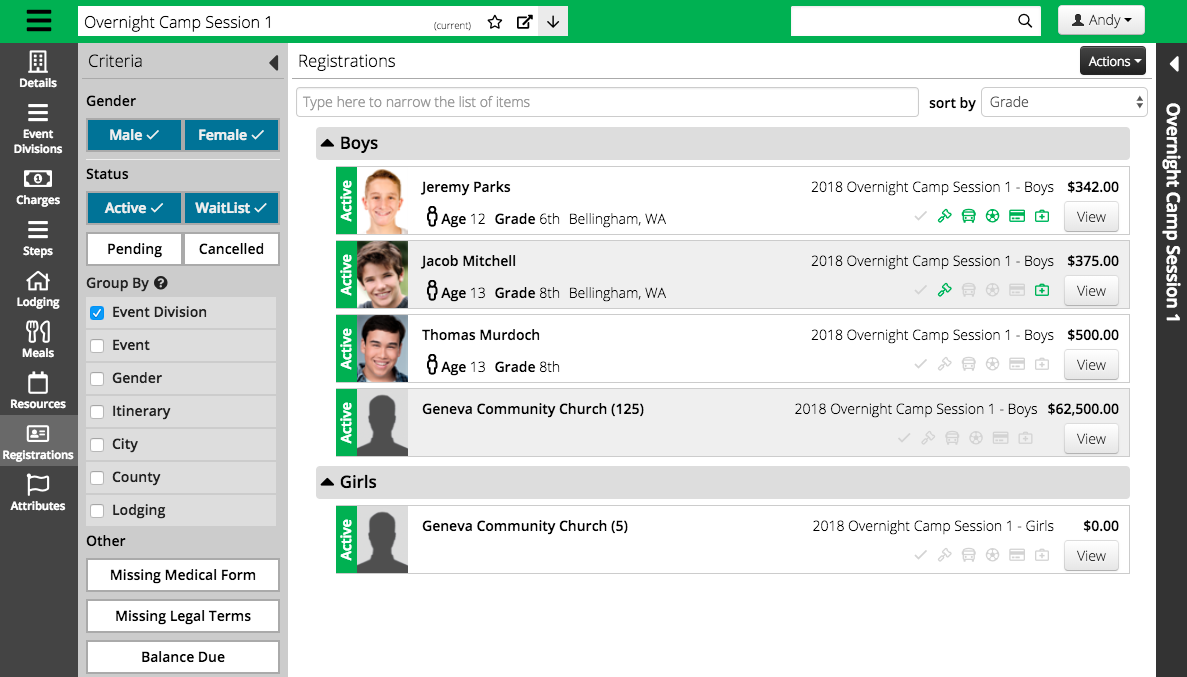
Registrations
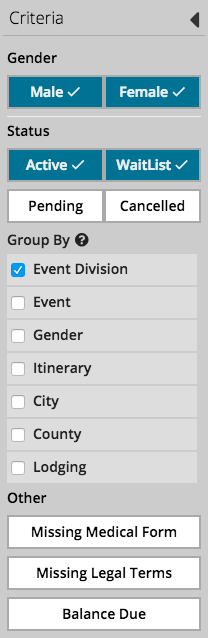
View the list of Registrations for your Event.
- Select the Registrations tab.
- Use the Criteria to filter what you are looking for and then select Find.
- To see more specifics about a Registration, select View.
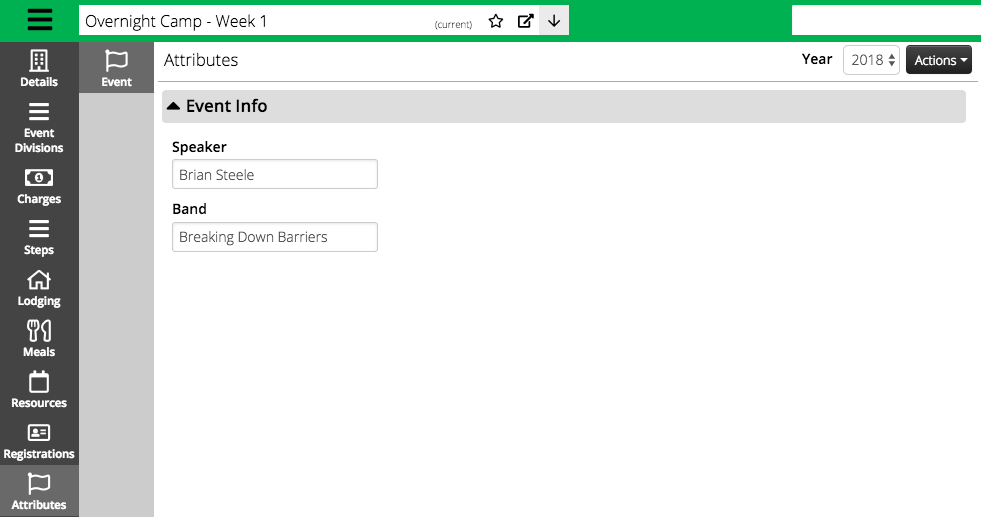
Attributes
Enter values for Event specific Attributes.
- Select the Attributes tab.
- Enter the values for the Attributes then select Save.