Application Settings are global settings that allow you to customize your implementation of CircuiTree.
Navigation
- Go to Config > General > Application Settings.

- Use the filter at the top of the screen to find specific Application Settings.
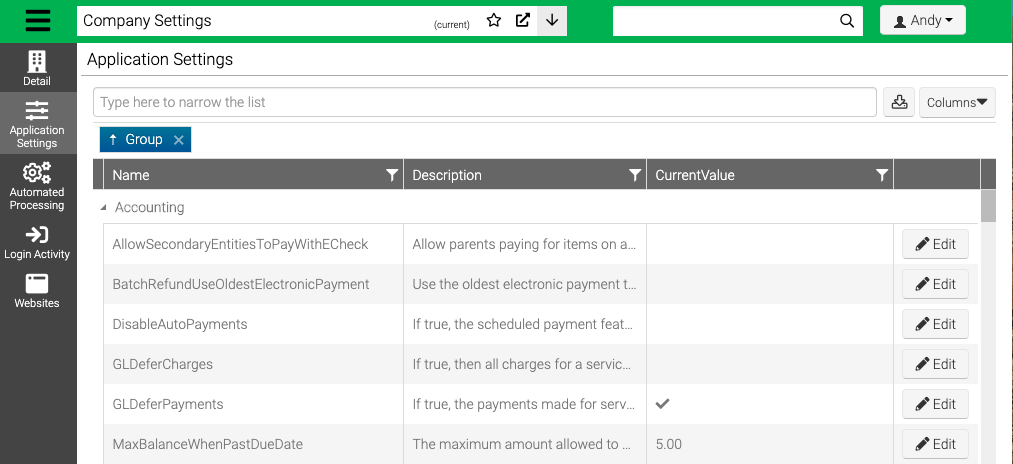
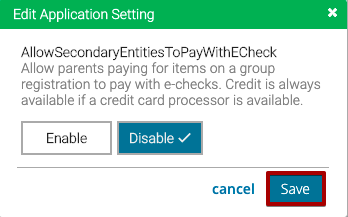
- Select Edit to update an Application Setting.
- Update the setting and then select Save.
Reset App Settings
After changing an Application Setting, you must reset them on the Registration Site for them to take affect.
- CT5 Registration Site – How do I reset Application Settings?
- CT6 Registration Site – How do I refresh cache?
Accounting
- AllowSecondaryEntitiesToPayWithECheck – This allows parents paying for items on a group registration to pay with e-checks. Credit is always available if a credit card processor is available. What is a Secondary Entity?
- BatchRefundUseOldestElectronicPayment – When you run the batch refund process, the system will automatically use the oldest electronic payment on the account instead of the newest.
- DisableAutoPayments – Automatic payments that have been scheduled will not be drafted.
- GLDeferCharges – If charges are deferred, they are posted immediately to a deferred GL code. If they are not, they are not posted at all until the revenue is earned (e.g. in the End of Event procedure or after the itinerary is over). Typically used for cash based accounting method. What is the Deferred Revenue Method?
- GLDeferPayments – If payments are deferred, they are first posted to a deferred GL Code when they are received, then moved to a final when end of event is done. If not, they go to the final GL code immediately when received. Typically used for accrual based accounting method. What is the Deferred Payment Method?
- MaxBalanceWhenPastDueDate – This is the amount that will be used to determine what payment is required by customers registering online (beyond regular deposit rules). The system looks to see if the customer has any previous balances past due or pending charges on the current registration past the balance due date. For any total amount greater than the MaxBalanceWhenPastDueDate setting, payment will be required for the customer to complete the registration.
- PayAllDepositsFirst – When distributing a payment among multiple items (registrations/reservations), should the payment pay all the deposits owed before the extra is used to pay off the rest of the balance?
- RefundCheckIfAmountIsOver – This is the dollar amount at which a refund check will be sent.
- SendCCPaymentNotificationInCT – In CT5/6, when you are making a payment in the payment wizard, the checkbox for “send email notice” allows you to send an automated email receipt to the customer. This stores the last value used on that box, and sets it for the next time.
- SendRefundNotification – Whether or not refunds processed within CircuiTree should send email notification to the customer.
- WarnBalanceDueOver – This is the amount at which customers will receive a balance due warning. The balance due total is calculated looking at itinerary departure dates. So if the current date is past the departure date of any itineraries with outstanding balances, what is owed from those itineraries is added to the balance due. If the current date is prior to departure date of itineraries with outstanding balances, the customer would not see the warning.
- WarnIfTaxIsOffOver – Currently unused.
Address Standardization
- AddressServiceAvailable – Currently unused since switching to SmartyStreets API.
Contact
- AddressLine1, AddressLine2, CityStateZip, CompanyName, ContactEmail, ContactPhone, DonationEmail, DonationPhone, PaymentEmail, PaymentPhone, RegistrationEmail, RegistrationPhone, TechSupportEmail, TechSupportPhone, WebsiteURL (marketing site) – This is all the applicable contact information for your organization. These are the merge field values that will be used when setting up your emails in CircuiTree.
Donations
- GroupOnlineAppealsBy – This is how your online donation appeals will be grouped. Select “0” to group by fund, and select “1” to group by campaign appeal category. How do I set up a Donation Fund? and How do I setup Donation Campaigns?
- PromptForReCaptcha – Requires donors to pass the reCaptcha security test before submitting a donation.
- RequireLoginForDonation – By checking this, your website will require donors to login to an account before donating. Not requiring this makes it easier to collect a gift from a potential donor. Their contact info will still be collected during payment and an account will be created so that is not lost if you don’t decide to require login.
- SendDonationAcknowledgmentInCloseBatch – When closing a batch that includes donations, an automated email with receipt can be sent to the donor. How do I Close a Batch?
Emails
- MandrillAPIKey – If you use Mandrill to link to MailChimp for adding MailChimp templates, this is where you will enter the API key Mandrill gives you during setup.
- SMTPDomain, SMTPPassword, SMTPPort, SMTPServer, SMTPUserName – This is the mail server setup. It is populated when you complete the configuration in the “Email Settings” section. Once you enter the info in “Email Settings,” no additional work is needed. How do I Configure Outgoing Emails?
- SMTPUseSSL – Does the email server use an SSL connection?
General
- AdministratorMinimumAge – This allows you to put a minimum age for anyone who can be designated as an administrator (someone who can register a child or group, add reservations, and see all account details) on an account.
- APIAddress – For CT internal use only.
- DaysAfterEventToPromptForLegal – When determining which unsigned terms and conditions to look for and alert the administrator, how long after the event should it be before you don’t alert them anymore?
- DaysLegalAgreementIsValid – How many days are the signed Terms and Conditions good for?
- DefaultCountryCode – This is the country your business is located.
- GlobalRootFilePath – For CT internal use only.
- MaxFileAttachmentSize – Here, you can set a limit for the size of the attachments you allow in your system.
- RequireBirthdateForFamilyAccounts – When parents create their account, they will be required to enter their birthday.
- RootFilePath – For CT internal use only.
- SchoolYearRolloverDate – This is that date that triggers all students roll over or “graduate” to the next school grade.
- SupportHours – Currently unused.
- WebServiceAddress – For CT internal use only.
Guests
- DefaultReservationEndTime, DefaultReservationStartTime – These are the times your resource reservations will default to begin and end; they can always be changed individually by reservation.
- LodgingDisplayOption – Here, you will determine whether your online lodging reservations are displayed by category (0), or by the specific room (1). What is a Resource Category?
Individual Entity
- MinorAge – This is the age at which a person is no longer a minor and can register him/herself.
Integration
- StopSellingBundlesBeforeEvent – The number of days before the event to stop selling bundles.
Itineraries
- AllowPublicItineraryLink – Checking this allows group leaders to copy and send a link to their itinerary to potential attendees. That way, they can follow the link and only have the option to sign up for that particular event under that group. Public Itinerary Link
- DefaultItineraryPrivacy – Checking this box sets the setting above to default to “off”.
- GroupRosterReports – Reports that can be downloaded by the leader from the Group Roster page.
- MergItinerariesSameDayRollover_Group – For groups only, itineraries with a start day on the same date that another itinerary ends will be merged together.
- StatementLetterResourceDescription – This will display the resource description instead of the accounts receivable category description on the customer’s statement.
Mass Email
- EmailFooter – Set a footer for your mass emails here.
- HTMLEmailFooter – Currently unused.
- MaxAttachmentSize – This is the maximum size for attachments in mass emails.
Medical
- DaysMedicalFormIsValid – This is the number of days that a signed medical form is valid for an individual.
- MedicationsSearchDaysExension – Number of days to search for medications pat the Event/Employment end date. Default is 0 to search for medications un the Event end time (or 11:59 pm if no time is provided).
- RequireSignatureInHealthCenter – Checking this will require a signature for any changes made (adding complaint, treatment, medication, etc.) in the online Health Center.
- ShowDownloadButtonInRegPortal – Will display a “Download Health Form” button on the customer’s Registration Details screen. Often used when the attendee needs to print their med form and take to physician to get verification.
Orders
- ProspectInformationInventoryDepartmentCategory – This is where you will enter the inventory department ID to filter inventory items for prospect campaigns. How do I Configure Prospects?
Payment
- EmailNotifyDays – The number of days in advance of a scheduled payment that the nightly process will send a notification (automated email) to the customer.
- SendNotificationForNonElectronicPayment – When making a cash or check payment internally, an automatic email with receipt can be sent to the customer.
Photos
- WebPhotosPath – For CT internal use only.
PointOfSale
- AutomaticallySetPriceLevel – If checked, the price level in point of sale will automatically be selected based on the customer type (Price Level 1, 2 or 3). How do I Create Inventory Items?
- DisallowSellingDiscontinued – Setting will not allow users to sell inventory that has been marked “Discontinued.”
- OrderHistoryDays -Only used for SalesLink5. When creating the initial database for SalesLInk, how far back should we go when including recent orders?
- POSDefaultEmailReceipt – When checking out customers, this controls the default option to email the customer a receipt (via automated email).
- UsePOSStaffAccounts – Allow Staff hired in CT to make purchases with store card (deducts the money from their pay).
Registration
- AllowMultipleRegistrationsSelection – On event selection page, the customer can choose more than 1 event to register for. This speeds up the registration process.
- AllowReservationCancellationsOnline – This allows the customer to cancel resource reservations for an event online.
- CheckinPhotoOverride – Photo that replaces the CT default silhouette image when checking in.
- CheckInPhotoPad – This is the quantity of minutes to wait for a photo to be matched to a registration entity before check-in email is sent. Set this to a larger number if a camper gets checked in before they have their photo taken. This avoids the parents receiving the email notifying them that their camper has arrived but not seeing their photo.
- DefaultCancellationReason – Here, you will enter the ID of the cancellation reason you would like to default in the internal application when canceling a registration. How do I Create Cancellation Reasons?
- DefaultDonateStoreCard – During online registration, when asking if customer’s any remaining store card balance after an event to be donated, the default answer will be “yes” if this is checked.
- DefaultDonationCampaignForStoreCards – Enter the ID of the donation campaign you would like to be defaulted for the setting above. How do I setup Donation Campaigns?
- DefaultDonationFundForStoreCards – This is the fund that will pre-populate for the setting above. How do I setup a Donation Fund?
- DefaultStoreCardRefillAmount – If a camper’s store card reaches this amount or lower, a notice will be sent to the financial contact to notify them (if the setting below is checked).
- DefaultStoreCardRefillNotice – Check this if you want customers (the financial contact on registration) to receive a notice when the store card balance gets below a certain amount to remind them to add more funds.
- GuestCountResourceType – When determining how many guests are on an itinerary, this Resource Type will be used calculate the number of guests on the Reservation (default: 1 – Lodging.)
-
1 – Lodging, 2 – Person, 3 – Equipment, 4 – Amenity (Capacity Based), 5 – Facility, 7 – Activity, 8 – Transportation, 9 – Amenity, 10 Meal, 11 – Package
-
- MinutesToHoldPending – This is how many minutes to hold a pending registration, lodging or activity before it is released and included in the open spots calculation.
- SchoolYearDifference – This is the difference between event year and school year to ask for during registration i.e. an event starts in September 2019 (calendar year is 2019) but you are curious what the attendee’s grade is for the 2018-2019 school year. You would enter “-1” to deduct 1 from the calendar year to ask the for the desired school year.
- SendAttendeeCheckinEmail – Checking this ensures that parents will receive an automated email when their attendee has checked in to their event. This is the email that contains the photo of the camper taken during check in.
- ShowReregisterOnRegistration – This option will allow the “Re-register” button to appear to appear online for customers on all current registrations. How do I setup Quick Enroll?
- ShowStoreCardRefill – Should parents be given the option of having emails sent for low store card amounts?
Roommate Requests
- LonersPerCabin – How many campers without roommate requests will be allowed per housing unit?
- SuppressRoommateRequestEmail – Check this box if you’d like to keep the roommate request email from being sent automatically for each new request.
- TMRChainLength – This is the maximum number of campers that will be allowed in a roommate request chain (without a manual override).
- TMRLimit – This is the maximum number of roommate requests a single camper can send.
- TMRMaxAgeDifference – This is the maximum age difference between campers who can be roommates.
- TMRMaxGradeDifference – This is the maximum grade difference between campers who can be roommates.
Shipping
- For many of these, you will have to communicate with UPS web services to obtain the correct information.
NOTE – View steps (1), (2), and (3) to find out how UPS shipping rates are calculated.
- PreOrderShippingRateID – This is the ID of the shipping method for pre-orders (the default is “23”, deliver to camp).
- ShipContingencyFee – (3) The final step is to multiply the base package rate times the number of packages, then add this setting as a percentage, then add the order handling feel that are set on each item that has been ordered. That is the total UPS shipping rate.
- ShipDefaultWeight – (1) For each item in the basket, it either uses the weight assigned to that part, or the default weight in the app setting. (Weight would be per quantity, so if you order 10 shirts, it is 10 * weight).
- ShipFromPostalCode – For UPS web service. Here, you’ll enter the zip code that you will be shipping from.
- ShipMaxPackageWeight – (2) After assigning a weight, the system divides the total weight by the max weight per package (rounding up to a full package). Then the number of packages is divided by the total weight to determine an average per-package weight.
- ShipOrderHandlingFee – If you plan on charging a handling fee for any items you ship, you can enter that here.
- ShipPhotoRate –
- ShipPhotoRateID –
- ShipUPSAccessNumber – For UPS web service.
- ShipUPSCustClassCode – For UPS web service.
- ShipUPSPassword – For UPS web service.
- ShipUPSPickupCode – For UPS web service.
- ShipUPSShipperNumber – For UPS web service.
- ShipUPSUserID – For UPS web service.
- ShipUSPSUserID – For UPS web service.
Staff
- NoStaffPhotoExistsOverride – Photo that replaces the CT default silhouette photo.
- StaffStoreLimit – Limit staff store charges to total compensation less this percentage. “-1” means no limit.
- StaffYearsSinceEmployment – Require a new application form after set years since employed.
SystemSetting
- TurnOnProcessTimers – Checking this will log the time it takes to complete processes in the database.
Transportation
- AllowTranspoCancellationOnline – This will allow customers to cancel transportation reservations online.
- Flight_AllowedDaysAfterEndOfEvent – If greater than 0, customers will have the option to choose a departure flight date anytime from the last day of the event up to the given number of days after.
- Flight_AllowedDaysBeforeStartOfEvent – If greater than 0, customers will have the option to choose an arrival flight date anytime from the first day of the event up to the given number of days before.
- NotifyDaysBeforeFlight – This is the number of days before a flight departure date for your staff to receive notifications about flight schedule changes.
Website
- AddSecurityQuestion – Checking this box will add required security question options to online user account.
- Culture – This defines the culture setting under globalization for the website.
- DaysBetweenProfileConfirmation – This setting is the number of days between each prompt for a customer to confirm their information on the registration site.
- EmailCamperBeginPad – This is the number of hours to add to the event begin date when determining if a parent can send a camper email for that event. Make the number negative if you want to allow the emails to be sent before the event begins.
- EmailCamperEndPad – This is the number of hours to add to the event end date when determining if a parent can send camper email for that event. Make the number negative if you want to to cut off emails from being sent before the event is over.
- EventDivisionListCacheMinutes – This is the amount of time that the event division list will be cached during online registration.
- EventDivisionPercentFullCacheMinutes – This is the quantity in minutes to cache the percent full value for the event division list.
- FixDuplicateEmails – Checking this box will prompt users to correct duplicate emails found in the system.
- HideCancelledRegistrations – This will hide cancelled registrations from customers on their account online.
- ShowNickname – Allow individuals’ nicknames to show when creating account and selecting attendee.
- StaffWebAddress -Do not modify. This is the URL of CircuiTree’s site used by applicants.
- UpdatePassword – This will require users to update their passwords to new, more stringent password standards.
- WebAddress -Do not modify. This is the URL of CircuiTree registration site.
WebStore
- StorePhotoExtensionLarge, StorePhotoExtensionMedium, StorePhotoExtensionXLarge – These are the formats for the different picture sizes used in the webstore. The default is .jpg.
- WebStoreBasketSaveDays – Here, you’ll enter the number of days to save users’ shopping basket selections.
- WebStoreCompanyName – You can enter a company name for your webstore here.
- WebStoreContactName – Here, you can enter a contact name for the webstore.
- WebStoreEmailAddress – And this is where you’ll enter a contact email address to place on order confirmations to the customer.
- WebStoreInventoryPad – Currently unused.
- WebStoreItemSort – “0” sorts by year and description, “1” sorts by description and year, “2” sorts by year, type, and description, “3” sorts by type, year, and description.
- WebStoreLocationID – The webstore is it’s own register with it’s own license. This tells it which location in the system it will be selling from (ex. Warehouse).
- WebStoreRegisterID – This is the SalesLink client license ID that has been set up for the webstore (found in SalesLink > Configuration).
- WebStoreSeparateSaleItems – When true, sale items will not show up in any department except for “Sale”.
- WebStoreShipDays – This is the number of days it takes to prepare a shipment to be sent to the customer.