Contents
The Medical Log allows you to track Complaints for Attendees at your Health Center Location. Also, you are able to log communication with Emergency Contacts, look up Medications, view Medical History and track of it on the Medical Timeline.
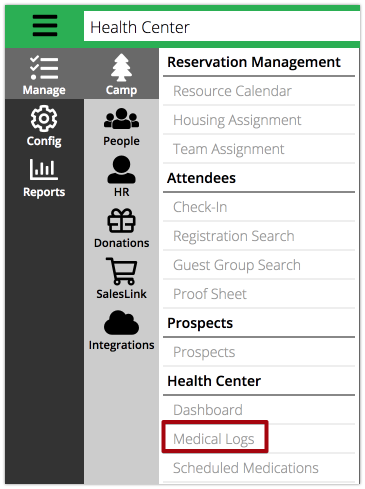
- In CT6, select Menu > Manage > Camp > Health Center > Medical Logs.
Search
The Medical Log is where you can look up Attendees and add Complaints to track their injuries or illnesses.
- Use the Criteria to filter the list of Attendees. Select Find to see the list of results.
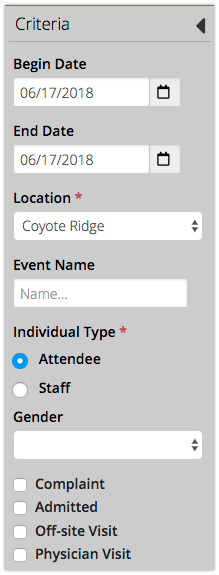
- Begin / End Date – Defaults to today’s date and used to display Attendees on site during the date range.
- Location – Location of the Attendee.
- Event Name – Enter the name of the Event to filter a specific one.
- Individual Type – Select either Attendee or Staff.
- Gender – Select either Male or Female.
- Complaint – Display any Attendee with a Complaint.
- Admitted – Display any Attendee who has been Admitted.
- Off-Site Visit – Display any Attendee who has had an Off-site Visit.
- Physician Visit – Display any Attendee who has had a Physician’s Visit.
- Use the Filter to narrow the list of Attendees.
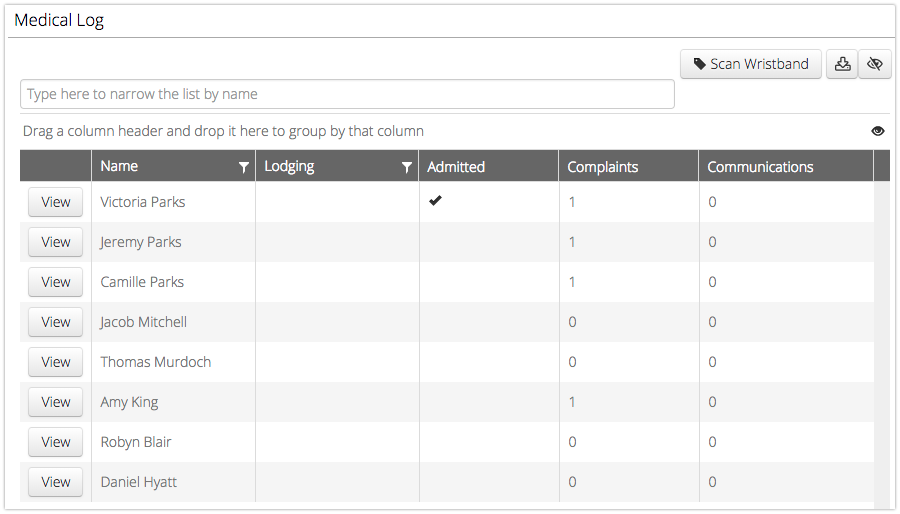
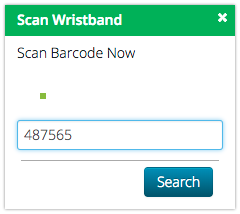
- Selecting Scan Wristband will bring up a dialog box that allows you to scan the Attendee’s wristband. Select Search to then look up the Attendee.
- Select the name of the Attendee to display the Summary. Along with Contact and Personal Information, a section for Health Details will display.
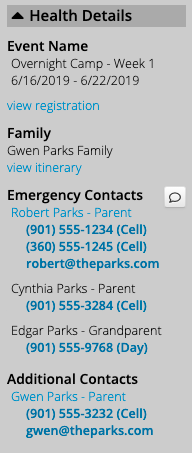
- Event Name – The name of the Event.
- Family / Group – The name of the Family or Group that the Attendee is part of.
- Emergency Contacts – List of Emergency Contacts with phone numbers from the Health Form. Select the
 to add a communication entry to the Attendee’s Timeline.
 - Additional Contacts – Lists
- From the Results or Summary, select View to open the Attendees’s Medical Log.
Attendee Medical Log
The Attendee Medical Log is made up of four sections:
- Complaints
- Medications
- Timeline
- Medical History
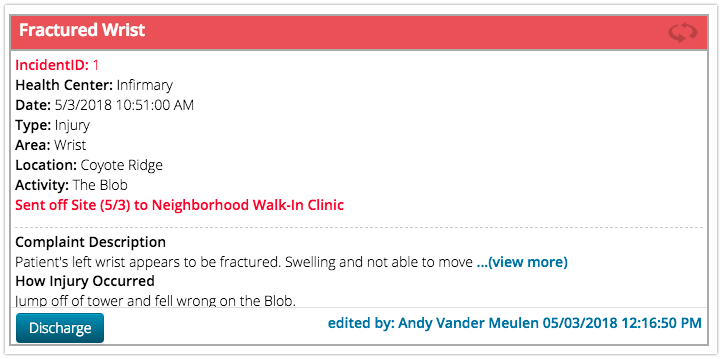
Complaints
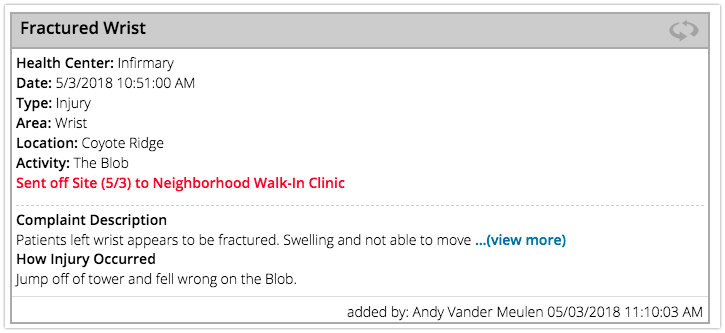
Complaints are used to track unique injuries or illnesses for an Attendee. Each time that the Attendee needs attention at the Health Center either a new Complaint will be created or an existing Complaint updated.
- Select Add Complaint in the lower right hand corner.

- Fill out the information about the Complaint and select Save.
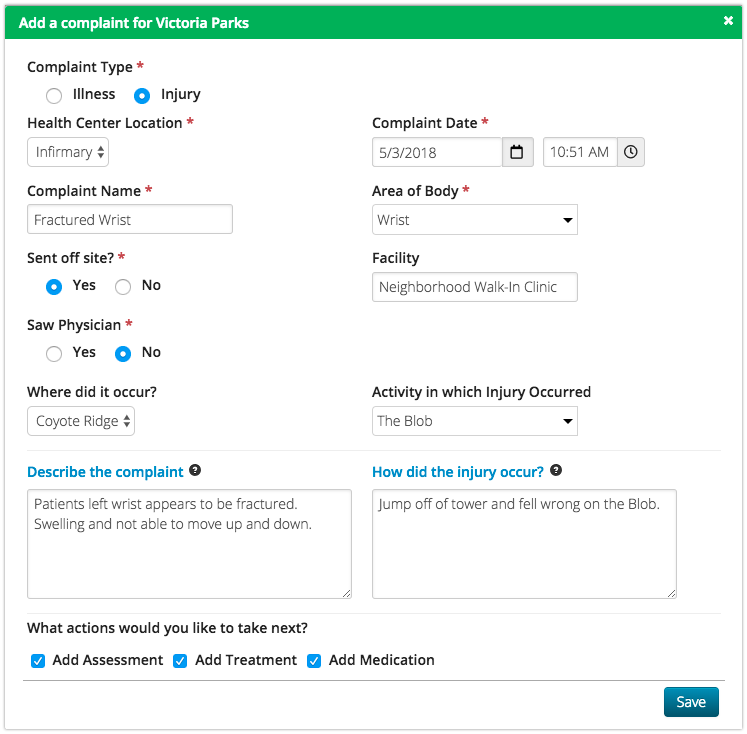
- Complaint Type – Select Illness or Injury. If Injury is selected then fields for Activity in which Injury Occurred and How did the injury occur? will appear.
- Heath Center Location – Select the location where the patient is being treated. How do I configure Health Center Locations?
- Complaint Date – Adds timestamp for today’s date and time.
- Complaint Name – Describe the complaint that the patient has.
- Area of Body – Select the area of the body that is affected. How do I configure Complaint Areas?
- Sent off site? – Select Yes if the patent was sent off site.
- ** Facility – Conditionally shown if Sent off site? is set to Yes. Enter the name of the Facility where patient was sent.
- Saw Physician – Select Yes if the patient saw a Physician during their visit.
- Where did it occur? – Select a Location where the complaint occurred.
- ** Activity in which Injury Occurred – Conditional shown if Injury is selected. Select the Activity from the list. How do I configure Activity Areas?
- Describe the complaint – Include specific details about the complaint.
- ** How did the injury occur? – Conditional shown if Injury is selected. Include specific details of how the injury occurred. (What was patient doing? Any Supervisors or Witnesses?)
- What actions would you like to take next? – Add a check next to Add Assessment, Add Treatment or Add Medication. Any steps that are checked will be asked next after selecting Save.
Add Assessment
Assessments allow you to track a patient vital information. Multiple Assessments can be added to the Complaint as needed.
- Enter the information for an Assessment and then select Save.

- Date – Adds timestamp for today’s date and time.
- Temperature – Enter Temperature in °F.
- Heart Rate – Enter as beats per minute.
- Respirations – Enter as breaths per minute.
- Blood Pressure – Enter systolic / diastolic.
- Height – Enter in inches.
- Weight – Enter in pounds.
- O2 Sat – Enter as percentage.
- Blood Sugar – Enter as milligrams per deciliter
- Assessment – Add description of Assessment.
- What actions would you like to take next? – Add a check next to Add Treatment or Add Medication. Any steps that are checked will be asked next after selecting Save.
Add Treatment
Track what Treatments are provided to the patient. Multiple Treatments can be added to the Complaint as needed.
- Enter the information for a Treatment and then select Save.
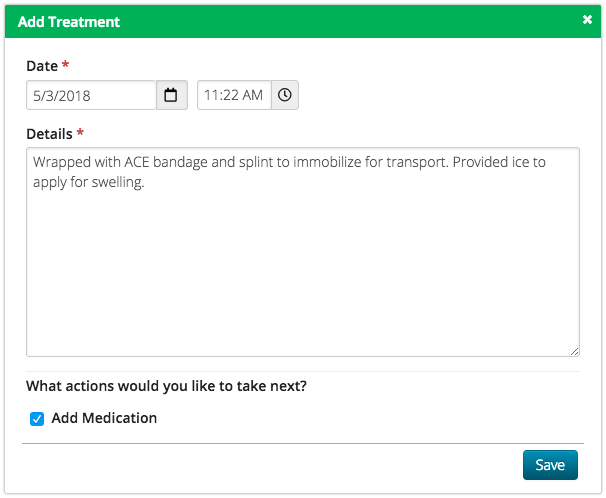
- Date – Adds timestamp for today’s date and time.
- Details – Enter details of the Treatment. If this is a frequent treatment, enter the name of a Complaint Treatment to autofill the details. How do I configure Complaint Treatments?
- What actions would you like to take next? – Add a check next Add Medication if needed and that step will be asked next after selecting Save.
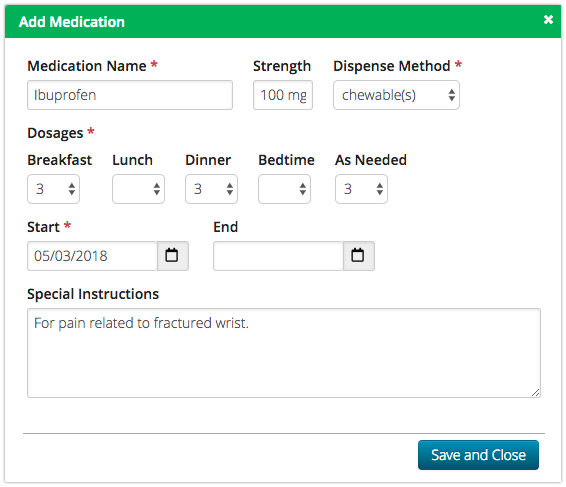
Add Medication
Enter any Medication that was given to the patient to treat the Complaint. Multiple Medications can be given or scheduled in relation to the Complaint.
- Enter the information for a Medication and then select either Save and Add Another or Save and Close .
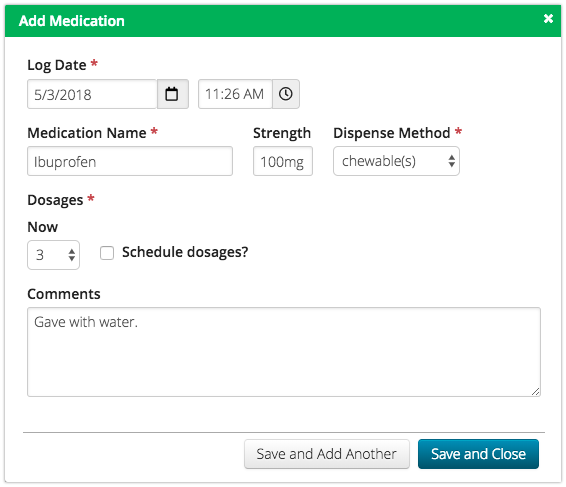
- Log Date – Adds timestamp for today’s date and time.
- Medication Name – Enter the name of Medication. As you type names of common medications will appear that you can select from.
- Strength – Enter the strength of the Medication for one dose.
- Dispense Method – Select the type of method to dispense the Medication.
- Dosage – Select the amount of Medication to dispense.
- Schedule dosage? – Select to enter a Scheduled Medication plan for the patient.
- Comments – Enter any comments.
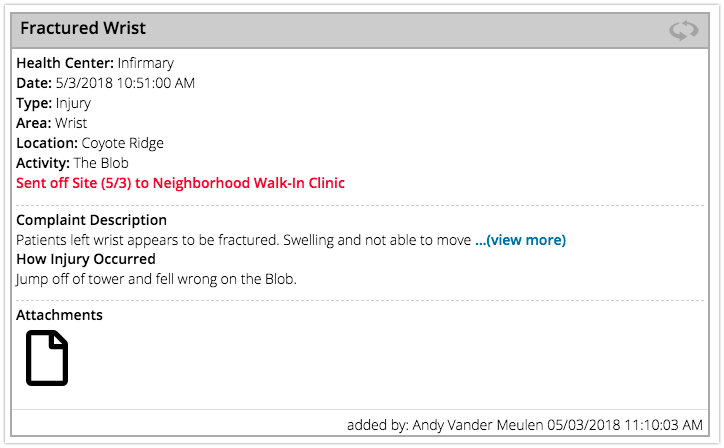
Card View
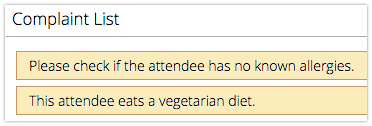
After adding a Complaint, a card will be added to the Complaint List to be able to reference later. To see more actions for the Complaint, select the header bar to flip the card over.
To see more actions for the Complaint, select the header bar to flip the card over.
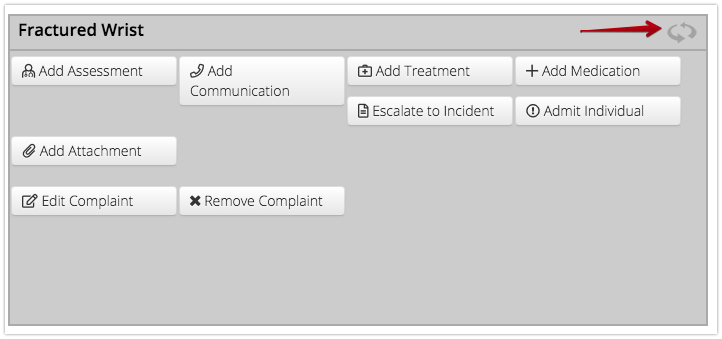
Further actions that can be added to the Complaint include:
- Add Communication
- Add Attachment
- Escalate to Incident
- Admit Individual
- Edit Complaint
- Remove Complaint
Add Communication
Enter Communication that is related to the Complaint and an entry will be made in the Attendee’s timeline.
- From the back of the Complaint Card, select Add Communication.
- Enter the information for the Communication and then select Save.
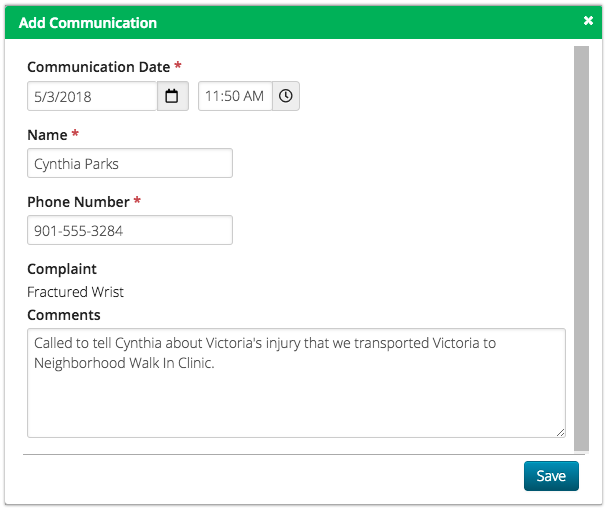
- Communication Date – Adds timestamp for today’s date and time.
- Name – Enter the name of the person who you are contacting. Emergency Contacts will pre-fill once you start typing.
- Phone Number – Enter the phone number.
- Comments – Add any comments about the phone call.
Add Attachment
Add any Attachments that are related to the Complaint.
- From the back of the Complaint Card, select Add Attachment.
- Enter the information for the Attachment and then select Save.
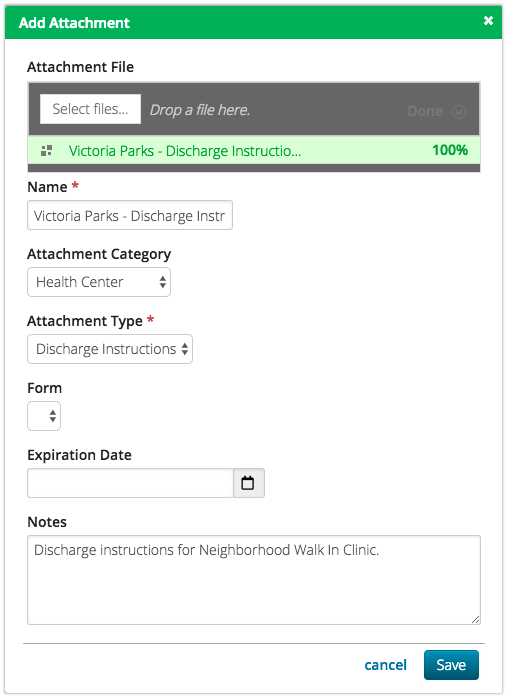
- Select Files – Either drag and drop the file or select files to search for the file.
- Name – Automatically pulls from the name of the uploaded file.
- Attachment Category – Select from the list of Attachment Categories.
- Attachment Type – Select from the list of Attachment Types.
- Expiration Date – Set an date that the Attachment expires.
- Notes – Add any notes as needed.
- Once an Attachment is added, it will appear on the front of the Complaint card.
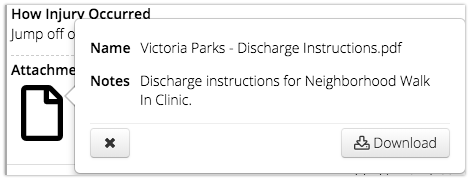
- Select the Attachment icon to see more details and download or delete if needed.
Escalate Incident
In some cases, you may need to escalate a Complaint to an Incident. Depending on your organizations policies, this will determine when you escalate to an Incident. Some example could include when a patient is set off site, an insurance claim is likely needed, or a major injury that directors need to be aware of.
- From the back of the Complaint Card, select Escalate to Incident.
- Enter the information for the Attachment and then select Save.
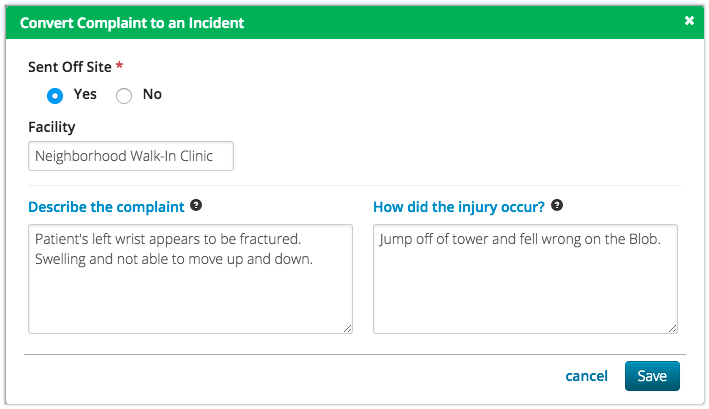
- Sent Off Site – Select Yes if the patent was sent off site.
- ** Facility – Conditionally shown if Sent off site? is set to Yes. Enter the name of the Facility where patient was sent.
- Describe the complaint – Include specific details about the complaint.
- ** How did the injury occur? – Conditional shown if Injury is selected. Include specific details of how the injury occurred. (What was patient doing? Any Supervisors or Witnesses?)
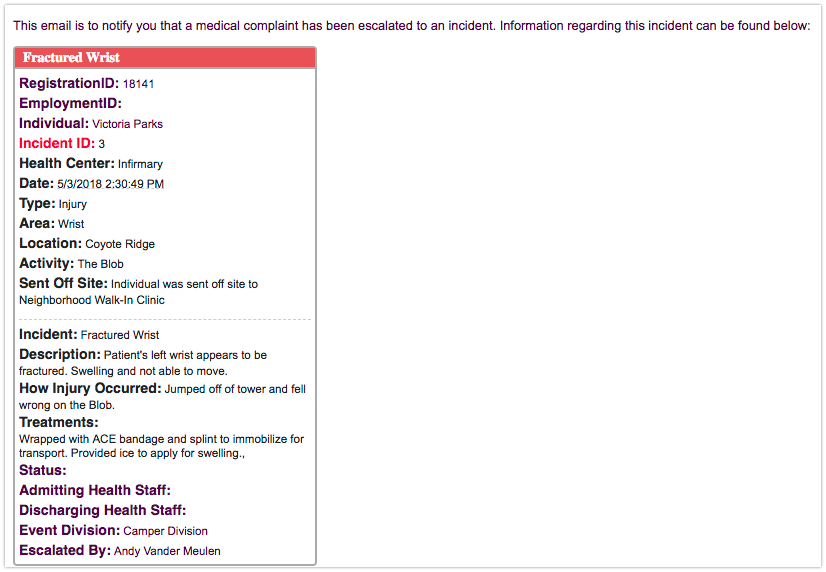
- After escalating, the header on the Complaint Card will turn red as well as assign an Incident ID.
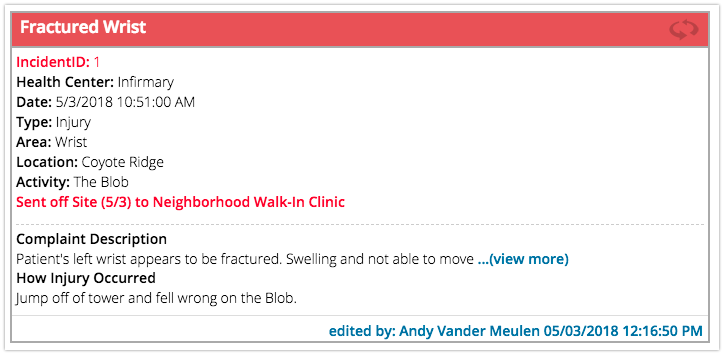
- The Medical Incident Conversion Automated Email will be sent to any Directors that are set under Health Center Locations. How do I configure Health Center Locations?
Admit Individual
You area able to note that the patient has been admitted to a Health Center Location to track available beds.
- From the back of the Complaint Card, select Admit Individual.
- Enter the information and then select Admit.
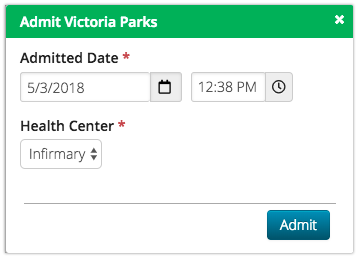
- Admitted Date – Adds timestamp for today’s date and time.
- Health Center – Select the Heath Center Location.
- To Discharge a patient, select the Discharge button on the front of the Complaint Card.
- On the Medical Log select Admitted to filter the list to only see Attendee’s who are admitted.
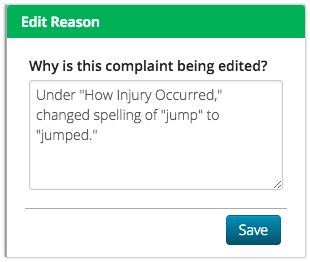
Edit Complaint
If something has changed on the Complaint that you need to update, you are able to edit it.
- From the back of the Complaint Card, select Edit Complaint.
- Update the Complaint and then select Save.
- Enter a reason why the Complaint is being edited and then select Save.
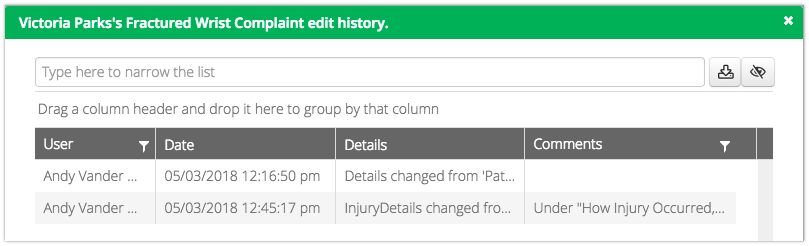
- On the Complaint Card, select Edited by to see a list of changes.

- The details and comments of what was changed will display.
Remove Complaint
If a Complaint is added on accident or needs to be removed, follow these steps.
- From the back of the Complaint Card, select Remove Complaint.
- Enter the information and then select Remove.
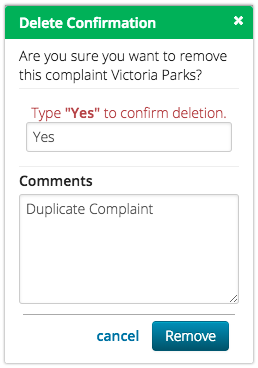
- Confirmation – Type Yes to confirm you want to remove the Complaint.
- Comments – Add any comments about the removal.
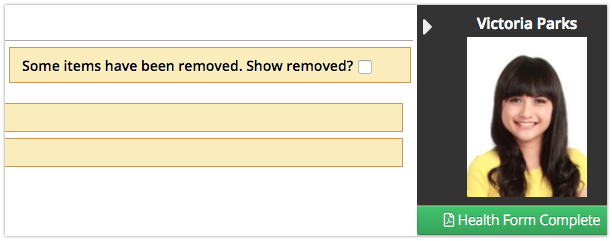
- The Complaint will be removed from the list but not deleted. On the Complaint List, select Show Removed to show Complaints that have previously been removed.
Medications
The Medications section lists all of the Medications for the Attendee.
- From the menu, select Medications.
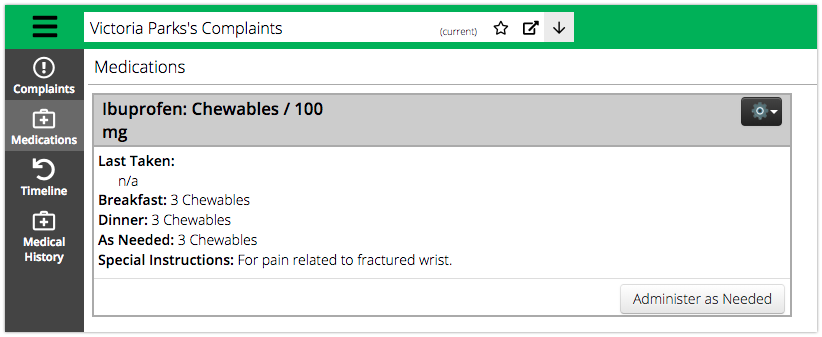
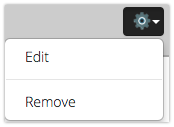
- Select the gear icon to Edit or Remove an existing Medication.
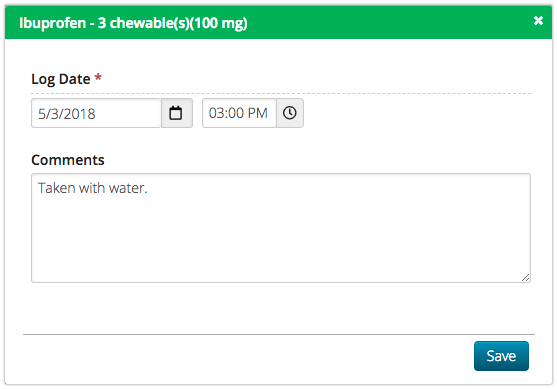
- Select Administer as Needed to record a date and comments for the Medication. Once complete, select Save.
- To add another medication, select Add Medication in the lower right hand corner. Enter the information and then select Save and Close.
- Log Date – Adds timestamp for today’s date and time.
- Medication Name – Enter the name of Medication. As you type names of common medications will appear that you can select from.
- Strength – Enter the strength of the Medication for one dose.
- Dispense Method – Select the type of method to dispense the Medication.
- Dosage – Select the amount of Medication to dispense at the given times.
- Start / End Date – Add a date to start and end the Scheduled Medication.
- Special Instructions – Enter any comments.
Timeline
The Medical Timeline provides the ability to review entires that have been made for the patient.
Actions Log
The Actions Log provides a record of each item that is added to a Complaint or Medication that is administered.
- From the menu, select Timeline > Actions Log. How do I customize my Grid View?
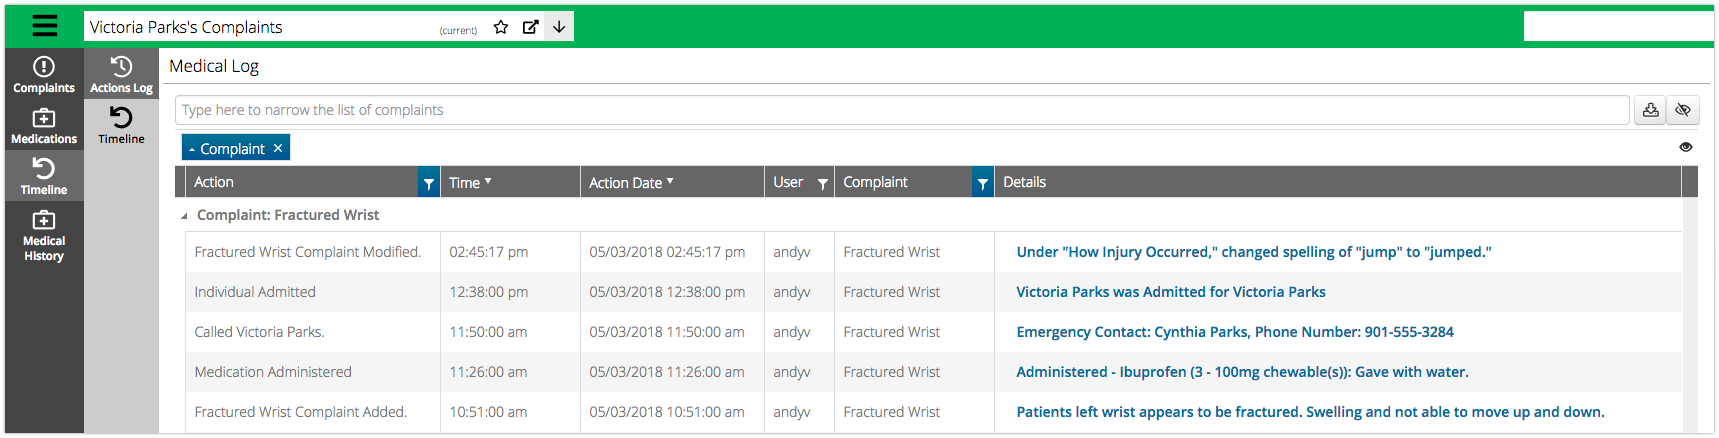
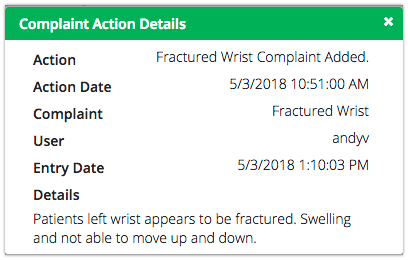
- Select the text in the Details section to see more.
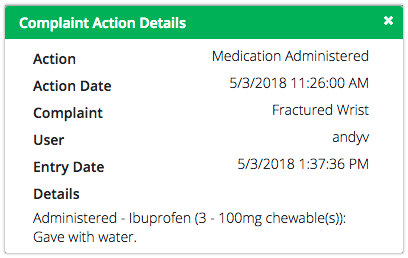
Timeline
See a chronological view of the patient’s medical record.
- From the menu, select Timeline > Timeline.
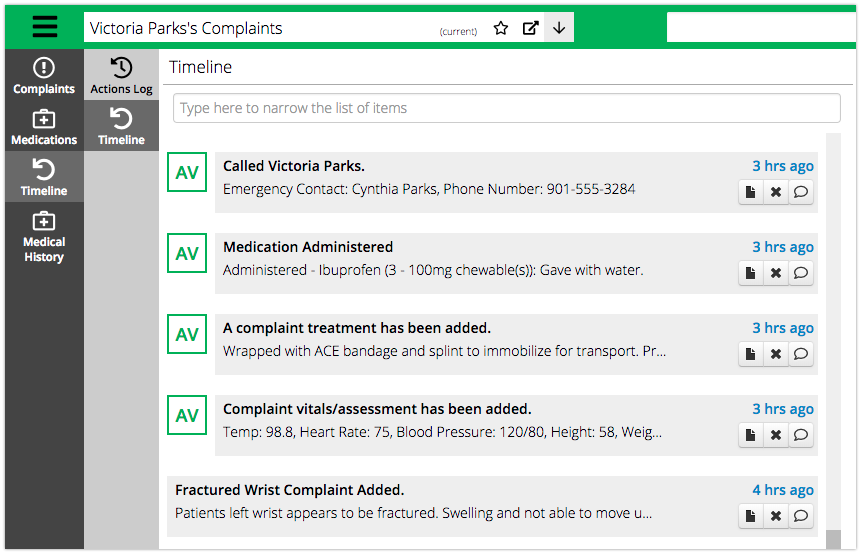
- Select the
 icon to see the Complaint Action Details.
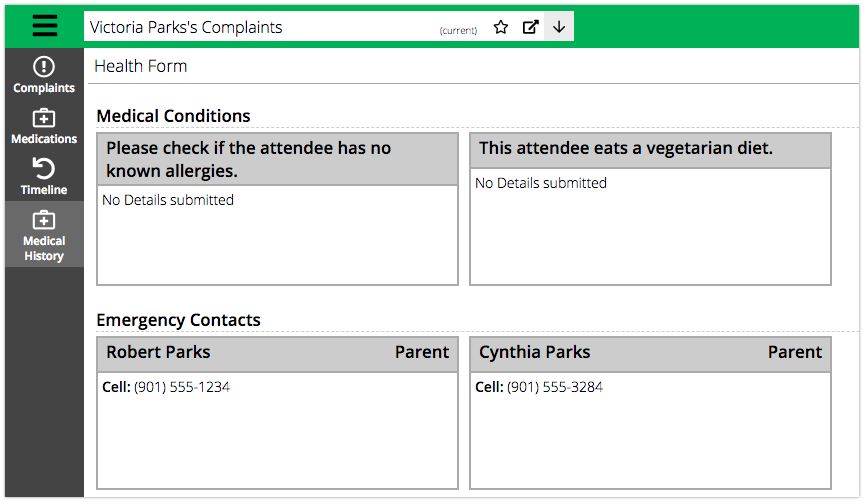
Medical History
View the details from the Attendee’s Medical Form that they submitted during Registration.
- From the menu, select Medical History.