Contents
Guest Groups is a powerful tool that allows you to track all of the different pieces of information that are needed in order to host the best possible event for a group. From custom workflow steps, to packages, to reservations, to contracts; Guest Groups gives you one spot to keep track of everything.
Webinars
To watch a series of three webinars on Guest Groups in CT6, click on the following link:
Configuration
Before you create your first Itinerary in CT6, make sure to go through the following article to configure Guest Groups.
Tablet Friendly
Need to take Guest Groups with you on the go? All the features are tablet friendly to allow you to have the information where you need it, when you need it.
Create Itinerary / Contract
Guest Groups is designed to allow you to start tracking a group from the moment that they become a prospect. Once they are interested in some dates, there are two places where you can go to create an Itinerary in CT6:
- Create or search for a Group and click Contracts and then Create Itinerary.
- Go to Manage > Camp > Attendees > Guest Group Search and click Create Itinerary. How do I use Guest Group Search?
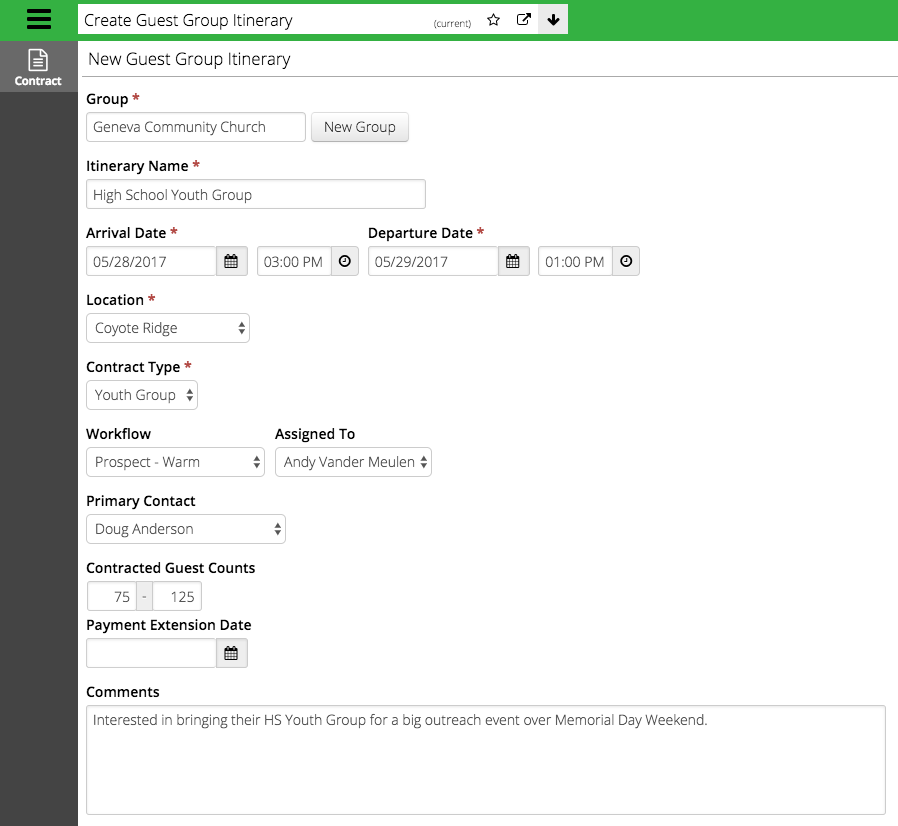
- Fill out the following fields:
- Group – From the Guest Group Search Create Itinerary, either Search for an existing Group or create a New Group.
- Itinerary Name – Enter a name for the Itinerary. Examples include “High School Youth Group” or “Memorial Day Retreat”.
- Arrival / Departure Date – Select an arrival and departure for the group. The default times are taken from the App Settings for DefaultReservationEndTime and DefaultReservationStartTime.
- Location – Select a location where the Itinerary will take place.
- Contract Type – Choose a Contract Type to allow for a custom contract.
- Workflow – Assign a Workflow Step to the Itinerary. This can be updated throughout the process to track the status of the Itinerary.
- Assigned To – Select a CircuiTree User responsible for the Itinerary and pass it on to someone else when that person’s job role is completed.
- Primary Contact – Choose an Administrator from the Group to be the Primary Contact person.
- Contracted Guest Counts – Set a minimum and maximum group size.
- Payment Extension Date – Select a date if payment terms need to be extended.
- Comments – Add any notes or comments for the Itinerary.
- Any Attributes that are assigned to the Contract Type will show up at the bottom of the screen. Fill out an click Save Itinerary.
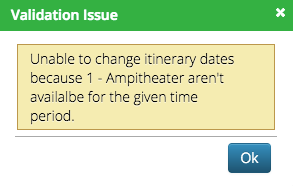
Change Dates
Ever had a group leader change their mind on what dates work best for their group? Once an Itinerary is Activated, you are able to go back to Contract to change the dates. Any Reservations that are not able to be transferred, will be displayed in a warning message. Remove the Reservation that are causing the issue from the Itinerary and then you can successfully change the dates.
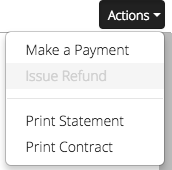
Print Statement or Contract
- To print either a Statement or Contract, click Actions and select from the list.
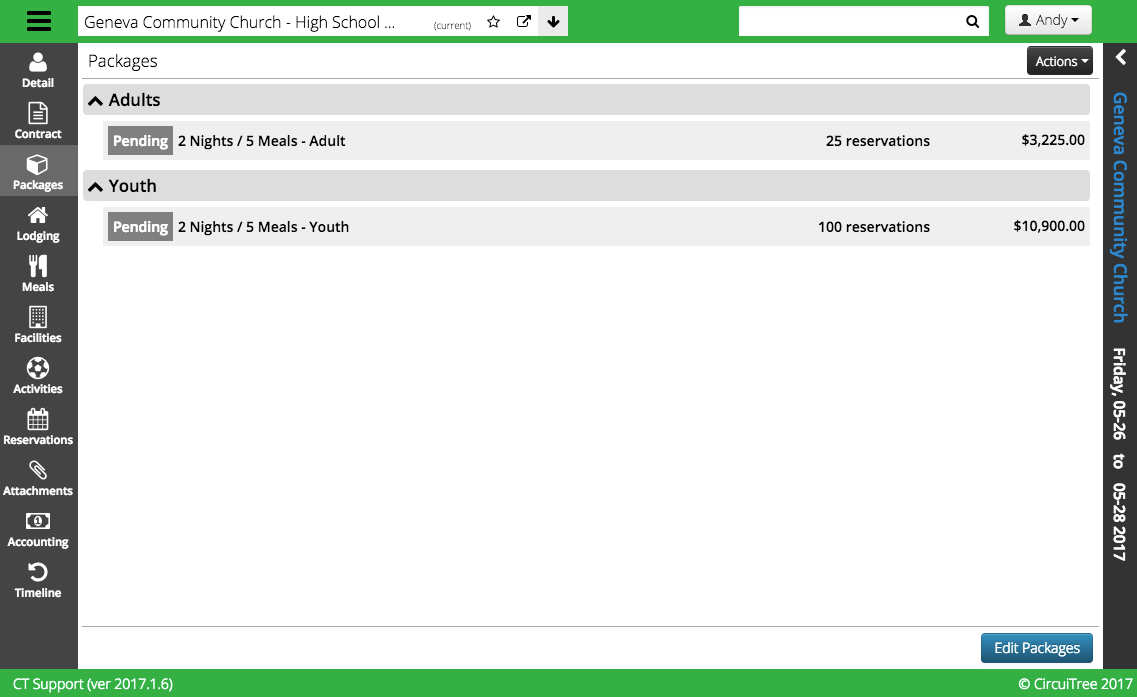
Packages
- Select Packages to see a list of available Packages. Filter using the Criteria on the left and click Find.
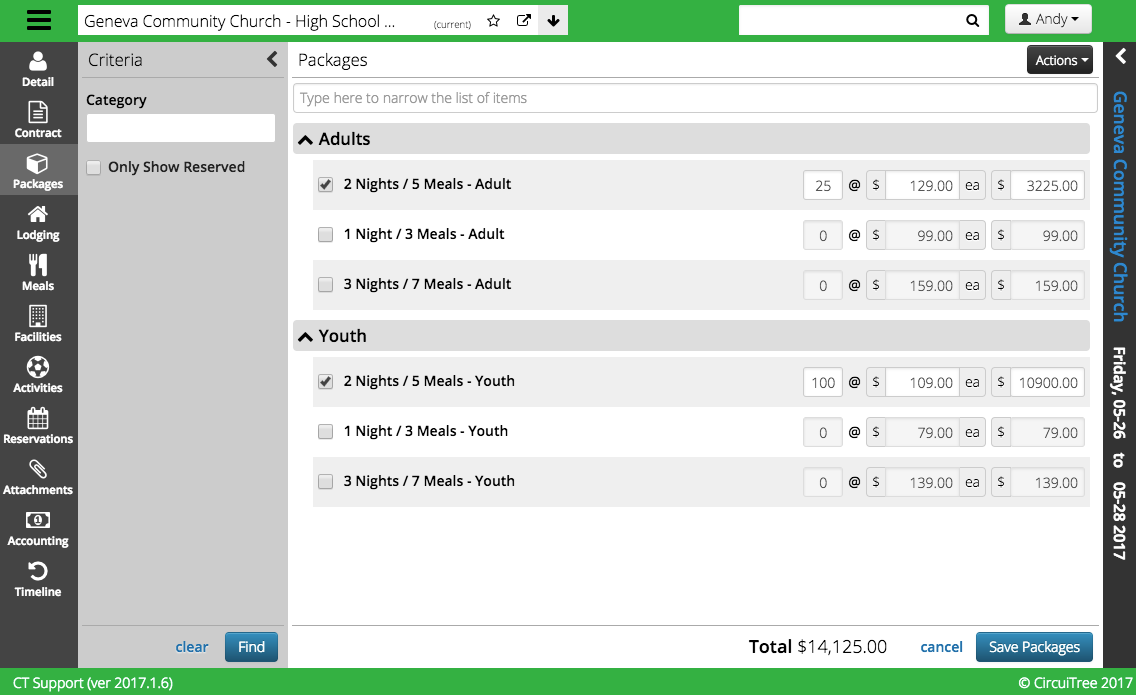
- Check the box next to the Package you want to reserve and an option to enter a quantity will display. The default charge per package and total charge appear. Click Save Packages.
- After saving, the reservations will be displayed in View Mode. Click on Edit Packages to make updates.
Lodging
- Select Lodging to see what Lodging Resources are available. Use the Criteria on the left to filter the list if needed.
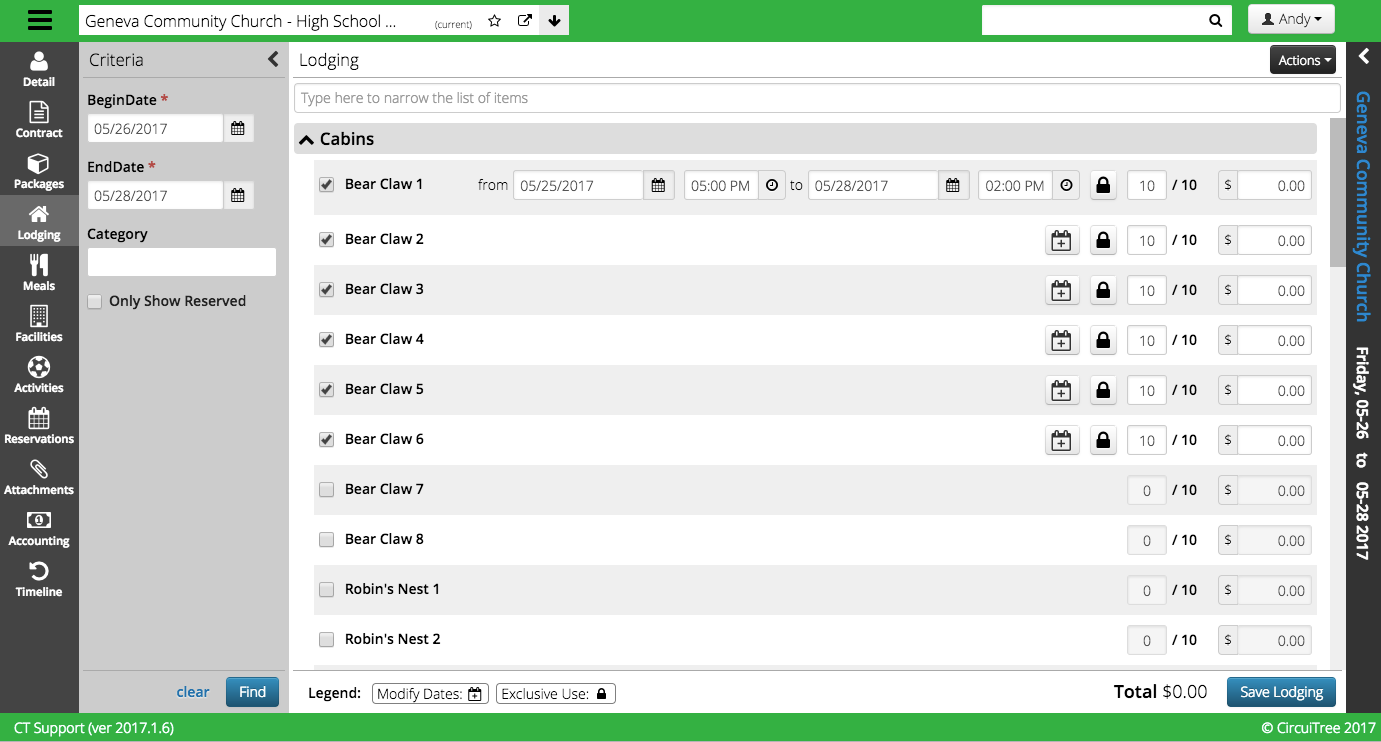
- Check the box next to the Lodging you want to reserve and an option to enter a quantity as well as the default charge will appear. Make any changes and then click Save.
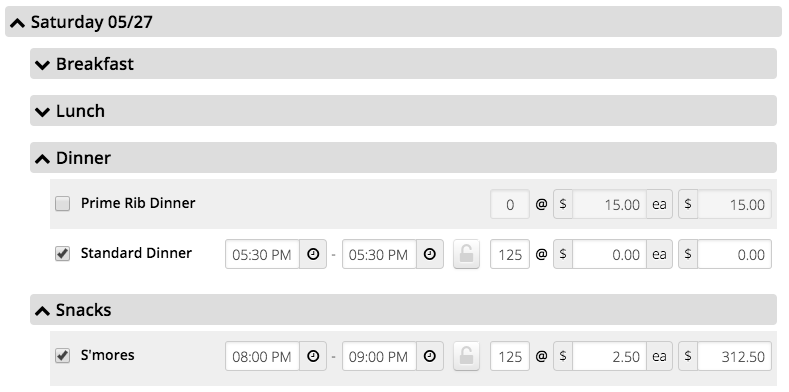
Meals
- Select Meals to see what Meal Resources are available. Use the Criteria on the left to filter the list if needed.

- Enter a First and Last Meal date and time, if needed.
- Check the box next to the Meal you want to reserve and an option to enter a quantity will display. The default time and charge will appear as well. Make any changes and then click Save.
Dietary Concerns
- To add a Dietary Concerns, click Actions > Add Dietary. Fill out the fields and click Save.
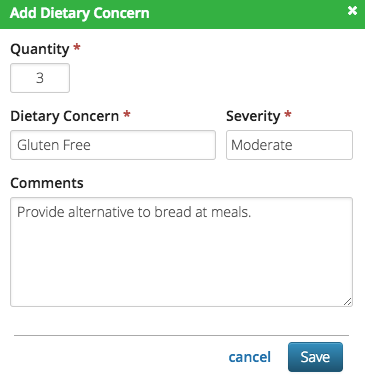
- Once added, Dietary Concerns will show at the top of the Meals section.

A la Carte
- To add an A la Carte item, click Actions > Add A la Carte. Fill out the fields and click Save.
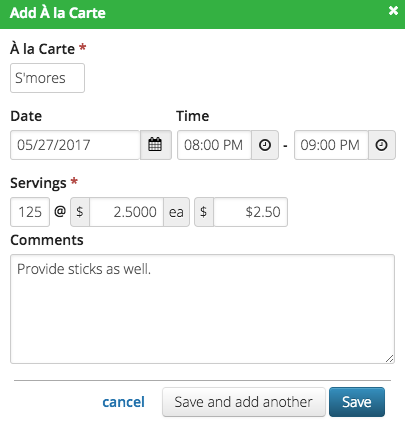
- A la Carte items will display on the day that they are reserved.
Facilities
- Select Facilities to see what Facility Resources are available. Use the Criteria on the left to filter the list if needed.
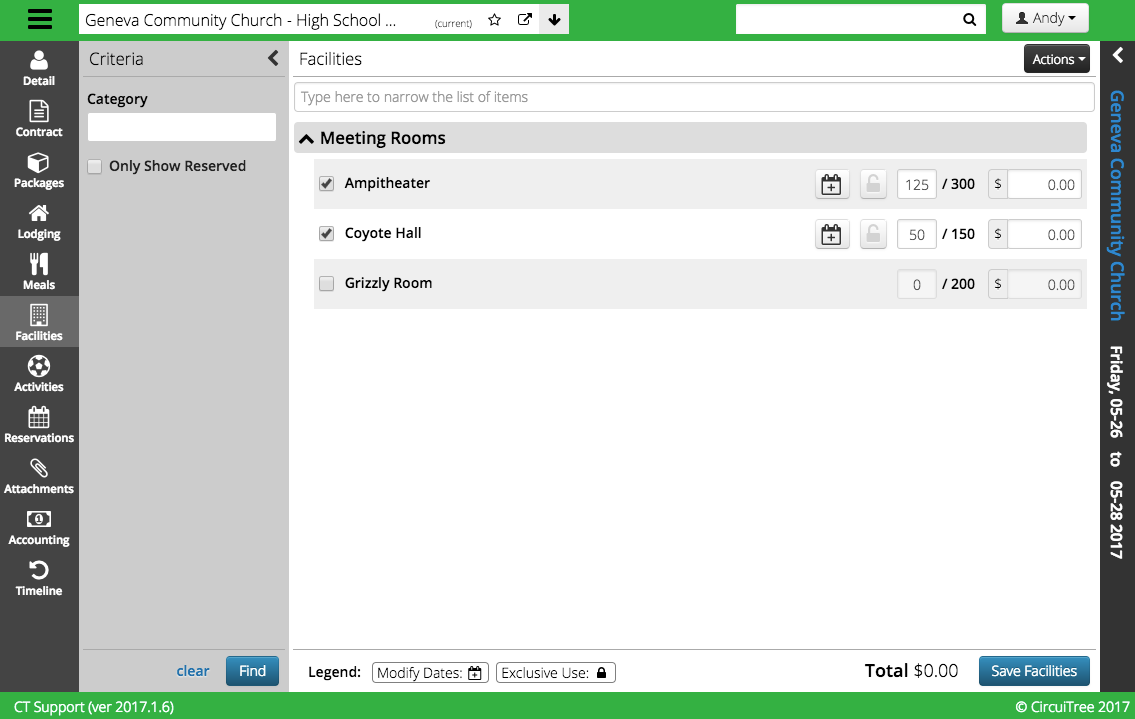
- Check the box next to the Facility you want to reserve and an option to enter a quantity as well as the default charge will appear. Make any changes and then click Save.
Activities
- Select Activities to see what Activity Resources are available. Use the Criteria on the left to filter the list if needed.
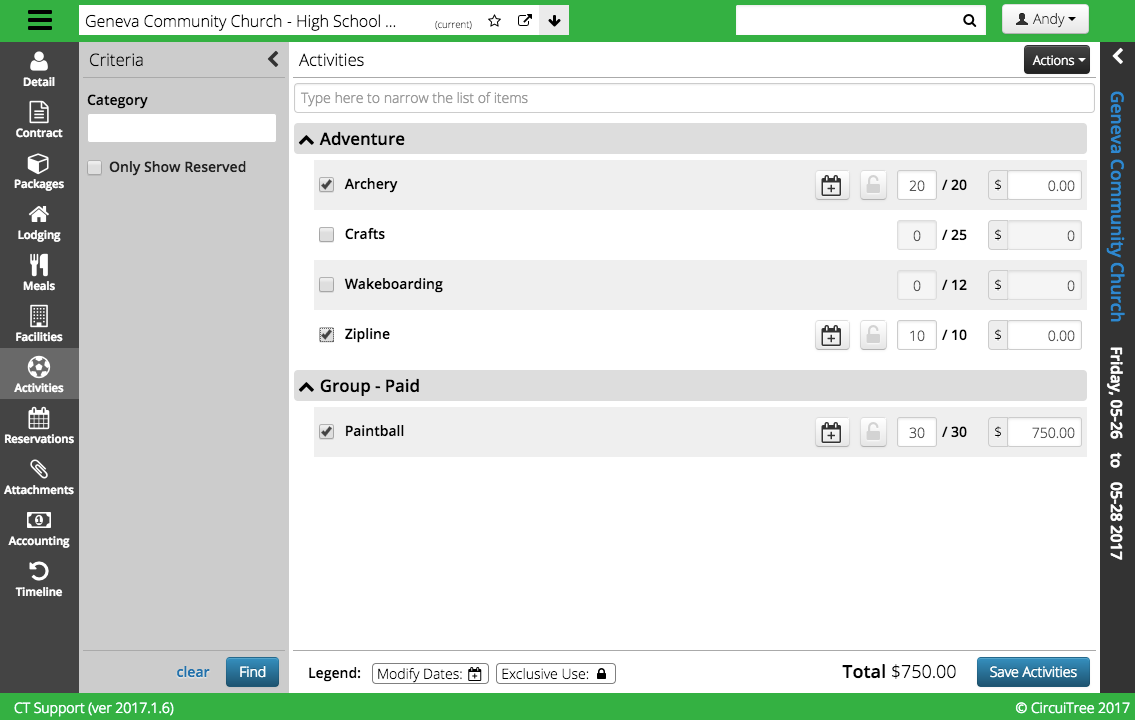
- Check the box next to the Activity you want to reserve and an option to enter a quantity as well as the default charge will appear. Make any changes and then click Save.
Reservations
Resource that fall under the following Resource Categories can be reserved under Reservations:
- Person
- Equipment
- Amenity
- Amenity (Capacity-based)
Attachments
Upload contracts, insurance forms or any other needed paperwork under Attachments.
- In the lower left hand corner, select
 .
. - Fill out the information and then click Save.
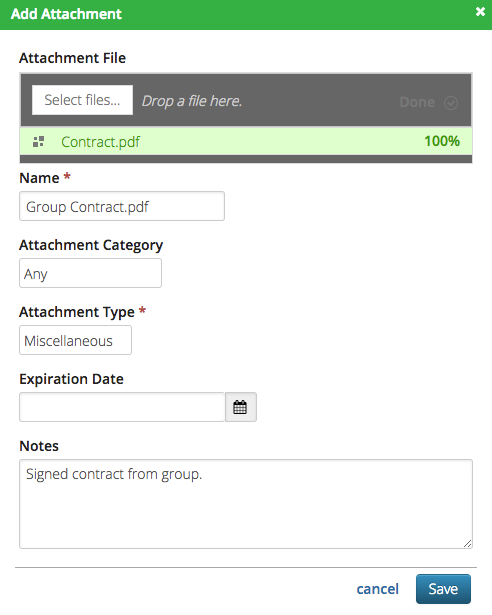
- Attachment File – Either click Select File or drag and drop file to upload.
- Name – Pulls from name of file that is uploaded. Update as needed.
- Attachment Category – Select the Attachment Category to filter the available Attachment Types.
- Attachment Type – Select from the list of Attachment Types.
- Expiration Date – Set the date that the Attachment expires.
- Notes – Add any comments for internal reference.
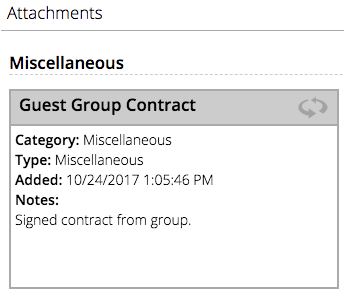
- Once uploaded, you can view details on the card.
- Flip the card by clicking on the header for available actions.
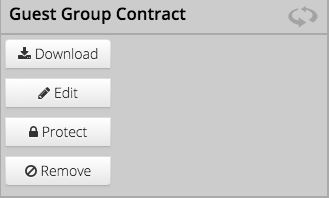
- Download – Choose to download the Attachment.
- Edit – Open the Attachment to edit.
- Protect / Un-protect – Takes out the option to Remove.
- Remove – Remove the Attachment from the Itinerary.
Roster
If an Itinerary has Packages with Event Templates attached to them, once the Itinerary is Activated, Group Registrations will be created. To manage these Registrations, click on Roster.
Once registrations are created, a Group Leader can access Manage Roster from their account on the Registration Site. Here are more details on the tools that they have to name registrations and access other important information:
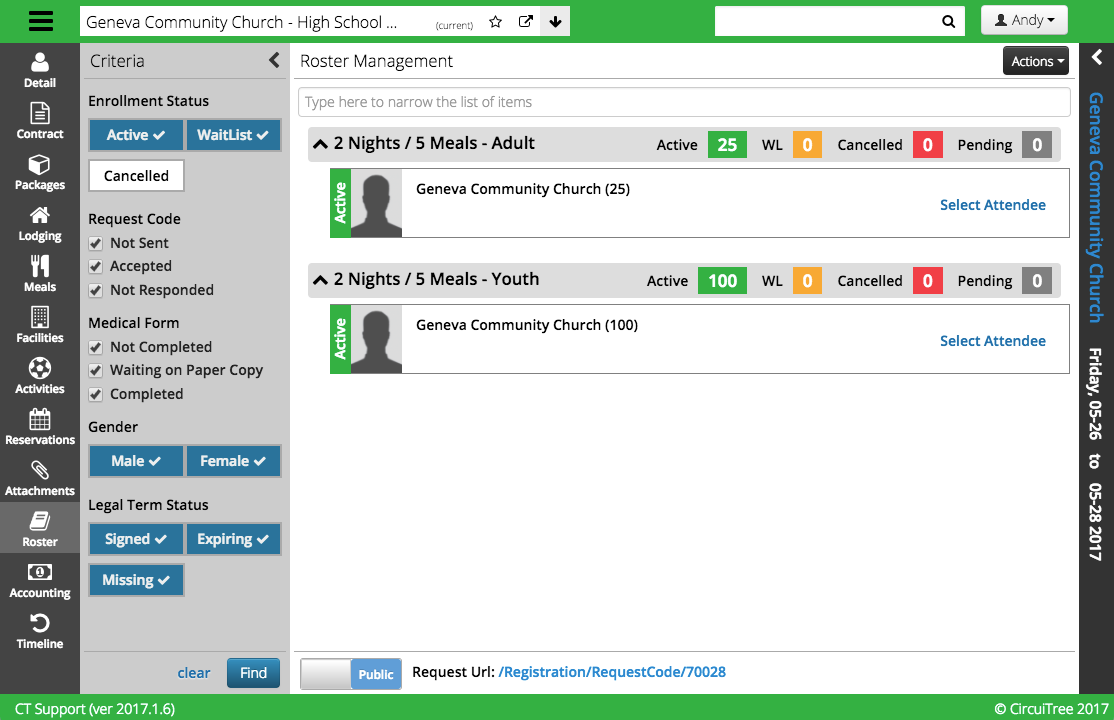
- Criteria – To filter the results, select the criteria and select Find.
- Filter – Look up a specific registration by entering a name at the top of the Roster Management section.
- Registration Counts – View the number of Active, Cancelled, Pending and Wait List registrations grouped by Event Division.
- Itinerary Status – Change the status from Public to Private at the bottom of the screen. Switching to public displays a link that Group Leaders can distribute to allow attendees to register for the Event.
Registrations
For each Registration, you can see different statuses and dive in to perform actions on the registration.

- Status – Displays Active, Cancelled, Pending or Wait List.
- Name – Select the name to open the Individual registration. How do I manage a Registration?
- Demographics – Age, gender and grade of Attendee.
- Workflow Steps – Icons represent the different workflow steps configured for the Event. Completed steps will display darker grey.
Remove Attendee
If you need to cancel or unname a registration select Remove Attendee. After selecting, you will be given a choice to Cancel or Unname.
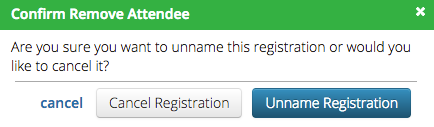
- Cancel will reduce the number of registration for the group.
- Unname will keep the registration count the same, but open up that spot for it to be named by someone else.
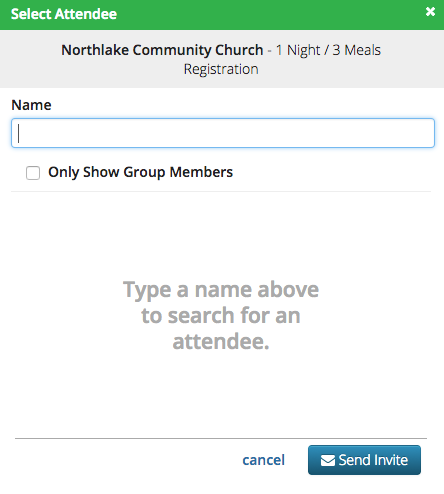
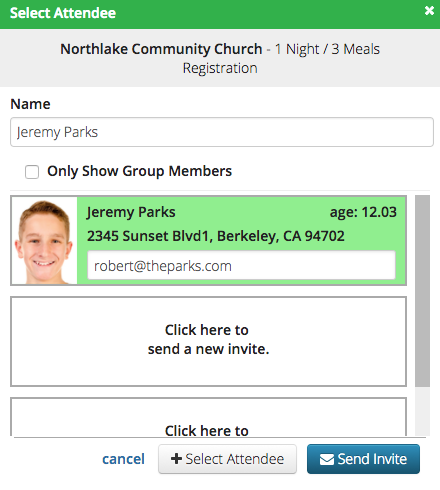
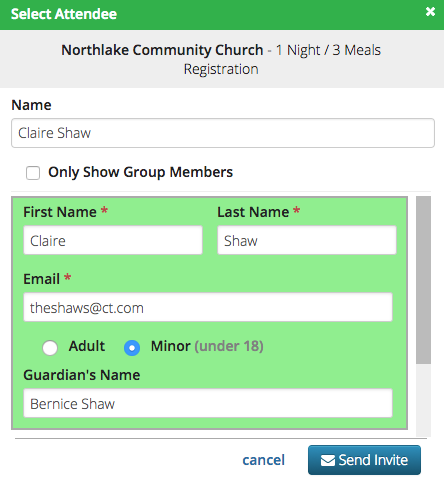
Select Attendee
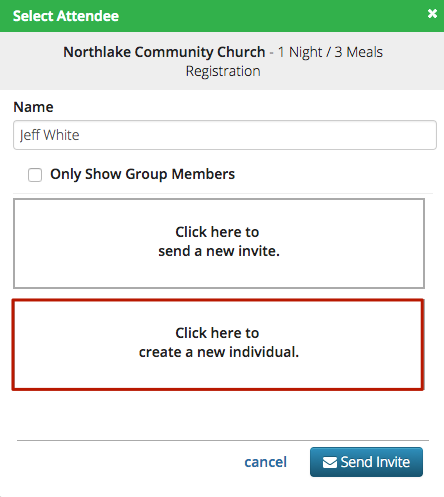
To name an Attendee or send an email Invite, choose Select Attendee.

Search
Search for existing Attendees by entering their name. To search for Group Members, select Only Show Group Members.
Select Existing Attendee
Select the Attendee and choose Send Invite and the Group Attendee Request Code Automated Email will be sent. To name the person on a registration, choose Select Attendee.
Send a New Invite
To send an Invite to a person not in the database, select Send a New Invite. Enter the first and last name of the Attendee as well as who should receive the invite email. Select Send Invite and the Group Attendee Request Code Automated Email will be sent.
Create New Individual
Click Create a New Individual to enter a new person that is part of the group and is registered for the Event.
Resend Invite
To send the Group Attendee Request Code again, select Resend Invite.

Accounting
View a Summary of charges, payment and any outstanding balance or dive into the Line Items to see something specific.
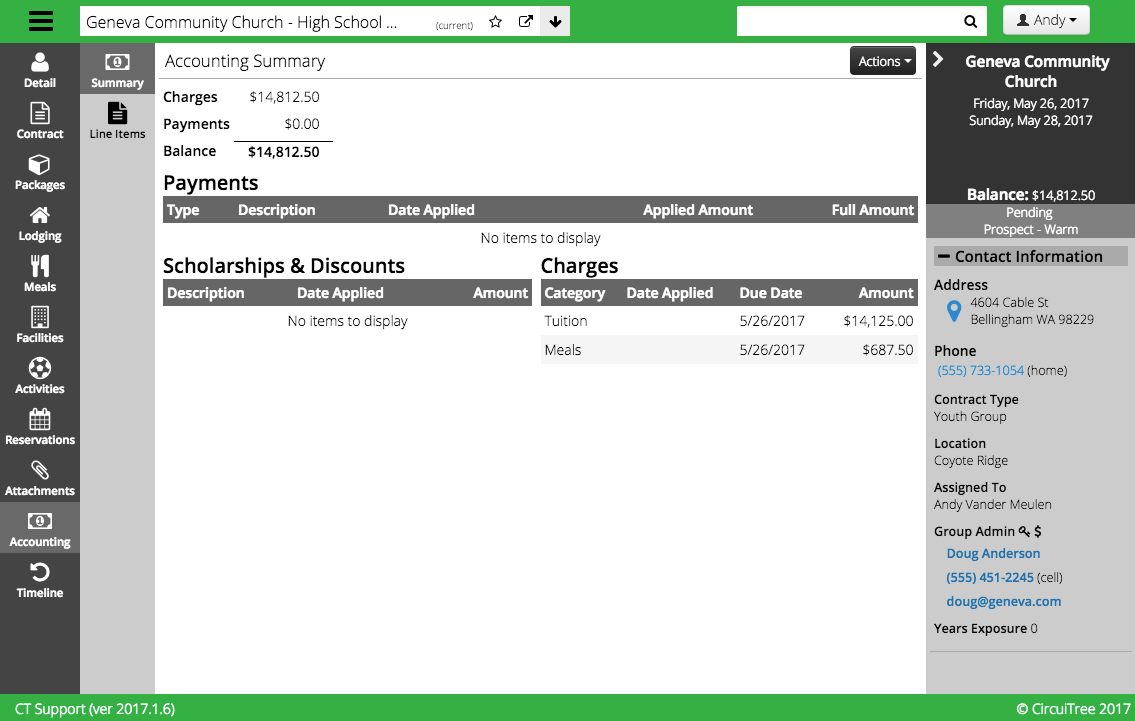
- Click Actions to be able to complete the following tasks:
- Make a Payment
- Issue Refund
- Reprice Itinerary
- Add Line Item
- Apply Manual Discount
- Apply Scholarship
- Cancel Scholarship
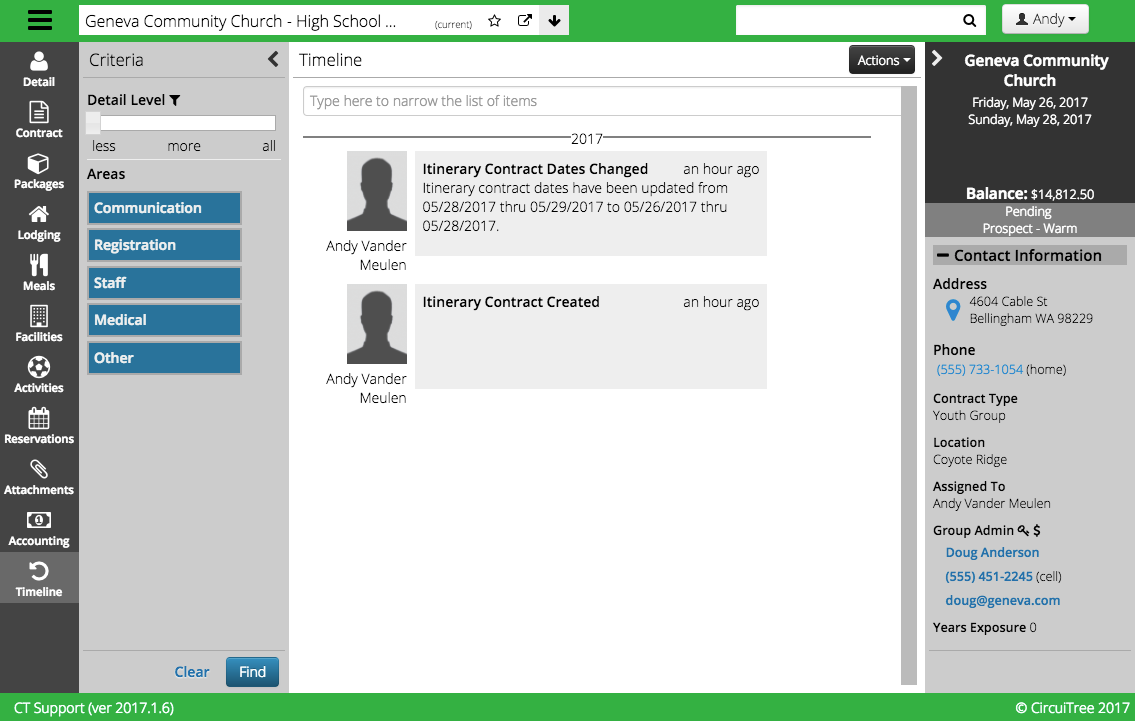
Timeline
Keep track of all that is going on with an Itinerary in Timeline. Entries are added when resources are reserved as well as when Itinerary Dates are changed and other items.
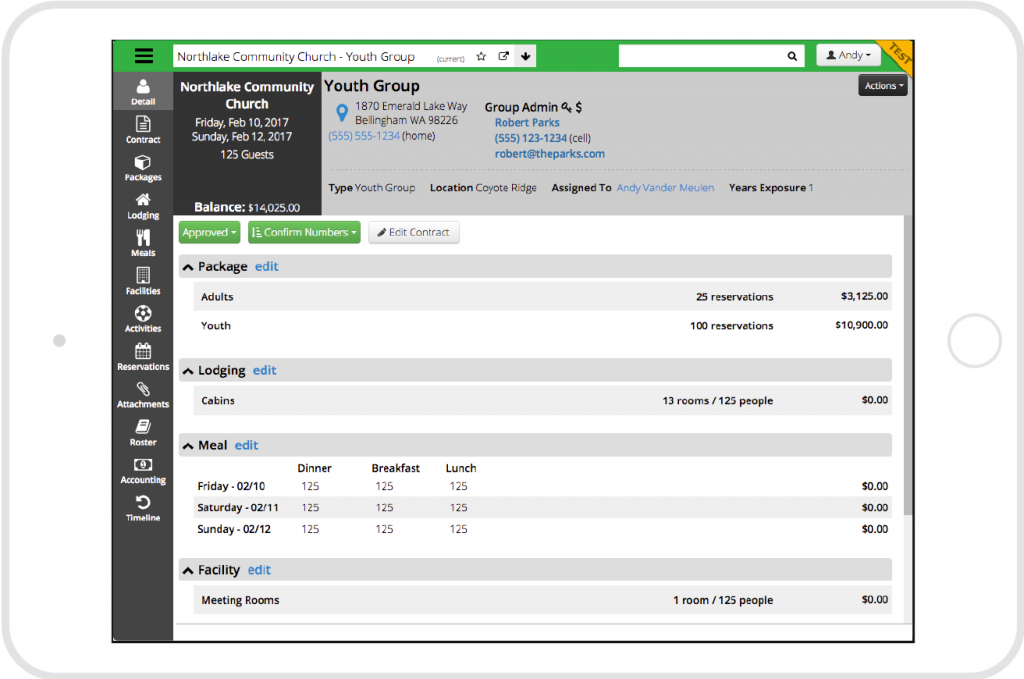
Detail
Once you have made some reservations, click on Detail to see a summary of everything for the group.
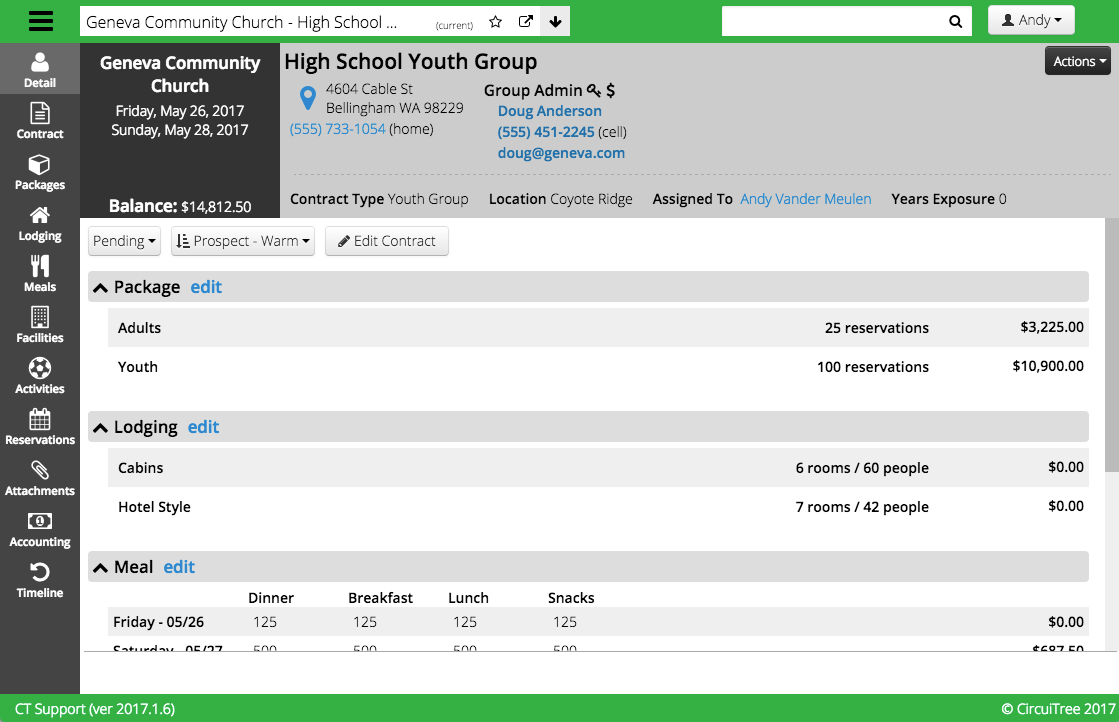
- Click on the Status to Activate or Cancel the Itinerary.
- Click on the Workflow to change to a new step.
- Click Edit Contract to go to the Contract section.
- Click the name next to Assigned To to switch the CT User responsible for the Itinerary.
- Click Edit next to any of the other sections to go to Edit Mode.