Contents
Resources are a very flexible option that allow you to manage a wide range of activities, facilities, equipment, and housing (among others) through Reservations.
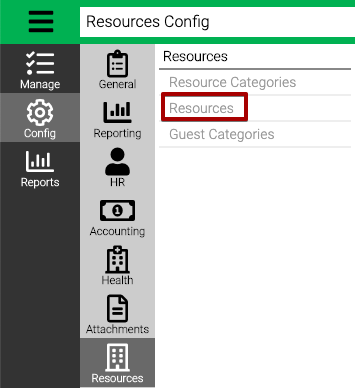
- Go to Config > Resources > Resources.
- Filter the results using the Criteria and select Find. Use the filter at the top of the screen to find a specific Resource.
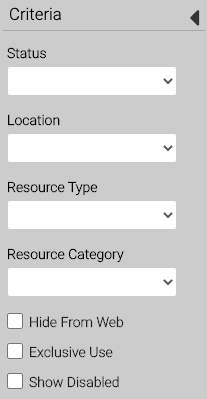
- Status – Select Active or Inactive.
- Location – Select a Location.
- Resource Type – Select a Resource Type.
- Resource Category – Select a Resource Category.
- Hide From Web – Check box to include Resources that are marked as Hide From Web.
- Exclusive Use – Check box to include Resources that are marked as Exclusive Use.
- Show Disabled – Check box to include Resources that are marked as Disabled.
- Select
 to edit or
  to remove.

Add Resource
- In the lower right hand corner, select Add Resource.
- Select a Resource Type.
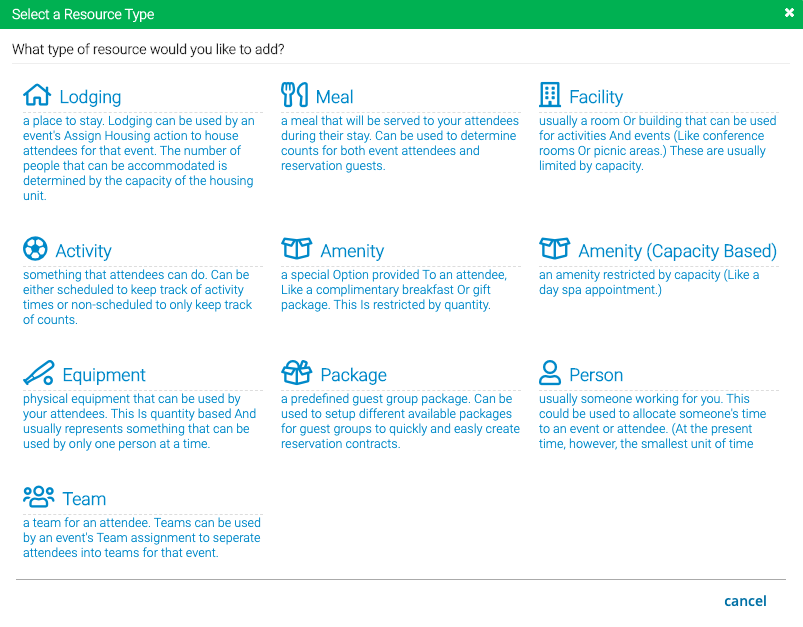
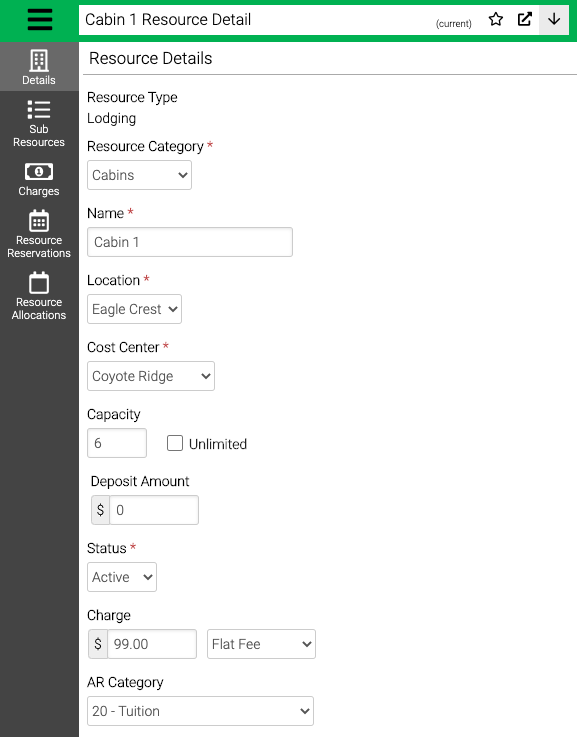
- Fill out the following fields.
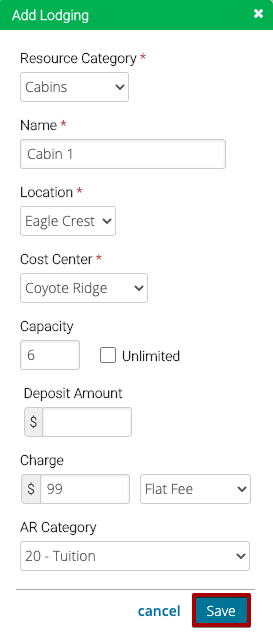
- Resource Category – Select a Resource Category.
- Name – Enter a name for the Resource.
- Location – Select a Location.
- Cost Center – Select a Cost Center.
- Capacity – Set a maximum capacity for the Resource or select Unlimited.
- Deposit Amount – Set an amount to require for deposit to reserve the Resource.
- Charge – Enter a charge amount.
- Charge Type – Select a type of charge:
- /per Person – Multiplies charge by quantity of Reservations (i.e. 6 at $99 = $594) and displays /per Person for reporting.
- /per Resource – Multiplies charge by quantity of Reservations (i.e. 6 at $99 = $594) and displays /per Resource for reporting.
- Flat Rate – Charges a few once per Reservation regardless of the quantity (i.e. 6 at $99 = $99). Typically used for Lodging.
- AR Category – Select an AR Category for the charge.
Other Options
When creating Resources, some Resource Types have other options to fill out.
Meals
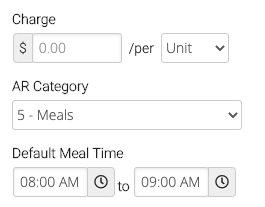
- /per – Select Unit, Serving or Person.
- AR Category – Defaults to Meals, update if needed.
- Default Meal Time – Set a time that is defaulted when the Resource is reserved or Allocated.
Activity
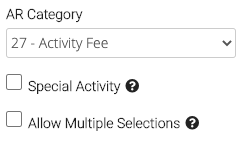
- AR Category – Defaults to Activity Fee, update if needed.
- Special Activity – Check box to allow Activity to overlap other Reservations.
- Allow Multiple Selections – Check box to allow Activity to be selected multiple times.
Package
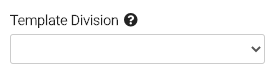
- Template Division – Assigning a template division to the package will use the template when creating Guest Group Package Reservations to automatically create an Event.
Edit Details
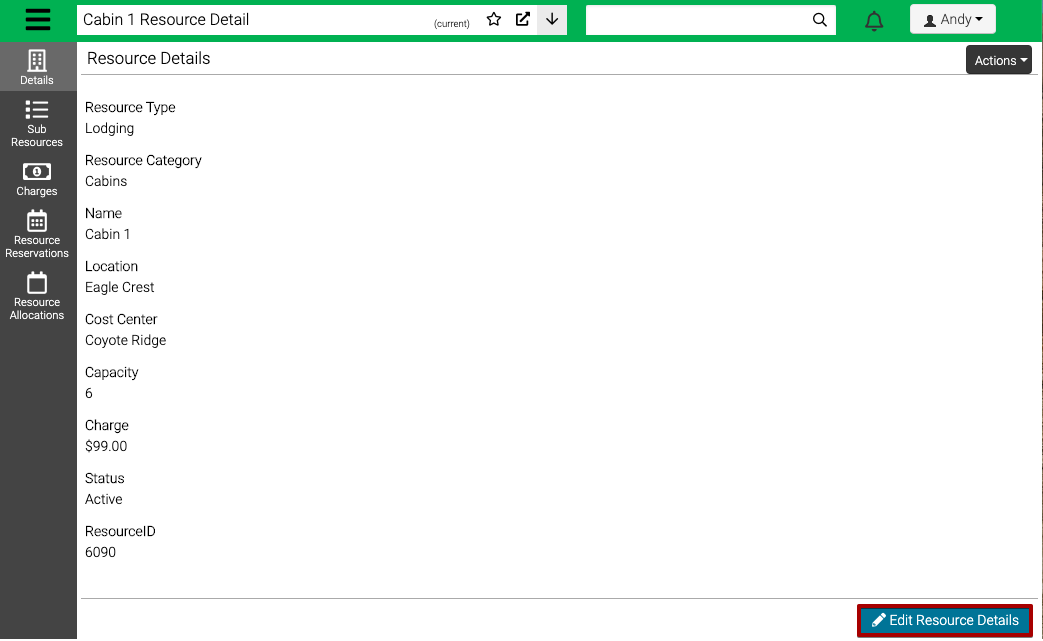
Once you have created a Resource, you can edit the details.
- Select Edit Resource Details.
- Update the fields as needed.
- Resource Category – Select a Resource Category.
- Name – Enter a name for the Resource.
- Location – Select a Location.
- Cost Center – Select a Cost Center.
- Capacity – Set a maximum capacity for the Resource or select Unlimited.
- Status – Select Active or Inactive.
- Deposit Amount – Set an amount to require for deposit to reserve the Resource.
- Charge – Enter a charge amount.
- Charge Type – Select a type of charge:
- /per Person – Multiplies charge by quantity of Reservations (i.e. 6 at $99 = $594) and displays /per Person for reporting.
- /per Resource – Multiplies charge by quantity of Reservations (i.e. 6 at $99 = $594) and displays /per Resource for reporting.
- Flat Rate – Charges a fee once per Reservation regardless of the quantity (i.e. 6 at $99 = $99). Typically used for Lodging.
- AR Category – Select an AR Category for the charge.
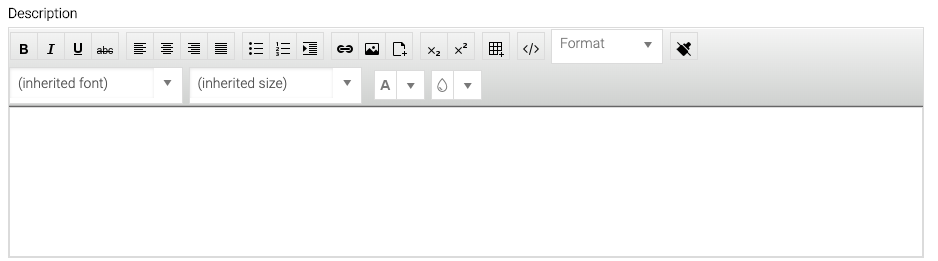
- Description – Displayed on Registration Site.
- Select More for more options.
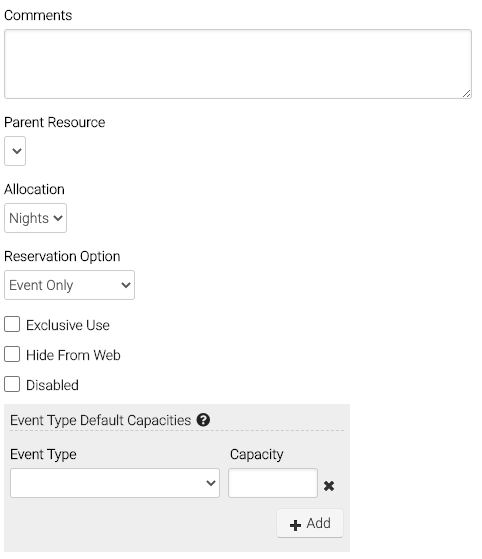
- Comments – Add an internal comment.
- Parent Resource – Set a Parent Resource.
- Allocation – Select either Nights or Days. Can be used in reporting.
- Reservation Option – Select one of the following:
- Event Only – Select to only allow Reservations when allocated to an Event.
- Open Registration – Select to allow Reservation at any time.
- Exclusive Use – Select so that once a Resource is Reserved, it is no longer available for any other Reservations during that time.
- Hide From Web – Select to hide the Resource from displaying on the Registration Site.
- Disabled – Select to Disable the Resource so that it can not be reserved.
- Event Type Default Capacities – Overrides the default capacity for the selected Event Type. Used to default capacities when creating Allocations for an Event or Division.
- Select Save.
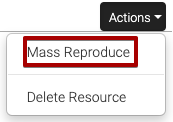
Mass Reproduce
If you have several Resources that you need to create that are similar, use the Mass Reproduce process. Useful for Resources like Lodging when there are lots of the same with different names.
- Go to Actions > Mass Reproduce.
- Fill out the fields.
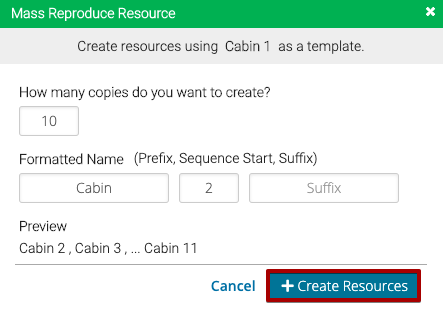
- How many copies do you want to create? – Enter the number of Resources to create.
- Formatted Name – Update the following:
- Prefix – The first part of the Resource Name.
- Sequence Start – Select a number to start counting from.
- Suffix – The last part of the Resource Name.
- Preview – Based on your number of copies and formatted name, the Preview will display the first two and last resource to be created.
- Select Create Resources.
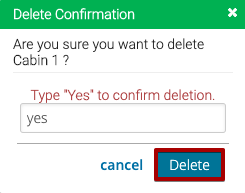
Delete Resource
- Go to Actions > Delete Resource.
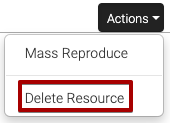
- Type Yes and the select Delete.
Sub Resources
You can configure Resources that are nested within each other for organizational purposes if needed. For example:
- Lodge (Parent Resource)
- Room 1 (Sub Resource)
- Room 2 (Sub Resource)
Once a Resource has Sub Resource, it becomes a Parent Resource and is not able to be reserved.
- Select Sub Resources.

- Select Add Sub Resource to create a new Resource under the Parent Resource.
- To move Sub Resources under a Parent Resource, go to the Sub Resource, select More and assign a Parent Resource.
Charges
- Select Charges.
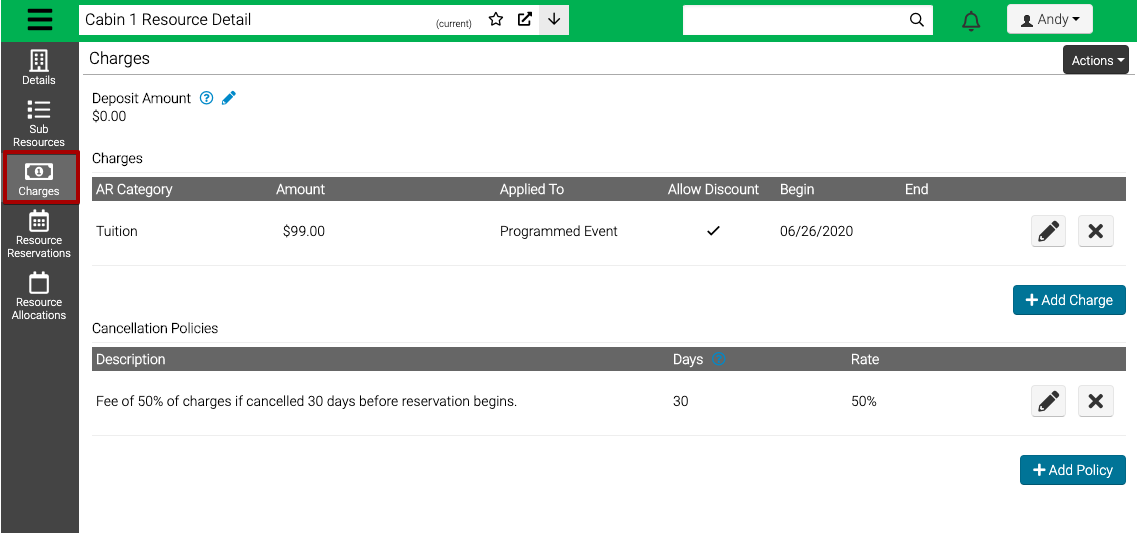
- Deposit Amount – Select
 to edit the Deposit Amount that is required when a Reservation is made.
- Select Add Charge.
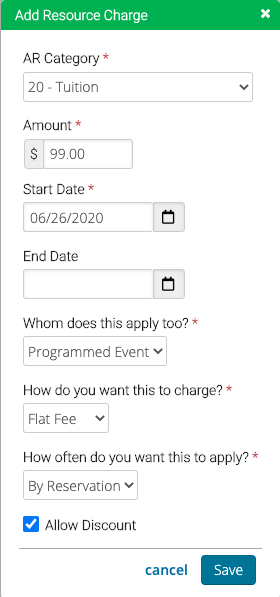
- AR Category – Select an AR Category for the charge.
- Amount – Enter an amount for the charge.
- Start Date – Enter a Start Date when the charge goes into effect.
- End Date – Optionally set an End Date for when the charge no longer applies.
- Whom does this apply to? – Select either Programmed Event or Guest Group.
- How do you want this to charge? – Select one of the following:
- Resource – Multiplies charge by quantity of Reservations (i.e. 6 people at $99 per person = $594) and displays /per Resource for reporting.
- Flat Rate – Charges a fee once per Reservation regardless of the quantity (i.e. 6 people, $99 for the room = $99). Typically used for Lodging.
- How often do you want this to apply? – Select one of the following:
- By Reservation – Apply charge once for the Reservation, regardless of how long it is. (3 nights, $99 per reservation = $99)
- By Nights – Multiple charge by the number of nights of the Reservation. (3 nights at $99 per night = $297)
- Allow Discount – Select to allow the charge to be discounted.
- Select Save.
Cancellation Policy
- Select Add Policy.
- Fill out fields and then select Save.
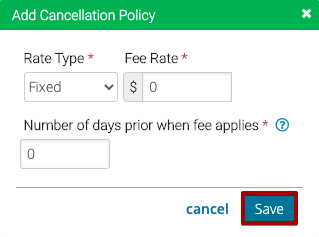
- Rate Type – Select Fixed or Percentage.
- Fee Rate – Enter a rate to charge. For Fixed it is a dollar amount and for Percentage a percentage.
- Number of days prior when fee applies – Any reservation cancellations within this many days of the reservation’s begin date will prompt this fee.
Reservations
View a list of Reservations for a given time frame.
- Select Resource Reservations.
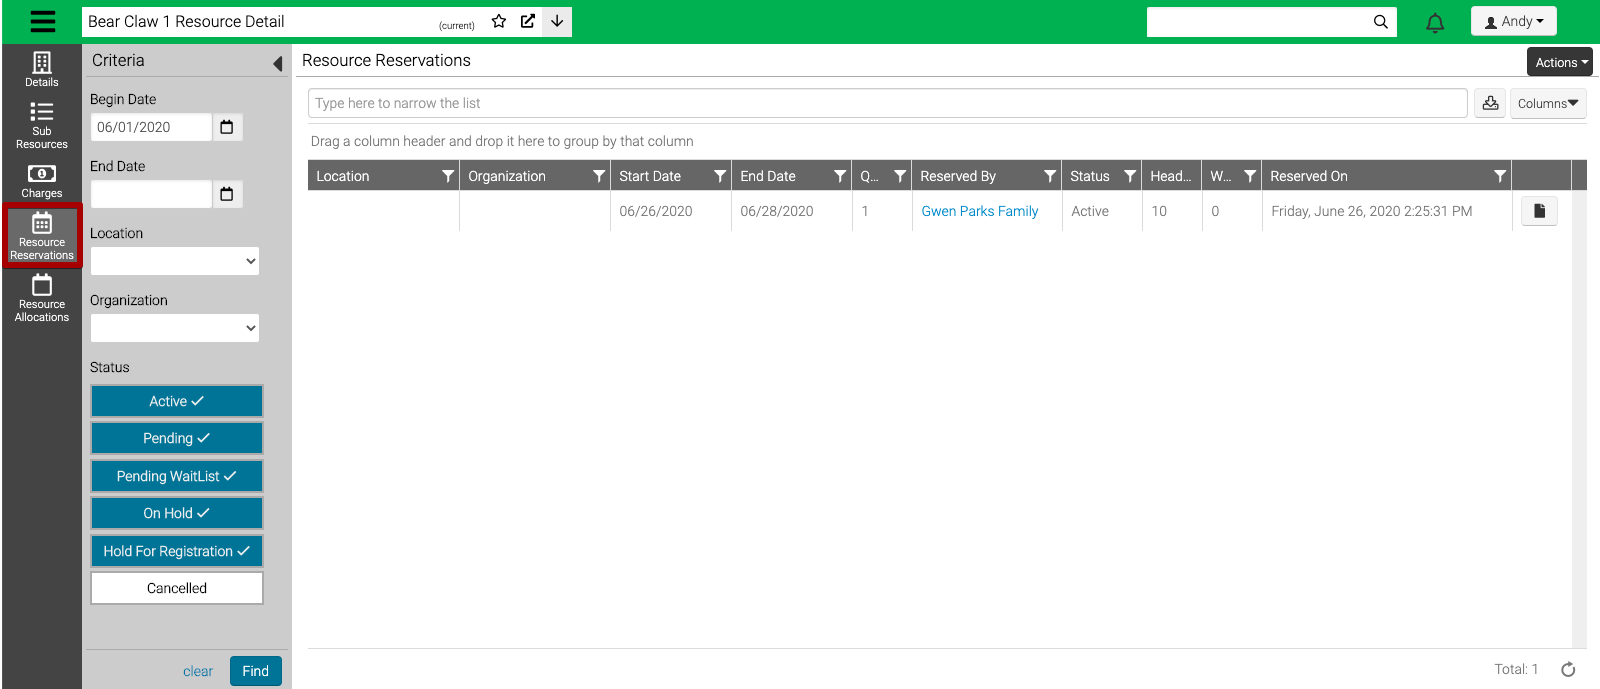
- Use the Criteria to filter your results and select Find.
- Begin / End Date – Enter a date range to filter the results.
- Location – Select a Location.
- Organization – Select an Organization.
- Status – Select a Status.
- To view a Reservation, select
 .
.
Allocations
View a list of Allocations for a given time frame.
- Select Resource Allocations.
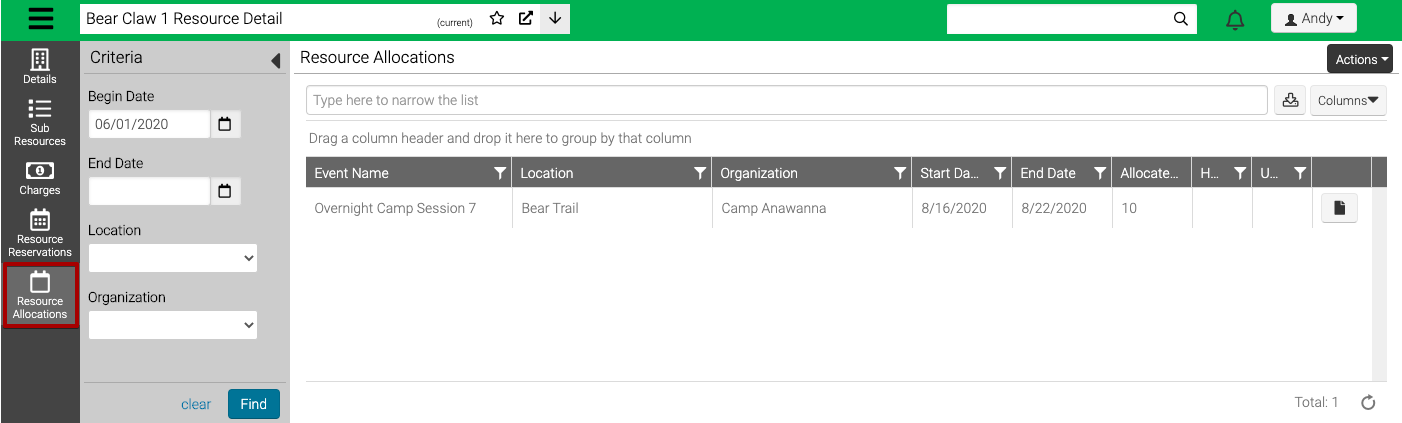
- Use the Criteria to filter your results and select Find.
- Begin / End Date – Enter a date range to filter the results.
- Location – Select a Location.
- Organization – Select an Organization.
- To view an Allocation, select .