The release of CT6 brings with it several new features designed to enhance the usability and flexibility of the web based platform. Some of the changes include a new menu and navigation system; the ability to add people, families, and groups; perform accounting functions including making a payment and interact with individual; and family registrations on a deeper level than ever before.
We aren’t stopping there though! Over the coming weeks and months, we will be continuing to release more features including the ability to create, cancel and transfer a registration. The process of moving functionality of CT5 to CT6 will continue by migrating features over as well as adding new ones. Check out the Release Notes to stay up to date on new features and fixes once they are released.
Got feedback from what you see? We would love to hear it. Your input helps us make the software better, and you can contribute to the process by leaving your comments on the CT6 Feedback Forum.
Vertical Tabs
One of the first things that you will notice after logging into CT6 is that there are no more tabs! While that is technically true, what we have done is organize the tabs into a list which we call Vertical Tabs. As you navigate through CT6, click on the Vertical Tabs to reference where you have been previously.
![]()
Click on the down arrow to expand the list of Vertical Tabs:
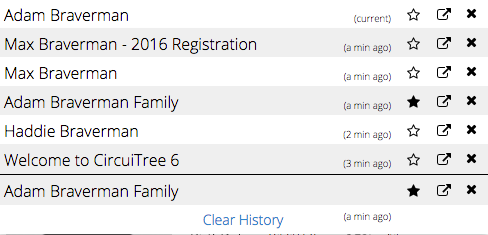
- Longer descriptions and a time indicator help you find where you were previously.
- Add a favorite to quickly reference later by clicking on the
 icon.
icon. - Click on the
 icon to open up the tab in a new tab in your browser to be able to take advantage of multiple monitors.
 - Close a Vertical Tab by clicking on the
 icon.
icon.
Mobile
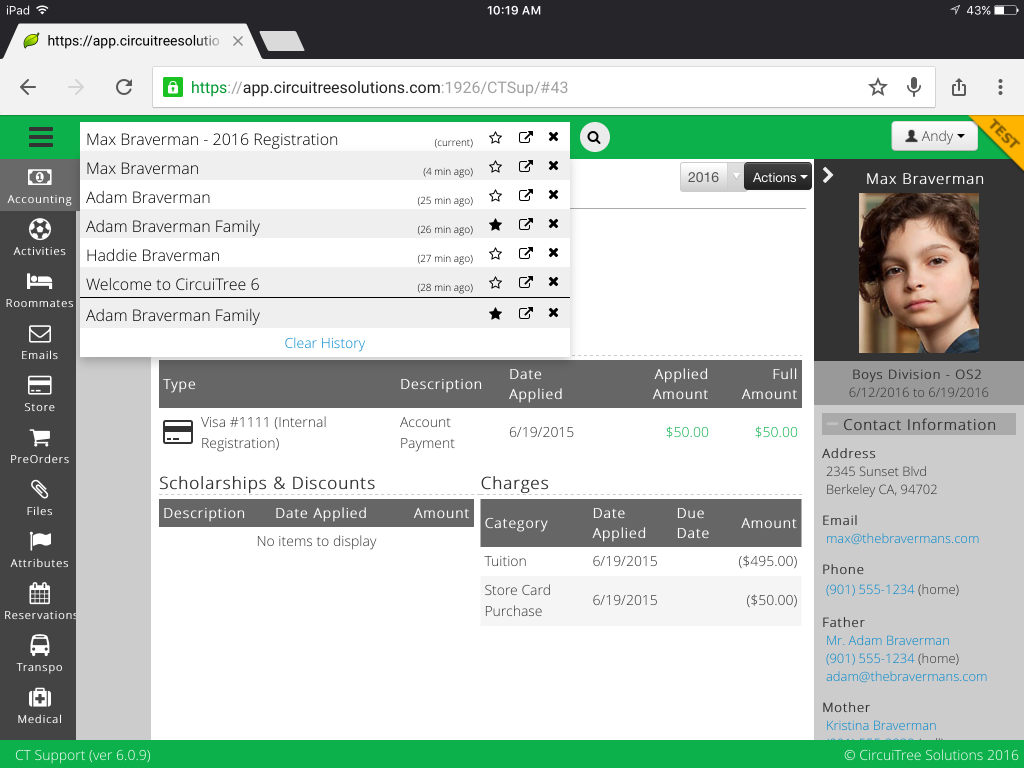
Vertical Tabs also function well on a tablet so you can take CT6 with you on the go.
Menu
The menu has been consolidated into a pop out that is accessible in the upper left hand corner. Click on the ![]() icon to open up the menu. From there, you will be able to access all the different sections of CT6.
icon to open up the menu. From there, you will be able to access all the different sections of CT6.
Search
Need to quickly look up a person, family or group? Enter a name in the search field and find the results.
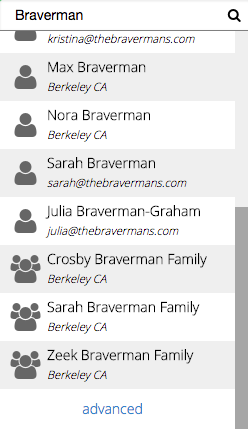
Advanced Search
To dive in even deeper on a search, click on Advanced.
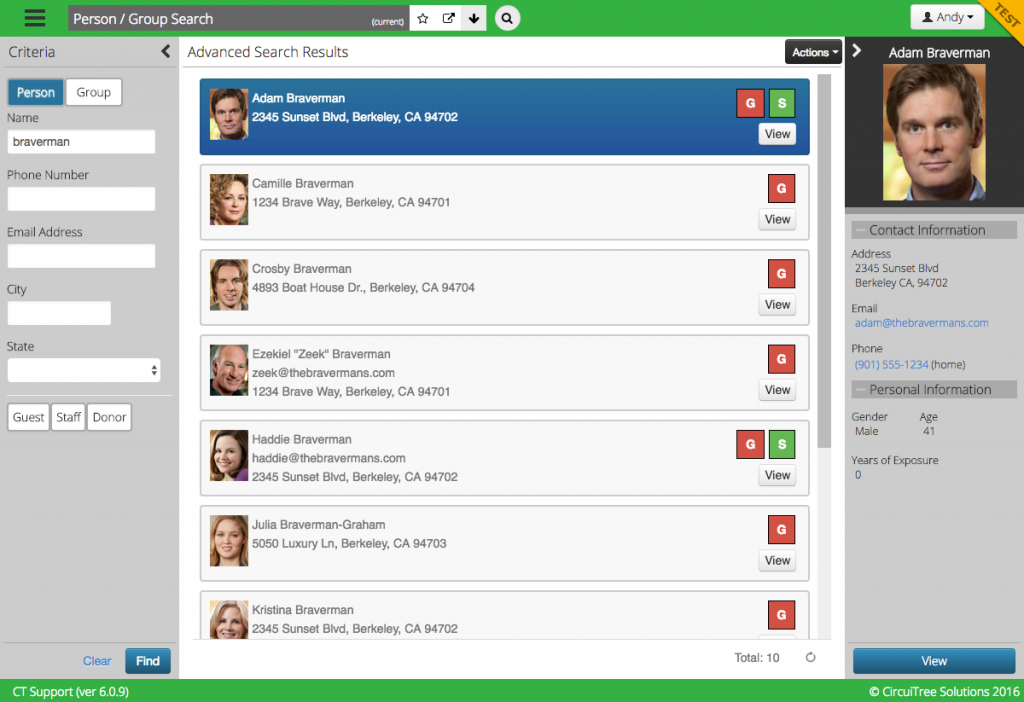
- Select either Person or Group or both.
- Indicators for Guest, Staff and Donor.
- Photos of Individuals appear in search results.
- Click on the name to see more details in the Sidebar.
- Click View to jump straight to the Person or Group profile.
Add Person / Family / Group
Need to add a new customer? Go to Manage > People, and you will find options to add a Person, Family or Group.

Add Person

- Under Name, search for existing people in the database to make sure there aren’t any duplicates.
- Click on the
 icon to add a Greeting, Middle or Preferred name.
 - Google Address integration makes sure that you get the correct address the first time.
- Upload a photo that you may have missed during Check-In.
- Click More to add details such as Employer, Profession or Grade.
Add Family
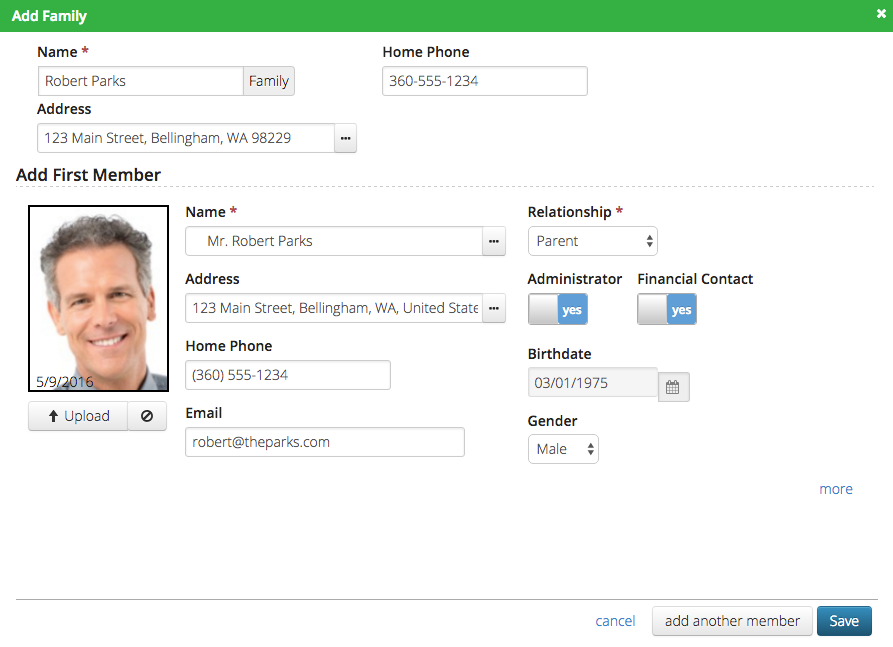
- Enter the family information as well as the first member.
- Add additional people by clicking on add another member.
Add Group
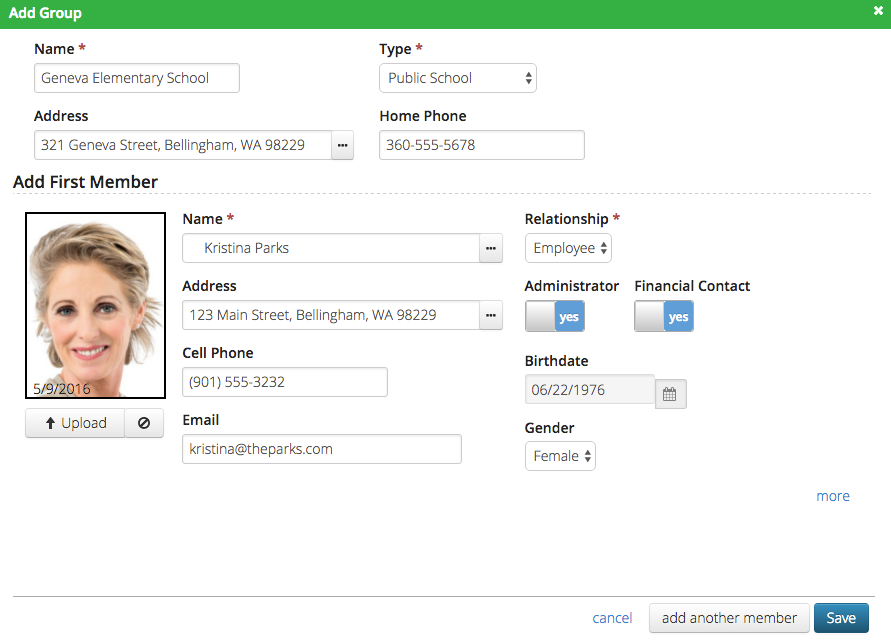
- Enter the Group information as well as add the first member.
- Add additional members by clicking on add another member.
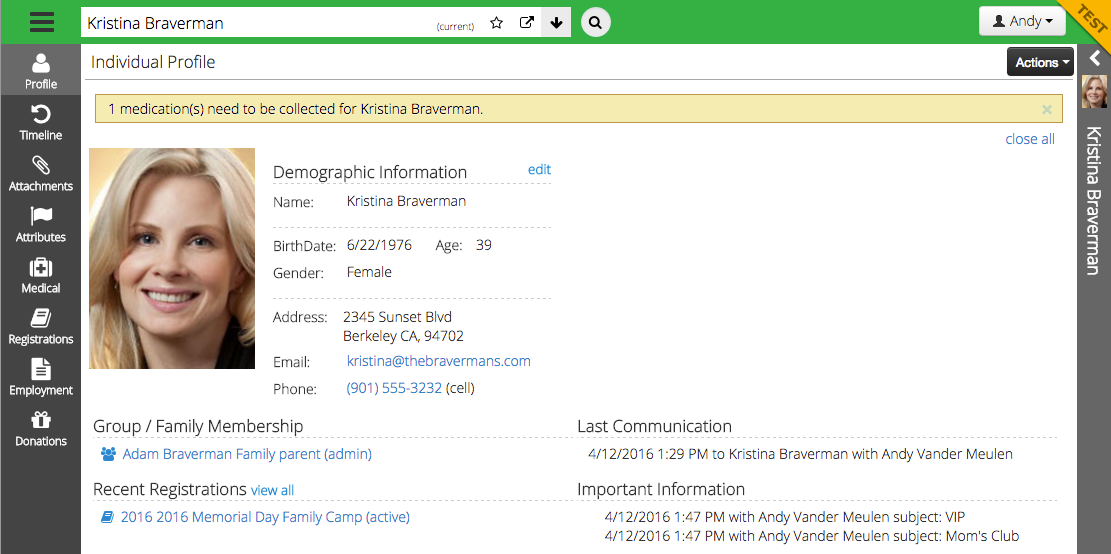
Individual Profile
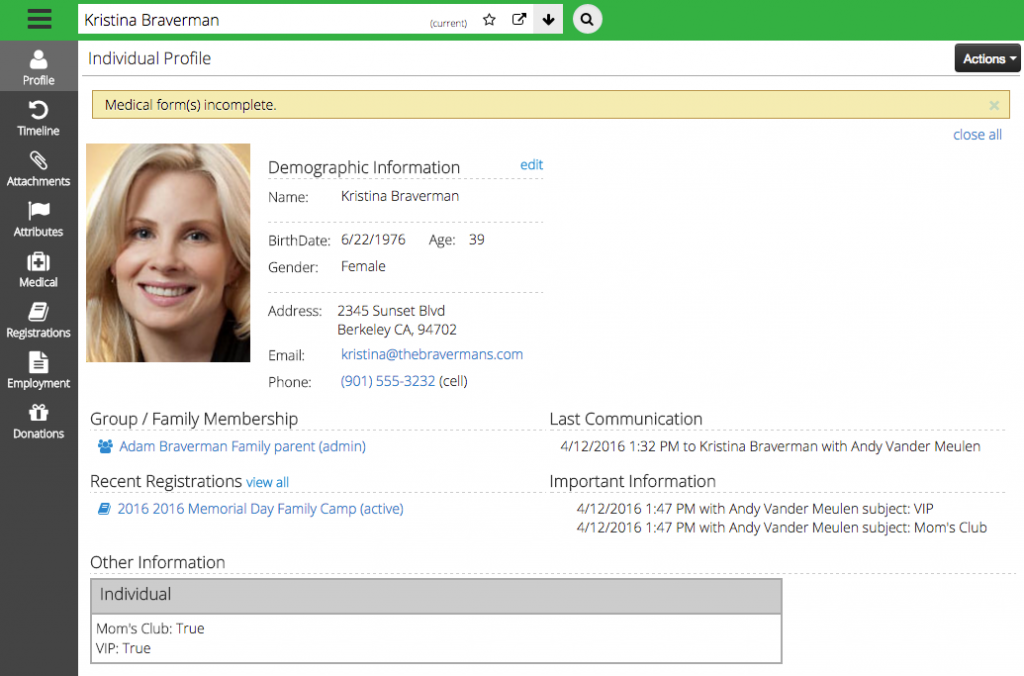
- Status bar at the top of the screen shows anything that is missing for this Individual.
- See the pertinent information on an Individual at a glance including demographics, memberships, last communication and recent registrations.
- Click Edit to update or add information.
Add Communication

- Quickly record a phone conversation or email exchange by clicking Actions to Add Communication
Sidebar
The Sidebar gives you context to the Individual, Family or Group that you are looking at when you are on different subtab.
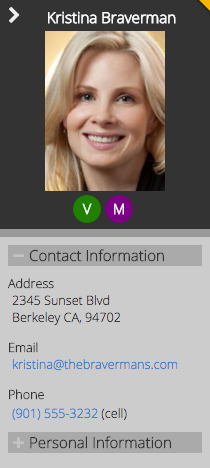
- On a Registration or Employment screen, click on the name of the Individual to return to their Profile.
- Hover over Flags
 to see the name of the Attribute and the value.
 - Click on the
 to expand or
  to collapse a section.
 - Want to email or call this person? Click on the email or phone number to open up your default program for that type of link such as Outlook for email or Jabber for phone.
- Need more space on the screen? Click on the
 icon to collapse the sidebar and the photo and name will shrink to give you more screen space.
Timeline
Timeline is a log of all the activity that happens for a person, family or group. Use Timeline to reference a phone conversation from 6 months ago, see when a medical form was signed or if an Automated Email was sent out.
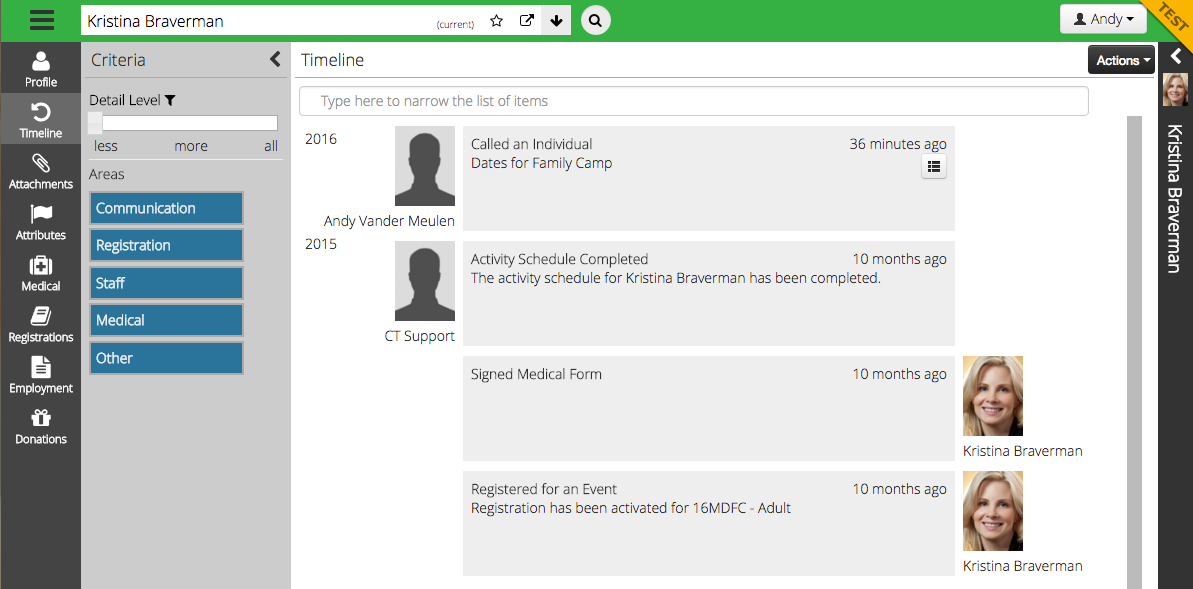
- Under Criteria, determine the Detail Level that you want to see from Less to All. Click on the
 icon to see a breakdown of what is in each section.
 - Choose which areas you want to see by clicking to select or deselect an option.
- Use the filter to quickly search for a key word or phrase.
- Activity is shown with internal CircuiTree users on the left and customers on the right with photos.
- Click on the
 icon to view more detail for a specific activity.
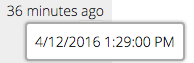
 - Time is stated in human readable time [36 minutes ago] to make it easy to reference. Hover over the time to see a timestamp of exactly when that activity took place.
Attachments
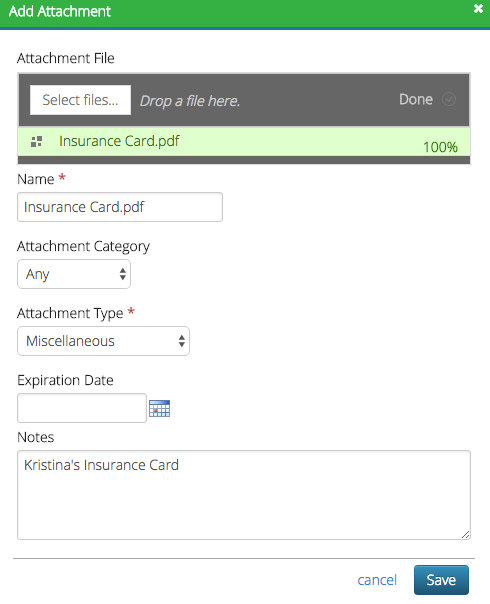
- Click on Add Attachment to upload a file.
- Drag and drop a file or click Select Files to upload file.
- Add a Name, Category, Type, Expiration Date and any Notes for the Attachment.
Attributes
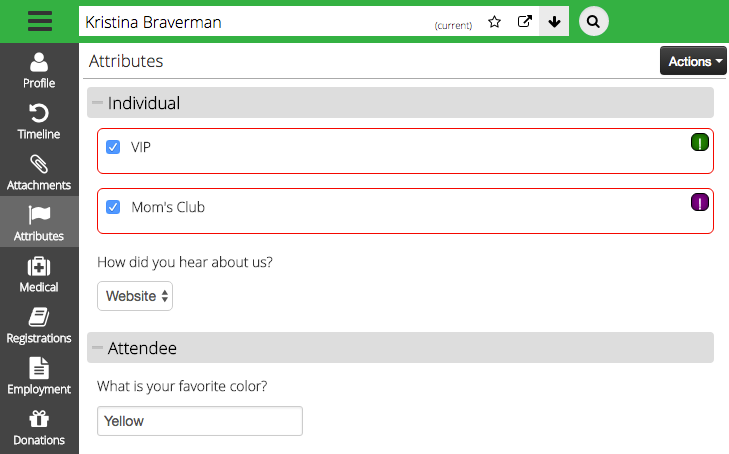
- Fill in Attribute values and see Flags.
- Click the header to expand or collapse the Attribute Category.
- Any Attribute that is connected to the Individual shows up in the list [Individual, Attendee, Staff].
Medical
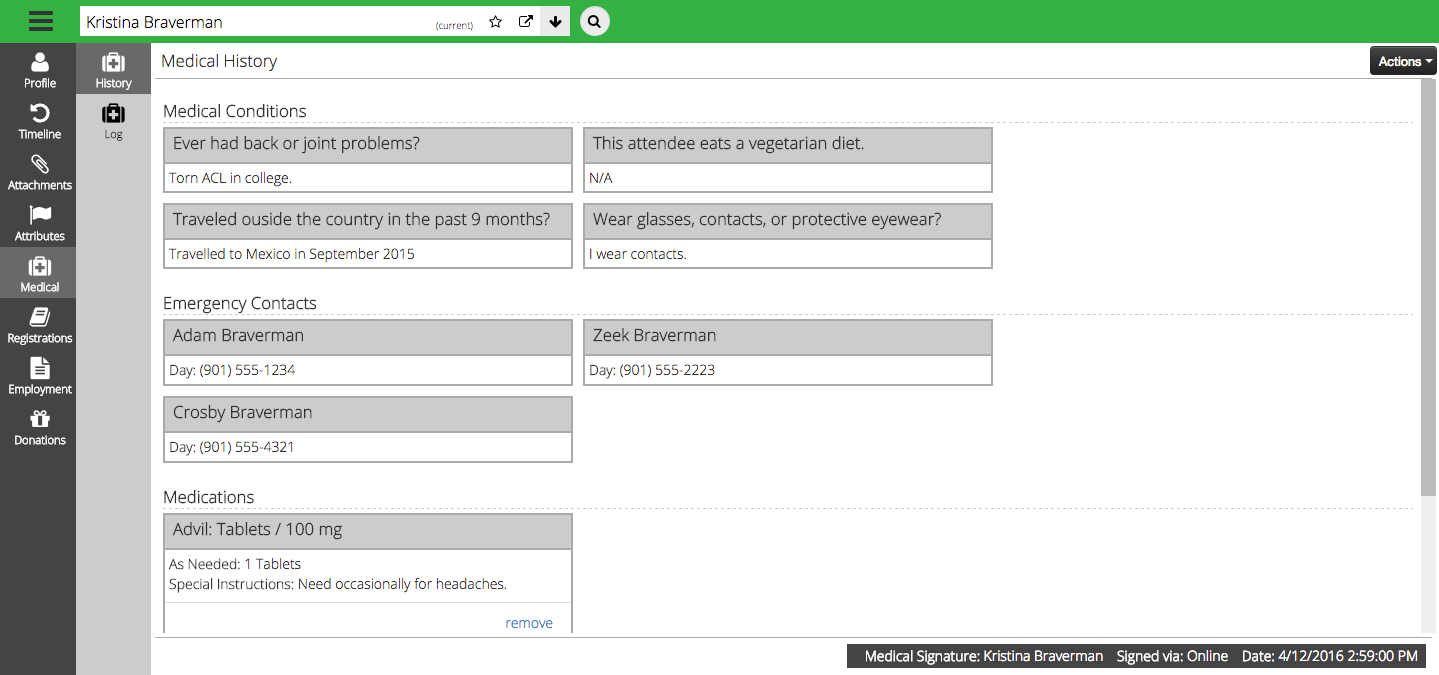
- See Medical History and Log as well as the signature and date from the Medical Form.
Registrations
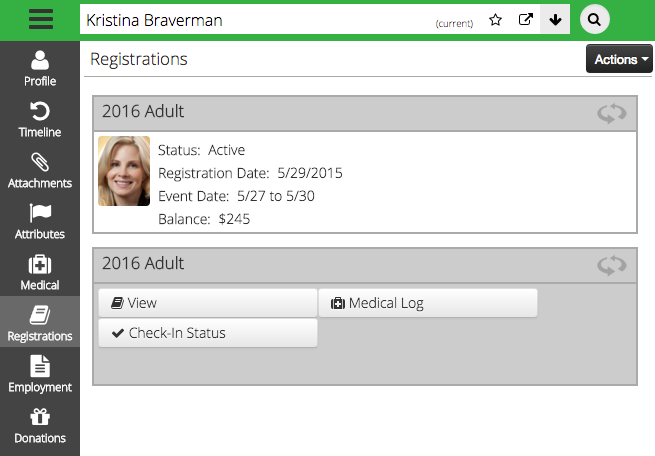
- See a list of registrations for this person and click the header to flip the card to perform more actions such as viewing the registration, going to the Medical Log or going to Check-In.
Employment
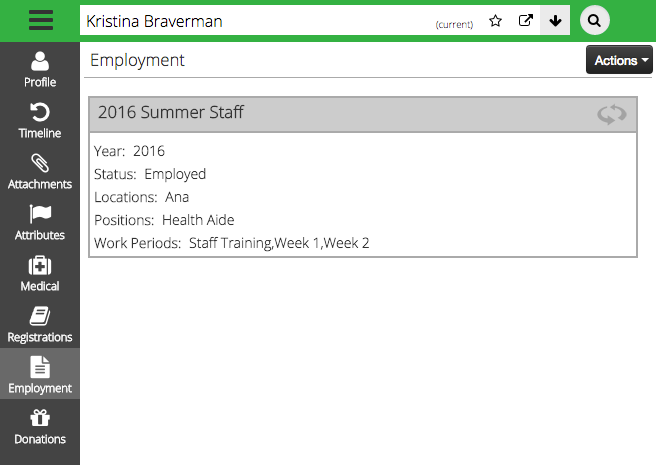
- View any employment records for the individual and flip the card to link to the Employment Details.
- Need to hire someone for a position? Click on Hire in the lower right hand corner to open the Offer screen.
Donations

- View a breakdown of giving by fund as well as important dates and individual donations.
- Click Add Donation to record another donations for the Individual.
Family Profile
In different places in CT6, including the Family Profile, you will notice Flip Cards. Clicking on the header of the card will flip the card around to display different actions. If you see a card with a ![]() icon, click on it to see what is on the back!
icon, click on it to see what is on the back!
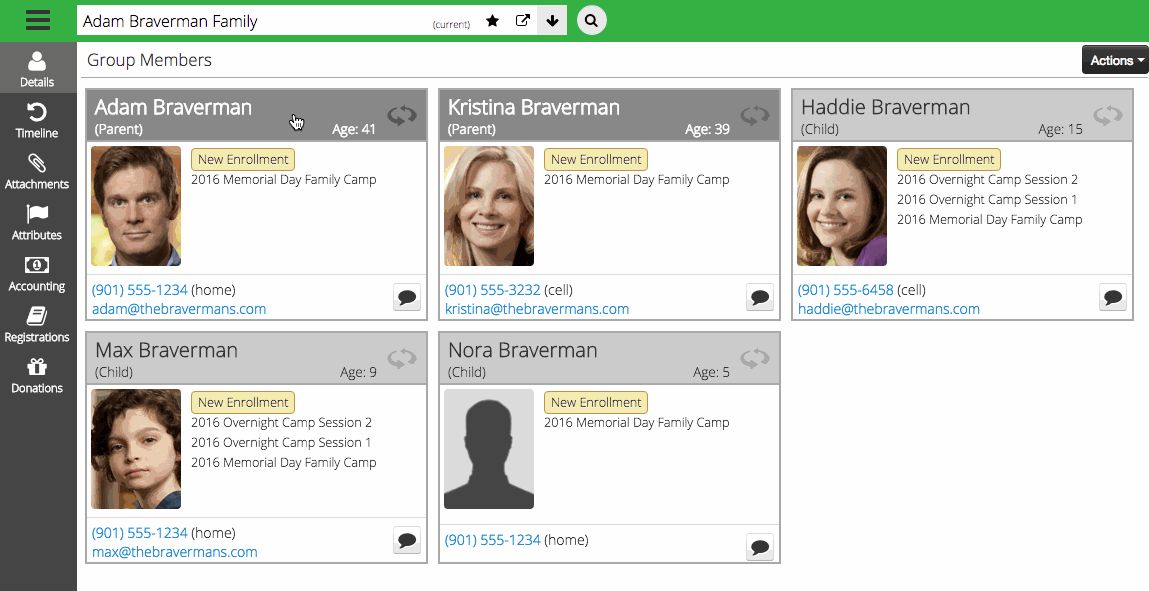
- Dark grey headers indicate Admins for the family and light grey headers indicate family members.
- See New Enrollments at a glance.
- Want to email or call this person? Click on the email or phone number to open up your default program for that type of link such as Outlook for email or Jabber for phone.
- Click on the
 icon to add Communication.
Registrations
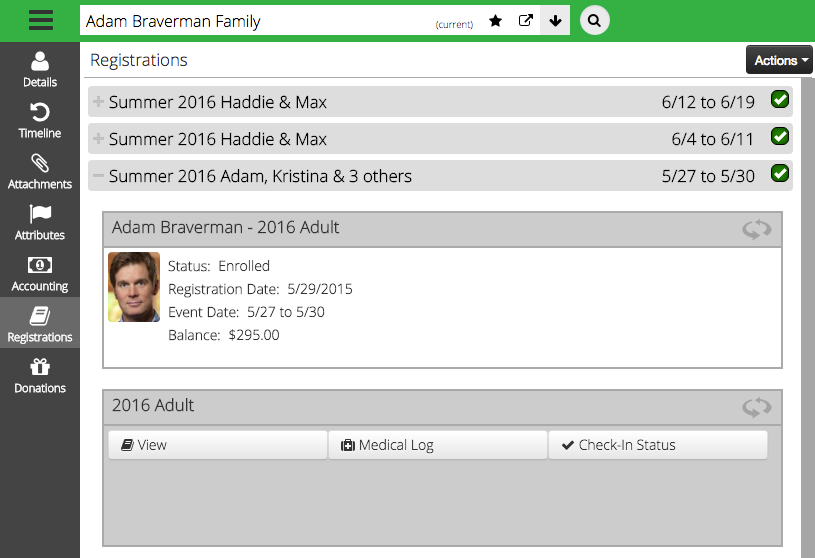
- Registrations happening at the same time or consecutively are grouped. Click the header to expand to see registrations for that time period.
- Click the
 icon or anywhere on the header to see more actions.
Make a Payment
Got a phone call and a customer needs to make a payment? Under the Family Profile or a Registration, click on Actions > Make a Payment.
Payment Amount
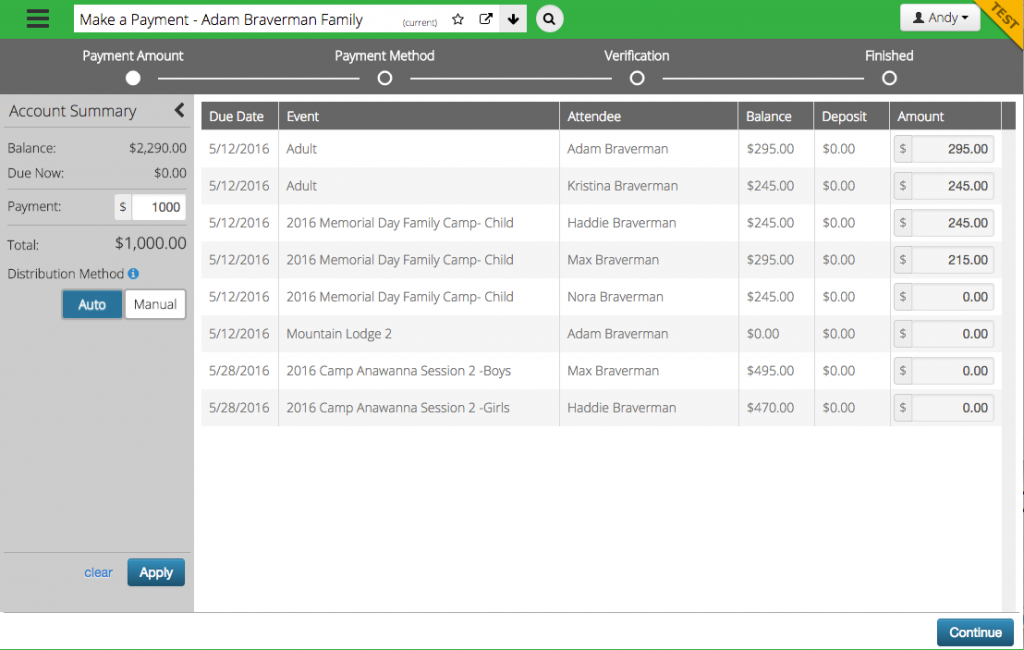
- See where you are at in the Make a Payment process using the steps across the top of the screen.
- Under Account Summary, see the Balance Due and the amount Due Now.
- Enter a Payment amount and then choose either Auto or Manual distribution and then click Apply.

Payment Method
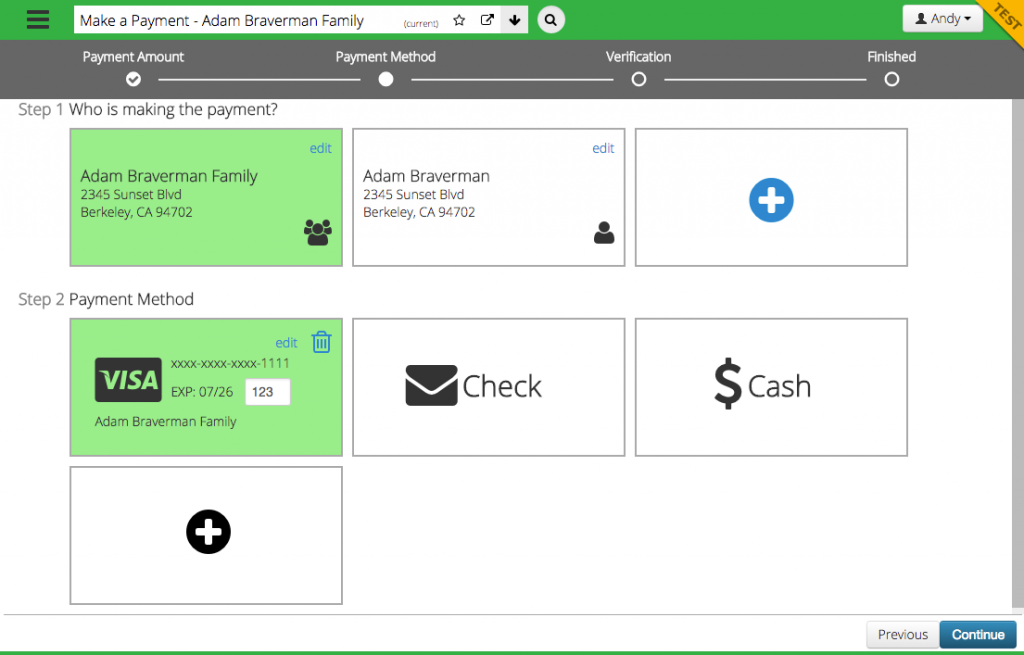
- Select who is making the payment, click the
 icon to add a new person.
 - Select an existing Payment Method or click on the icon to add a new one such as a credit card or electronic check.
- When selecting credit cards, enter the CVC code in the box provided.
Verification
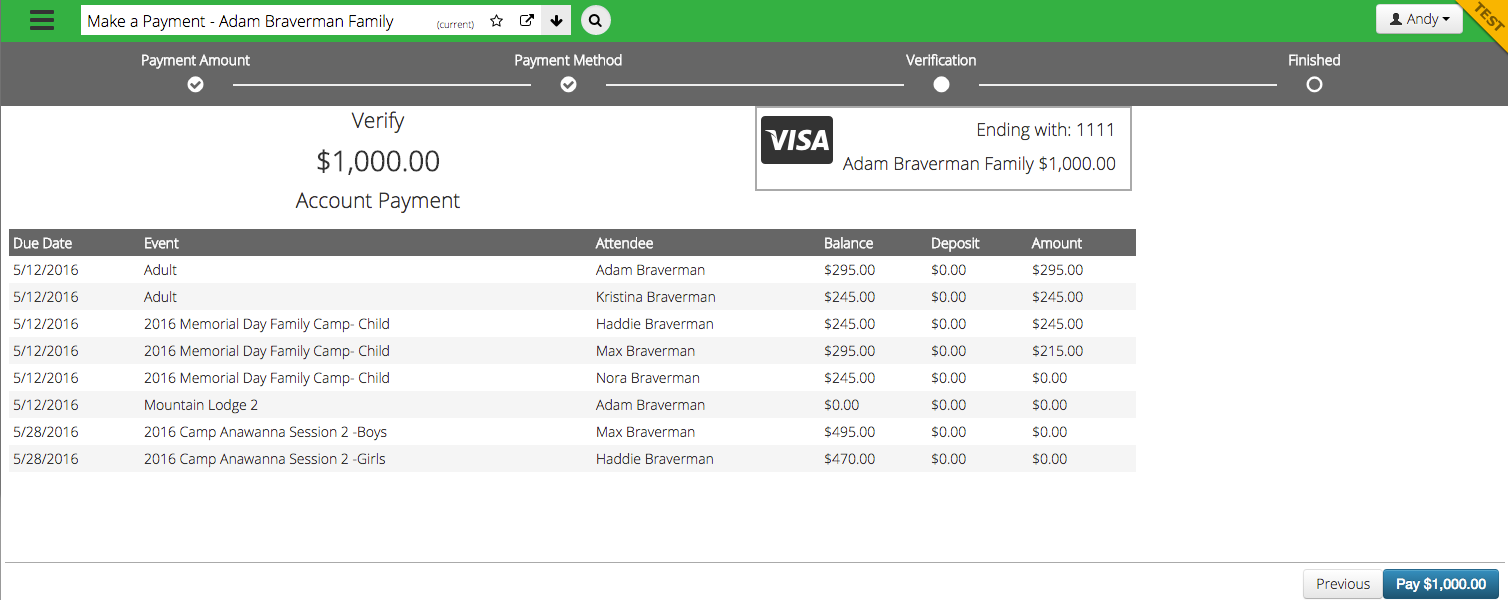
- Verify that the payment looks correct and then click the Pay button to process the payment.
Finished
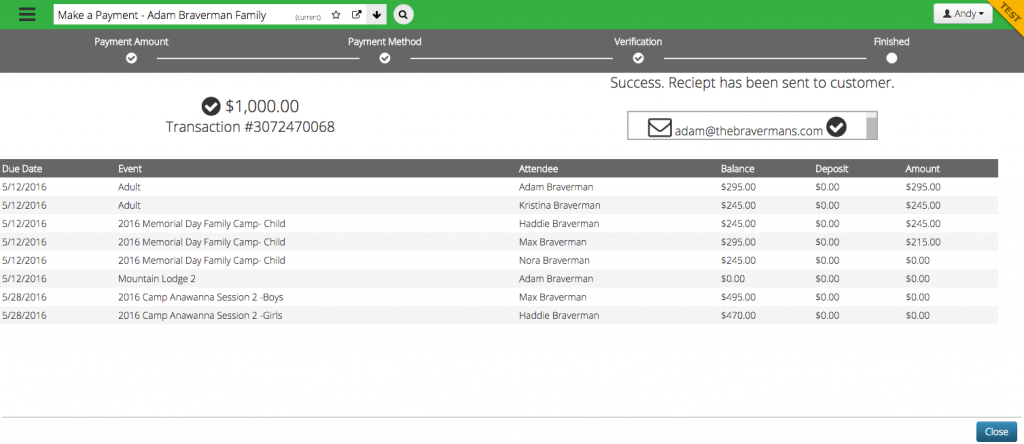
- Transaction number and email address where receipt is sent displayed.
Registration Detail
Starting from either an Individual or Family Profile, dive in to see more about a Registration.
Accounting
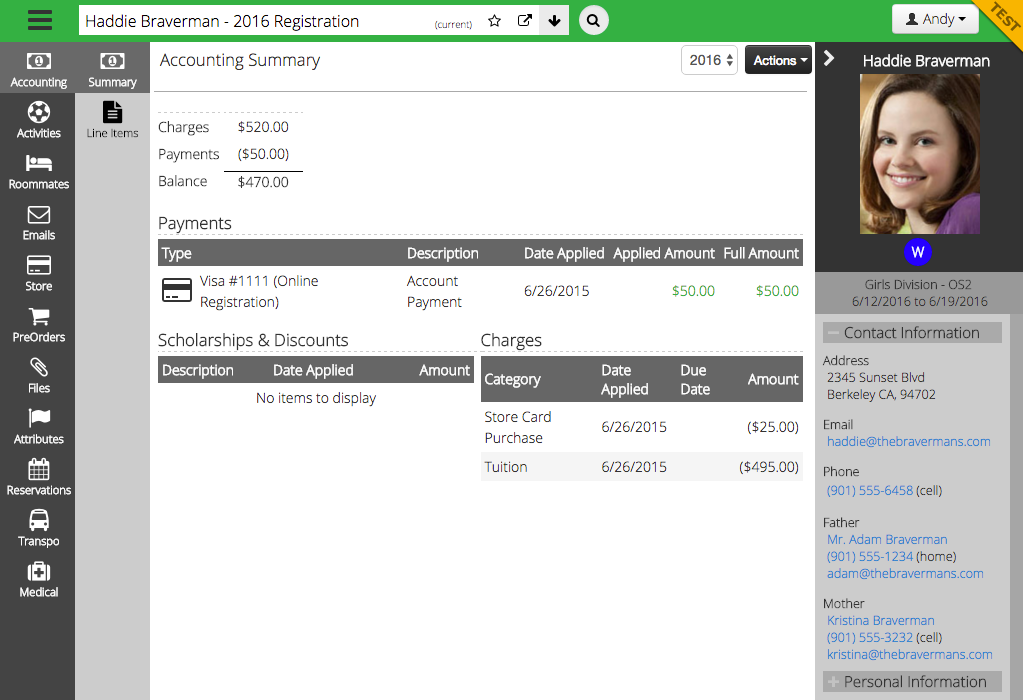
- See a Summary of Payments, Charges, Scholarships and Discounts.
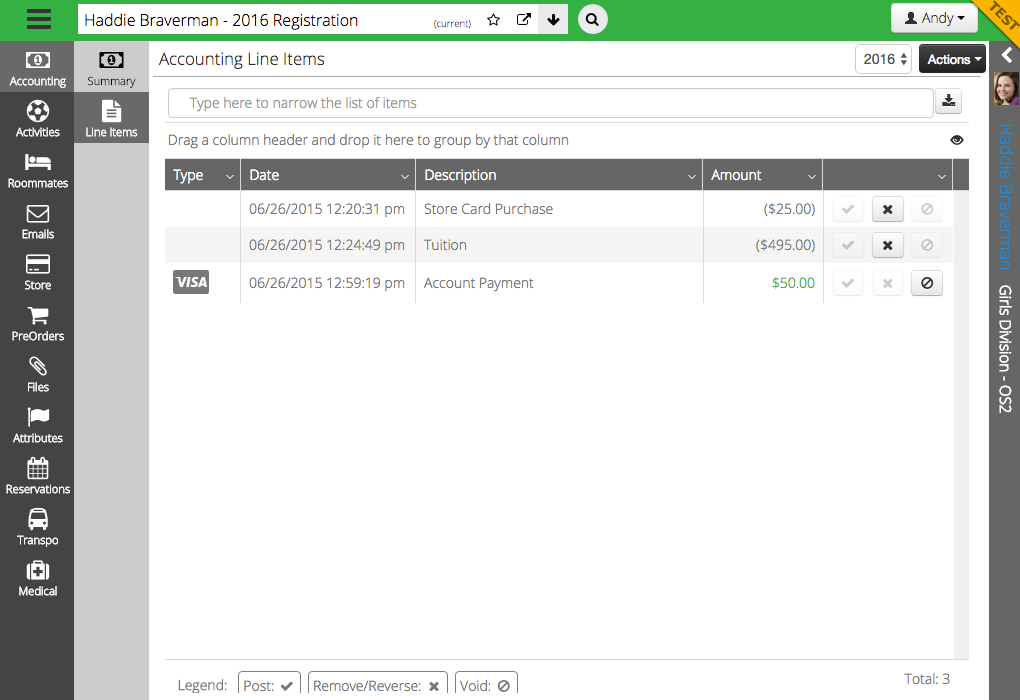
- Under Line Items, see all the accounting detail for this registration.
- Use the filter to search for a specific Line Item.
- Perform different actions on a specific Line Item clicking on one of these icons
 . Unavailable actions are greyed out.
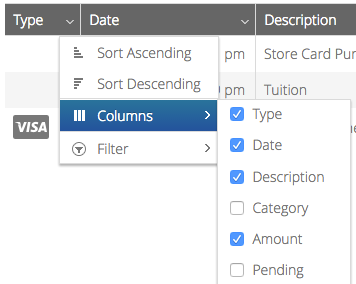
 - Next to a column, click the down arrow to see more options, including sorting, displaying different columns and filtering.
Accounting Actions
There are several accounting actions that can be performed on a registrations and can be accessed by clicking on Actions.
Issue Refund
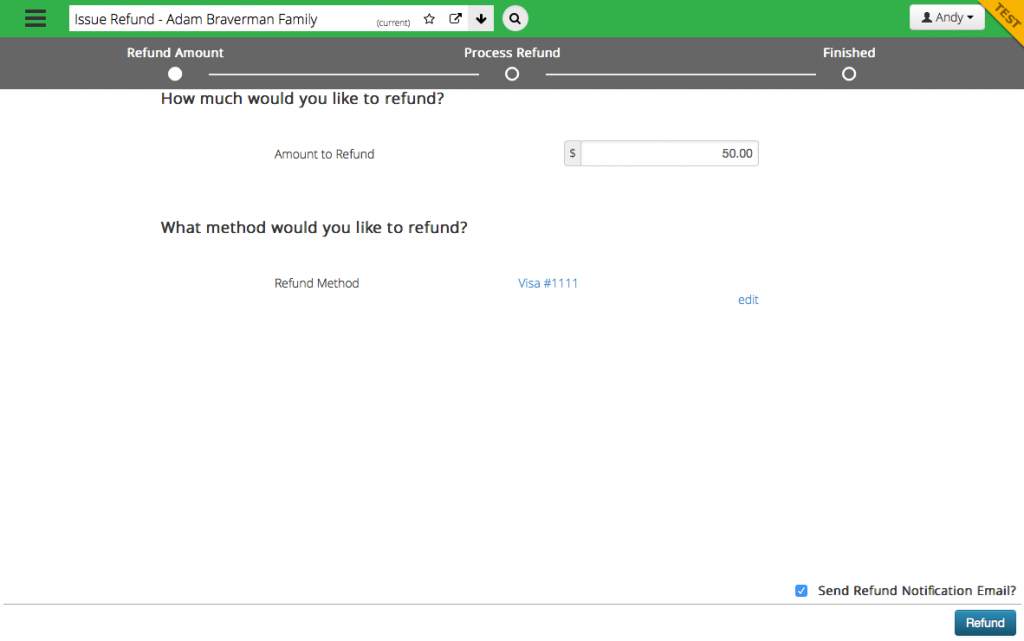
- Enter the amount to refund.
- Refund Method is determined by Payment Method, click Edit to change to a different method if needed.
- Check box to send Refund Notification Email [Manage > Automated Emails > Electronic Refund Notification].
Reprice Registration
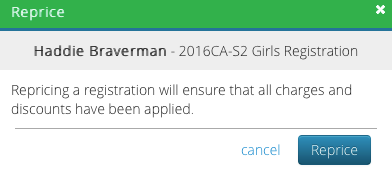
- Did a charge change or was a new automatic discount added? Click Reprice Registration to update the registration.
Add Line Item
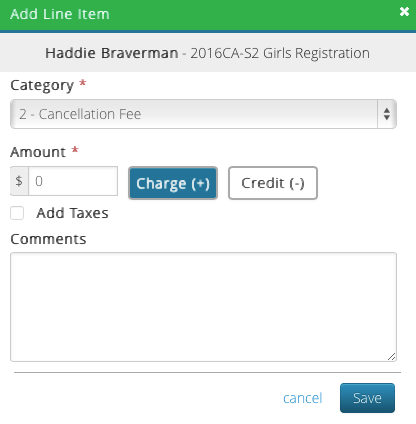
- Manually add a Line Item by selecting a an AR Category and by determining if it is a Charge or Credit.
Apply Discount
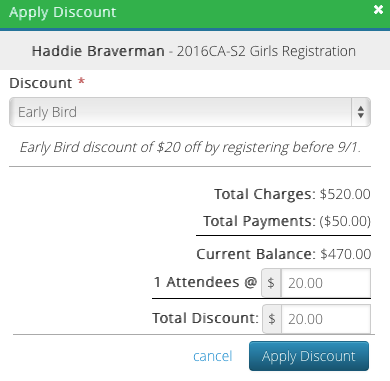
- Select a Discount and edit the Amount or Total Discount as needed to reduce the balance of the registration.
Donate Balance
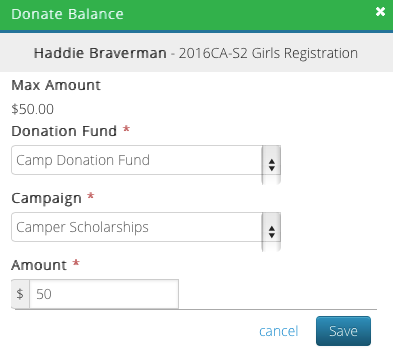
- Select the Donation Fund, Campaign and Amount to donate from the registration.
Apply Scholarship
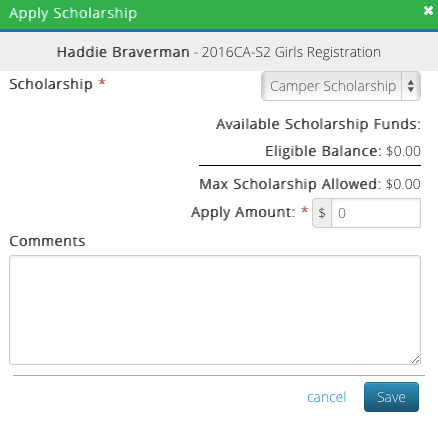
- Select a Scholarship and the Apply Amount as well as add any important Comments.
Cancel Scholarship
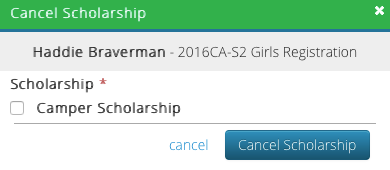
- Select which Scholarship to cancel and it will be removed from the registration.
Activities
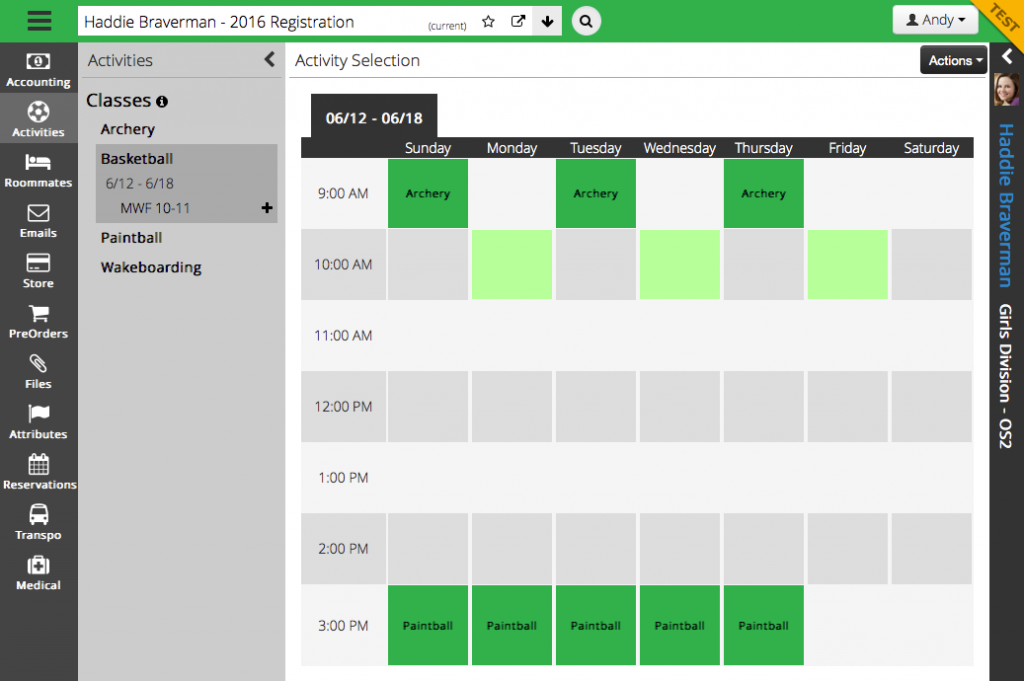
- Activity Selection is now similar to what customers experience on CT Registration Site.
- Select Activities from the list on the left or by clicking on an available time slot for class options.
- All Activity Reservations will now appear under Activities instead of under Reservations.
Roommates
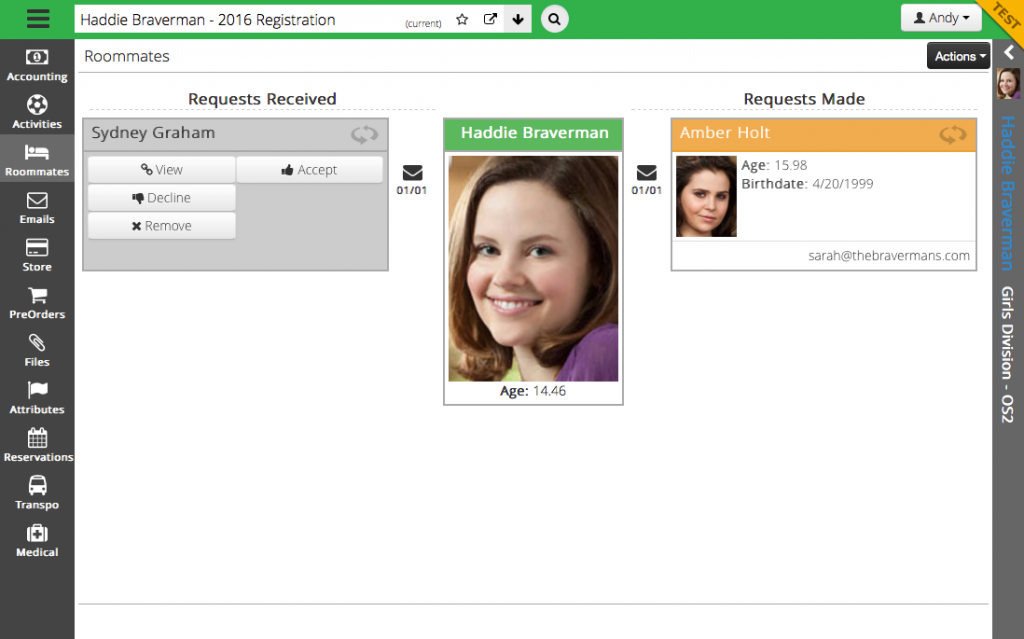
- View Roommate Requests that have been Received and Made by the Attendee.
- Flip the card to View, Accept, Decline or Remove the request.
Emails
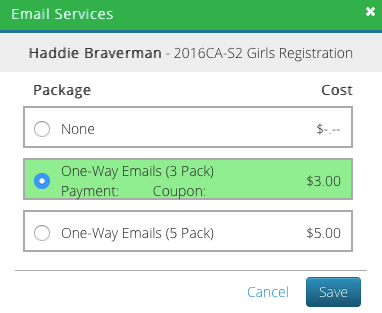
- Click Add Email Package to select a One-Way Email option from the list to grant access and add any associated charge to the account.
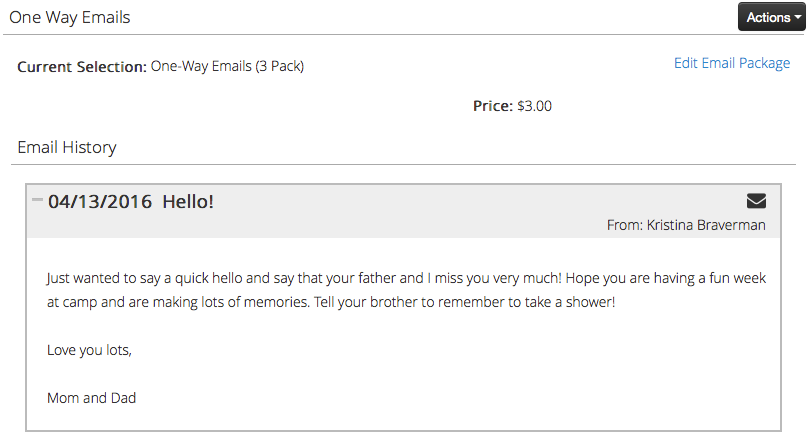
- Once an email is sent from a parent, it is displayed in the Email History.
- Click Edit Email Package to upgrade a parent to a different level.
- Once an email has been batched with the Attendee Emails in the Nightly Process, the icon will change from
 to
to  to alert you that it has been printed.
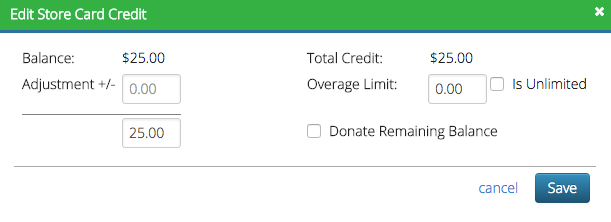
Store
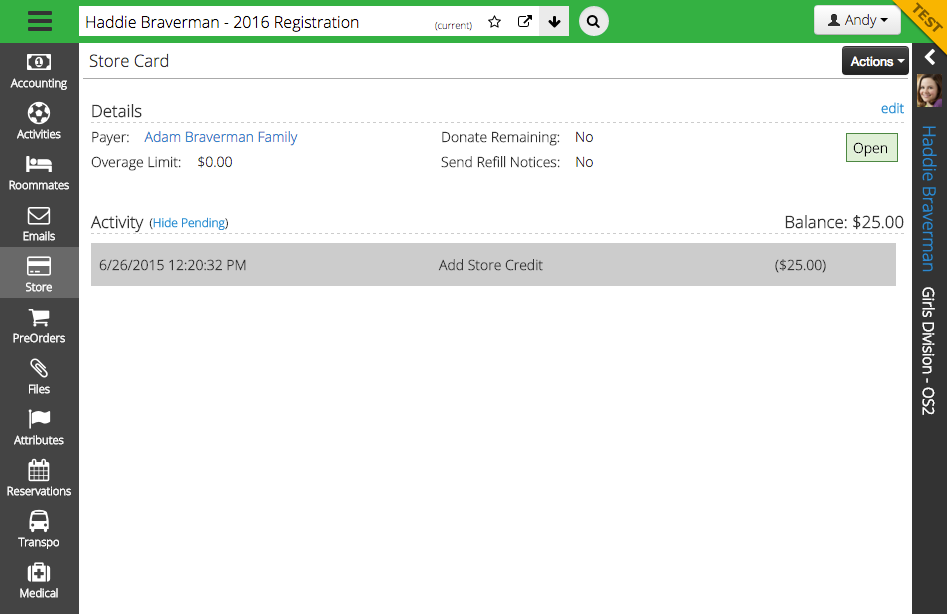
- View the current Balance on a Store Card as well as any activity from the Event.
- Click edit to make an adjustment to Store Credit, set an Overage Limit and check to donate any remaining balance.
Pre-Orders
- The ability to add a Pre-Orders to a Registration will be available in a future release.
Files
- Click here to read about how to add an Attachment.
Attributes
- Click here to read about how to enter information into Attributes.
Reservations
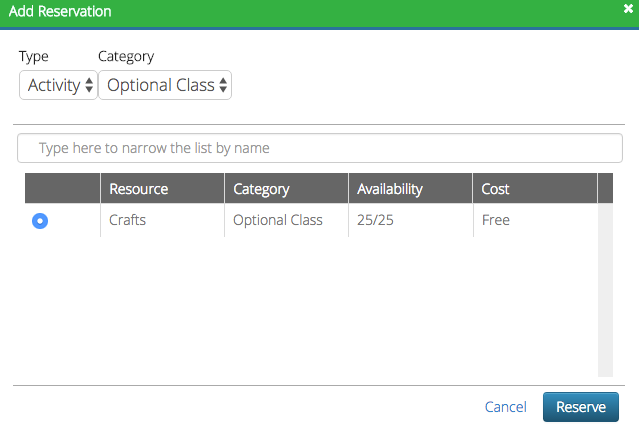
- Click Add Reservation to reserve available Resources for an Event.
Transportation
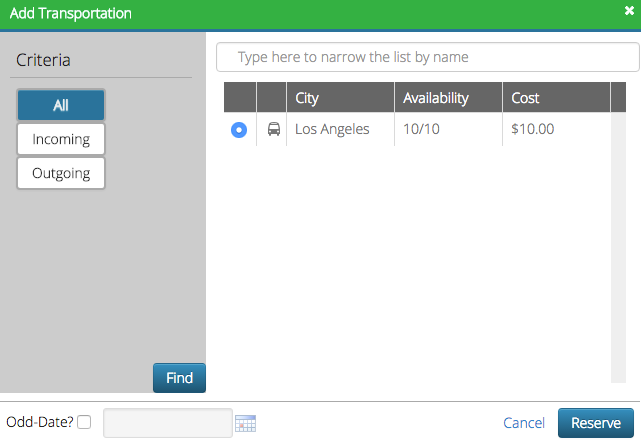
- Reserve Incoming or Outgoing Transportation.
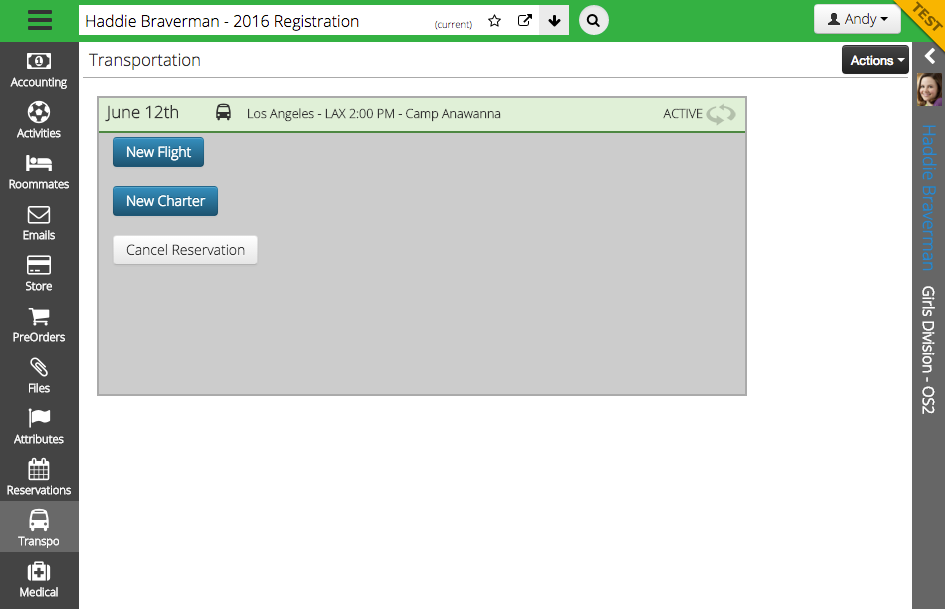
- Once reserved, flip the card to add a New Flight or a New Charter.
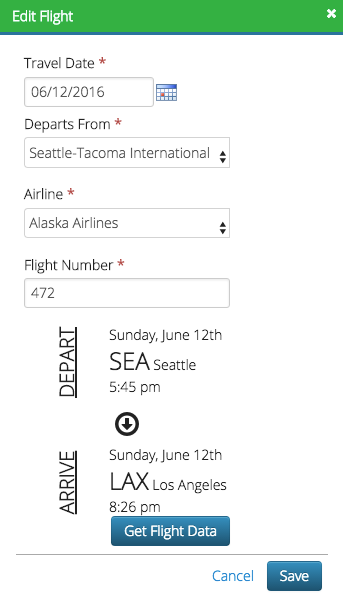
- Enter the flight information and then click Get Flight Data to stay current on the departure and arrival times.
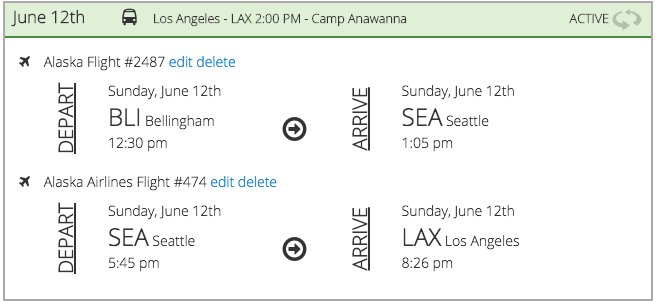
- View flight data at a glance on the front of the card.
Medical
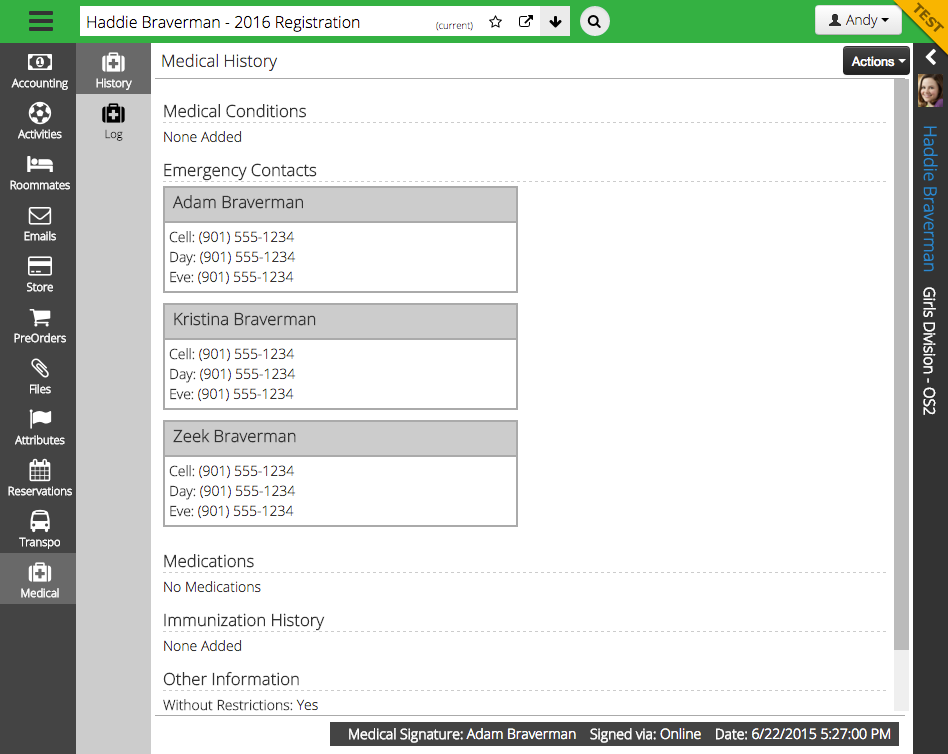
- See Medical History and Log as well as the signature and date from the Medical Form.
Feedback
Post any comments that you have below or head over to the CT6 Feedback Forum.