The following are instructions on how to install and configure the Posiflex CR-6300 Series Cash Drawer (with USB) for use with SalesLink.
Uninstall / Reinstall
If you are having issues with the cash drawer, that could be caused by either something not installed or downloaded properly. If you are uninstalling and reinstalling be sure to remove the device driver first and then remove POS for .NET. After that is complete, install POS for .NET again and then the device driver.
Install POS for .NET
The first step is to install POS for .NET. Instructions on how to do so are here:
Download & Install
- Go to Posiflex’s website to download the latest OPUS driver.
- Once the download is complete, rick click on the file and select Run as Administrator.
- When asked, make sure to choose to install the Cash Drawer.
- After installation is complete, a window for Cash Drawn Configuration will open, close this.
Posiflex Configuration
Warning – The next steps may vary with future releases of the device driver
- Make sure the case drawer is plugged in. This step is complete when you see the cash drawer in your list of Devices and Printers.
- In your list of programs, go to Posiflex OPOS Manager.
- Right click and select Run as Administrator.
- In the Posiflex Control Manager, set the Control Object to Monroe CCO.
- Click the default Device Class on the left. If there is not one listed, the next step will create a new Device Class.
- Set the drop downs on the right:
- Change Device Class to CR-Cash Drawer.
- Enter a Device Name.
- Set the Port/IP addr to USB.
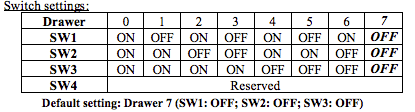
- Set the Drawer Open Code to 8-Drawer 7. Recommended to keep the default setting of 7.
It is recommended that the Drawer Open Code stay at the default setting of Drawer 7. If this needs to be changed, here are the steps to do so:
- Find the dip switches on the back of the unit.
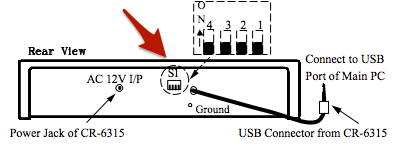
- Follow the guide to change the drawer code.
Notes
- Determine which direction is ON, typically it is indicated with a label or an arrow.
- If the dip switches are set closest to ON then they are ON.
- Switch 4 is used for maintenance and should be set to OFF.
- If there is not a default Device Class, click Add Device. If there is a default Device Class, click Update Device.
- Close the manager and reopen to allow the configuration to take effect.
- Click Check Health, this should open the cash drawer.
- If this is successful, restart your computer.
SalesLink Configuration
- Find SalesLink and right click and select Run as Administrator.
Quick Tip – Selecting Run as Administrator does not have to be selected each time SalesLink is opened. During hardware setup, it helps to bypass several issues.
- Go to Tools > Hardware.
- Click Refresh Devices.
- Check Use Cash Drawer.
- Select the cash drawer that was just setup.
- Click Connect.
- This may take a moment. If the button doesn’t turn to Disconnect, it may be disconnecting a previous configuration. Try clicking again.
- If an error message appears, most likely something was not configured correctly. In this case, repeat the installation and configuration process.
- Once the button switches to Disconnect, the cash drawer has been connected successfully.
- Click Open to test.