The following is an installation guide for installing the drivers for a MiniMag II Model # IDBM-3341xx series for use in CT5.
Install POS for .NET
The first step is to install POS for .NET. Instructions on how to do so are here:
Uninstall / Reinstall
If you are having issues with the card reader, that could be caused by either something not installed or downloaded properly. If you are uninstalling and reinstalling be sure to remove the device driver first and then remove POS for .NET. After that is complete, install POS for .NET again and then the device driver.
Download
Important – Follow these instructions carefully to ensure that your credit card reader will be setup properly.
- Click on the link to download the OPOS Driver from ID TECH:
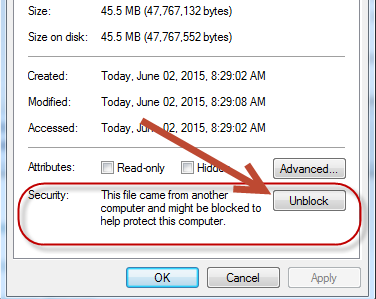
- Once the file is downloaded, right click and select Properties.
- A dialog box will open, check under Attributes for a Security section:
- If the Security section is not present, click OK.
- If the Security section is present, click Unblock and then Apply and then OK.
- Right click on the file that was downloaded and click Extract All.
- Check the box next to Show extracted files when complete.
- Open the folder and right click on setup.exe and select Run as Administrator.
- When asked “Do you want to allow…”, click Yes.
- Go through wizard to install the driver and then restart your computer.
Configuration
After your computer has restarted:
- Plug in the card reader.
- Go to Control Panel > Hardware and Sound > Devices and Printers.
- Find the card reader in the list. It should be under Devices and show a keyboard icon.
Since the device is not showing up correctly, you will need to download the MiniMag Configuration Tool that will help change the device to the correct mode.
- Click the link to download the tool:
- Right click on the download and click Extract All or Unzip.
- After the extraction is complete, open the folder and right click on setup.exe and select Run as Administrator.
- Complete the installation wizard.
- In your list of programs, open MagSwipe Configuration Utility.
- Click Select Reader Interface.
- Make sure your card reader [only one at a time] is plugged in and click on the radio button for the USB plugin on the far right image.
- A device should show in the combobox at the bottom, click Continue.
- The device should beep three times.
- Click on Change Advanced Reader Settings.
- Confirm that under USB HID Format that the radio button next to ID TECH USB HID Keyboard radio button is selected.
- Click Send to MSR at the bottom of the screen. The device will beep.
- Go back to Devices and Printers to confirm that the card reader shows under Devices with a keyboard icon.
- Once this is complete, continue on to SalesLink Configuration.
SalesLink Configuration
- Find SalesLink 5 and right click and select Run as Administrator.
Quick Tip – Selecting Run as Administrator does not have to be selected each time SalesLink is opened. During hardware setup, it helps to bypass several issues.
- Go to Tools > Hardware.
- Click Refresh Devices.
- Check Use a Card Reader.
- Select MiniMag II USB KB in the dropdown and click Connect.
- If it does not show up, click on Refresh Devices and check again.
- If it still does not show, remove the driver and try again.
- Once the button switches to Disconnect, the cash drawer has been connected successfully.
- Create a test order and go through checkout to make sure that the card info is inserted correctly.