Activities allow you to offer different options to your attendees while they are attending an event. Activities are a type of resource in the CircuiTree system, so the will show up under reservations when one is selected by an attendee. As with other resources, they are able to be allocated to an event or event division as needed.
To allocate an activity to an event you will navigate to:
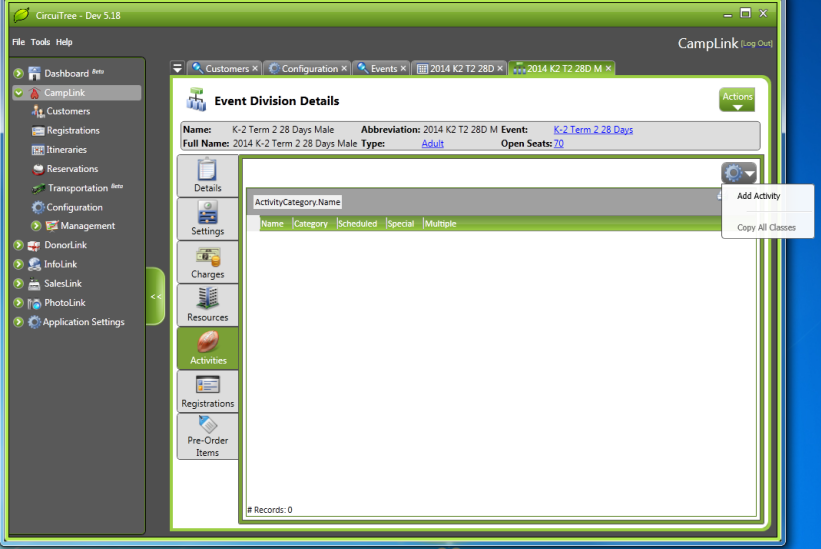
CampLink > Configuration > Events > [specific event] > Activities tab > Add Activityto allocate an activity to an event division you will navigate to:
CampLink > Configuration > Events > [specific event] > Divisions tab > [specific Event Division] > Activities tab > Add Activity
Step 1: Select the Type of Activity
There are two types of activities in the CircuiTree system.
Activities without Scheduling: This type of activity is simpler to set up and is more commonly used when only a few options are available and class conflicts are not a worry. Because of the ease of selection, these types of activities are available for selection during registration.
Activities with Scheduling : This type of activity will allow you to specify the exact time that the activity will meet. This type of activity requires more time from your customer to select their schedule; however, you will be able to monitor class sizes more accurately and also be able to prevent scheduling conflicts.
Navigation: Schedule Activity Wizard > Type of Activity

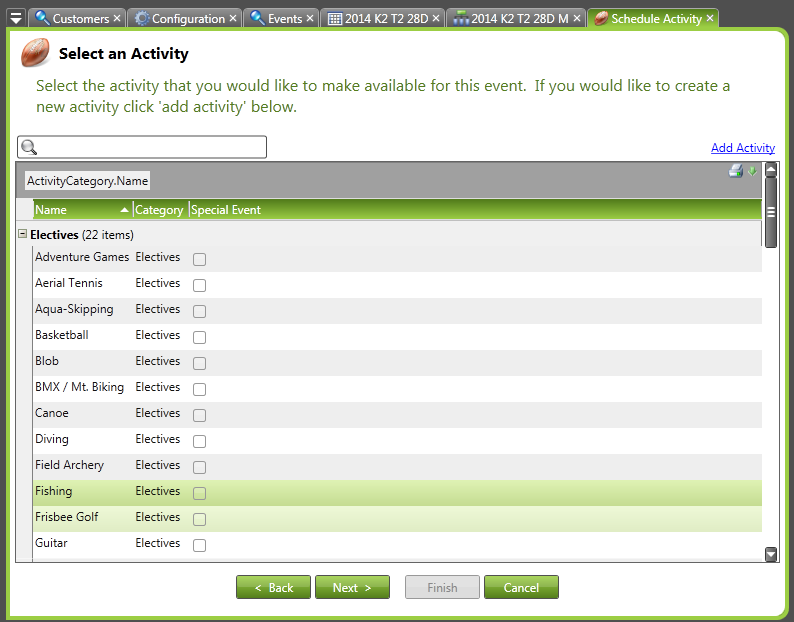
Step 2: Select an Activity
This step allows you select which activity you would like to offer to this event or event division. If you would like to create a new activity, click the “Add Activity” hyperlink at the right of the screen. To edit an activity, right-click on the desired activity and click “Edit”.
Navigation: Schedule Activity Wizard > Type of Activity > Select an Activity
Step 2a: Create New Activity
Activities are the different options you would like your attendee to select from. While defining activity names and descriptions, you are also asked some of the default values that can be set automatically when allocating to specific events or event divisions.
Navigation: Schedule Activity Wizard > Type of Activity> Select an Activity > Add Activity
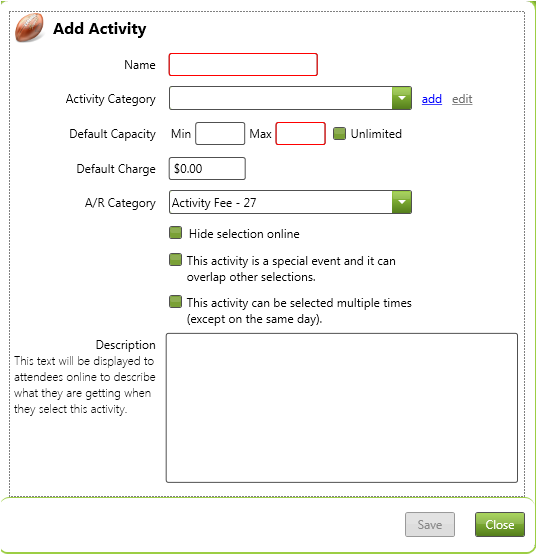
- Name (required) : The name of the activity (i.e. Basketball)
- Activity Category (required): The category of activity that this is. This is used for grouping and minimum and maximum requirements when attendees select activities
- Default Capacity: Determines the default values used when allocating activities to events. A maximum is required when the activity is not unlimited.
- Default Charge: This is the default amount that will be charged to the attendee when it is selected. This value can be changed per allocation.
- A/R Category: This is the accounts receivable category that will be used to assign GL codes to charges that are incurred by this activity. By default, this is set to Activity Fee – 27.
- Hide Selection Online: This is the default value given to activities when allocated. If checked, then this activity will not show up online when attendees select activities.
- Special Event: When checked, this activity has the ability to overlap other activities when selected. This is used as a way for you to prioritize different classes by importance. Example: Suppose you offer an activity called “Amusement Park” which is a trip that happens once a week, and you also offer “Tennis” every day. You want an attendee to be able to select “amusement park” and “tennis”, but the amusement park activity will override any other activities when/if it conflicts with Tennis (so that someone could go to tennis every day but Wednesday when he goes to the amusement park.) To configure this scenario, you must set the Amusement Park activity as a “Special Event”, and the system will allow the attendee to select both classes without any conflict messages.
- Allow Multiple Selections: When checked, this activity will be allowed to be selected more than one time during the event as long as the classes are offered on different days.
- Description: This is the text that will be displayed to the attendee when the activity is selected. Use this field to help attendees determine what the activity is and what makes it special at your campus. Tip: This field will render as HTML on the website. If you feel inclined to make your activities stand out, this would be a great way to do it.
Step 2b: Create New Activity Category
Navigation: Schedule Activity Wizard > Type of Activity> Select an Activity > Add Activity > Add Activity Category
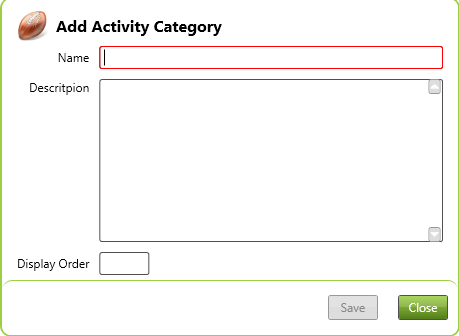
- Name (required) : The name of the activity category (i.e. Sports)
- Description: This will be displayed to your customers under the category name when selecting online.
- Display Order: Used to set the sorting of categories when displayed online.
Step 3: Set Activity Times and Dates
The activity dates are used to determine when the activity will meet. If the activity is with scheduling, you also will be able to tell us when the class will meet. Navigation: Schedule Activity Wizard > Type of Activity> Select an Activity > Activity Dates
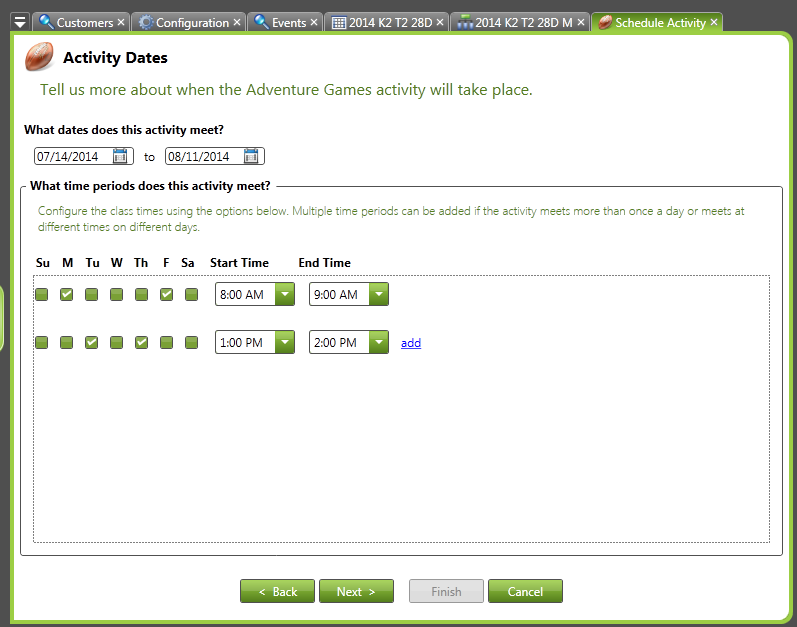
The first set of dates defines the date range the activity will meet. This is defaulted to the selected event begin date and end date.
The time periods are the times this activity will meet during this event.
NOTE: If your activity does not require scheduling then the time periods grid will not be displayed
NOTE: Once a class has an active reservation, no changes are allowed to class times or dates.
Example: If your class meets on Monday and Friday from 8-9 am and Tuesday and Thursday from 1 to 2 pm, then you would create 2 time periods:
- One with “M” and “F” check and the Start Time set to 8:00 am and the End Time set to 9 am.
- The other time period would have “Tu” and “Th” checked, and the start time would be 1pm and the end time would be 2pm.
Step 4: Associate Activity With Event(s)
This step allows you to share your class with other events occurring during the same time frame. For example, if you have a basketball court that is shared by multiple events during the same time, this will allow you to have one basketball class that is shared with any number of events. It is important to realize that if you choose to share the allocation with other events instead of creating a new allocation, all the same settings will be shared with the other events, including max capacity and charges.
By default, the event or event division that was selected to add the activity will be displayed. To add more events or event divisions, click the Add button at the top right of the tab. To remove an event or event division, you can right-click the desired row and click Remove.
Navigation: Schedule Activity Wizard > Type of Activity> Select an Activity > Activity Dates > Select Events
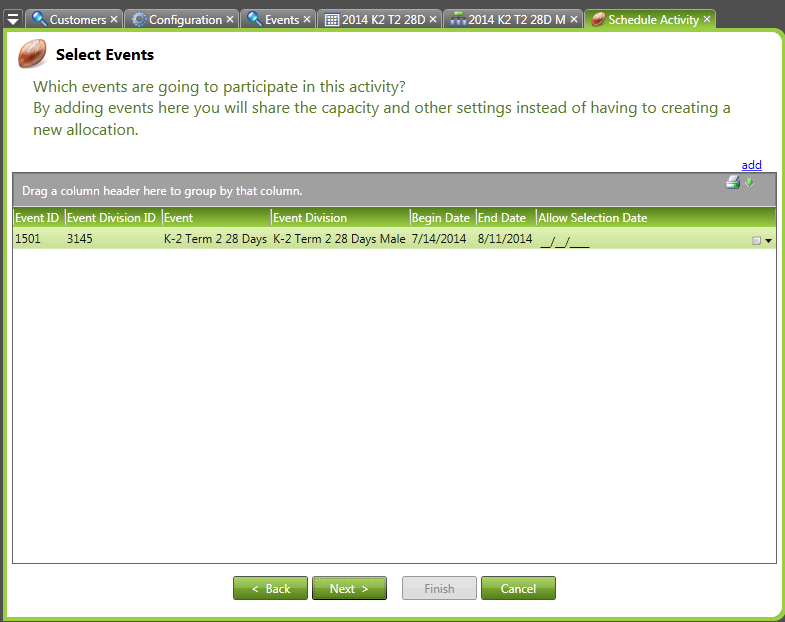
- Allow Selection Date: This date determines when the attendees will be allowed to select activities. If the date is left blank, then it will be available immediately.
NOTE: Any change made to the Selection Date will be effective to all activities for that event or event divisions.
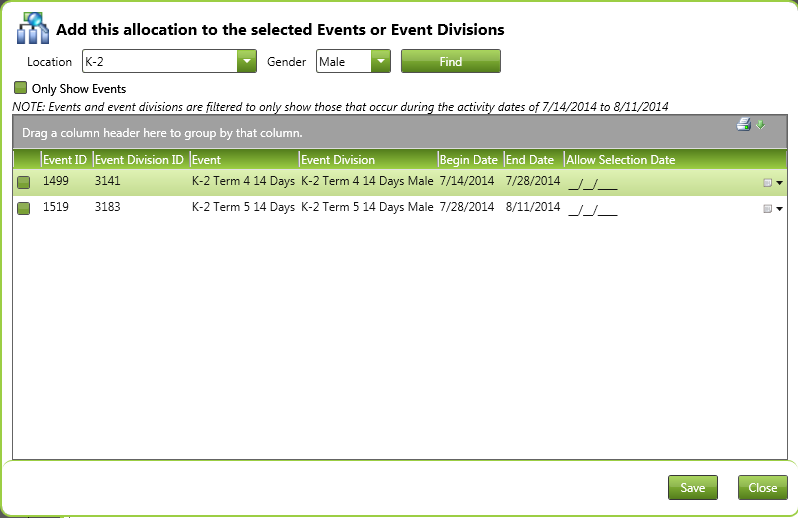
Step 4a: Add Shared Allocations
This screen will allow you to share the activity with other events that are occurring during the same time frame. You must select whether you are going to share with an entire event or event division. To swap between the two different modes, check the “Only Show Events” checkbox.
NOTE: Events and Event Divisions are filtered to only show events that occur during the dates the activity is active. (To change the dates of the activity see Step 3: Set Activity Times and Dates.)
Navigation: Schedule Activity Wizard > Type of Activity> Select an Activity > Activity Dates > Select Events > Add Shared Allocation
Step 5: Set Activity Options
This step allows you to override the default values that were defined when you created the activity.
NOTE: Minimum and Maximum Capacity mean that you are requiring a certain amount of activity selections for that activity category. So if you select 1 for the Minimum Capacity, the registration wizard will not let registrants move past this step until they select an activity.
Navigation: Schedule Activity Wizard > Type of Activity> Select an Activity > Activity Dates > Select Events > Activity Options
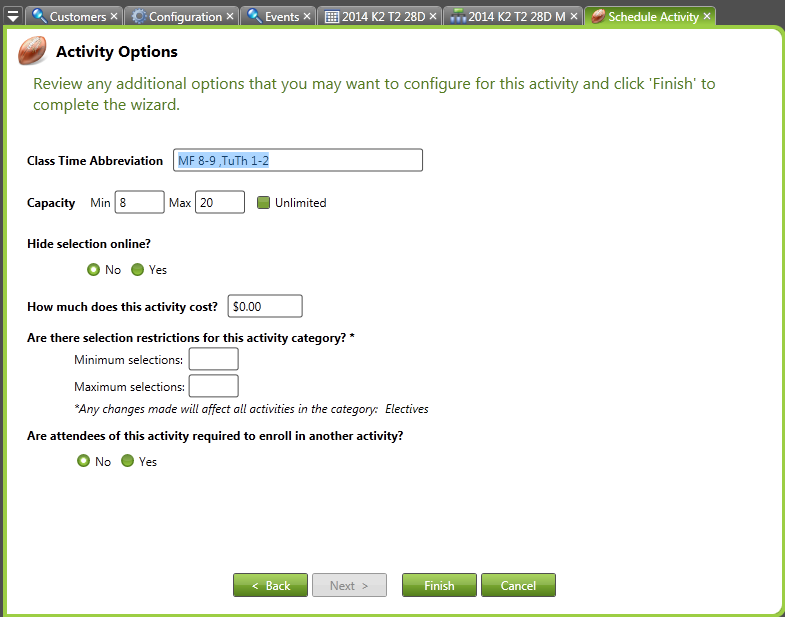
- Class Time Abbreviation: This used to help distinguish between different classes for the same activity.
- Capacity: The capacity of the activity. NOTE: If this activity was shared with multiple events, the capacity is shared with all the events.
- Hide Selection Online: If Yes is selected, then the activity will not be shown to customers online.
- Activity Cost: The cost of the activity that will be applied to the are attendee’s registration when this class is selected.
- Minimum Selections: The minimum number of selections that must be made for this activity category.
- Maximum Selections: The maximum number of selections that can be made for this activity category.
- Require Another Activity:If Yes, this will allow you to automatically enroll the attendee in another activity if selected. This feature can be used for “Add-On” activities that are optional for attendees of another class. Example: You offer a Basketball class, and you want to offer attendees a Shooting Hoops class after the basketball class. However, the only people that will be allowed to take the Shooting Hoops class are those that enrolled in the Basketball class. In this scenario, you would set the Shooting Hoops class to require the Basketball class. When attendee selects the Shooting Hoops class, he will also be automatically enrolled in the Basketball class.
Step 6: Accept Options and Complete Process
Click Finish to save all changes. To modify any of the settings, go to the event or event division details and right-click on an activity click “Edit Activity”.