Contents
Are you manually tracking camper check-ins on multiple pieces of paper and trying to keep everything organized? Then the Check-In feature is for you!
This feature allows you to check in Attendees, Staff and Guest Groups using a simple interface. As people arrive, you can confirm their housing, pay off a balance due, check-in medications, upload a photo and assign a wristband to use in SalesLink or Heath Center.
One of the challenges facing anyone who sends someone away to camp or a retreat is knowing that they got there safely. Check-In allows your staff to verify that someone has arrived at an event and automatically notify the relevant people when that occurs.
Webinar
Check out this webinar from our “Summer Prep” series:
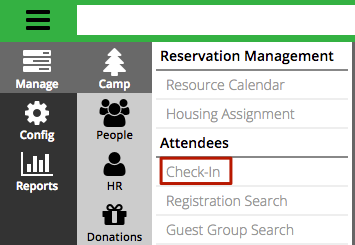
In CT6, go to Manage > Camp and then select Check-In.
Criteria
On the Attendee Check-In screen, use the Criteria on the left to narrow down the list of results.
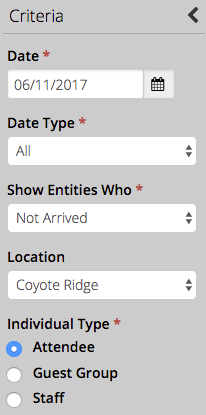
- Date – Defaults to today’s date.
- Date Type – Select between All, Arrival or Departure.
- Show Entities Who – Select between All, Not Arrived, Check-In or Checked-Out.
- Location – Choose the Location where you are checking in Attendees.
- Individual Type – Select Attendee, Guest Group or Staff.
Under More are the following options:
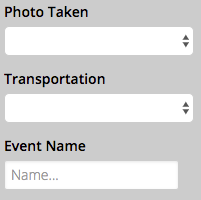
- Photo Taken – Choose between Has Photo Taken or Doesn’t Have Photo Taken.
- Transportation – Select Yes or No.
- Event Name – Enter a specific Event Name that you want to filter by.
Results
Under Criteria, select Find to view the Results.
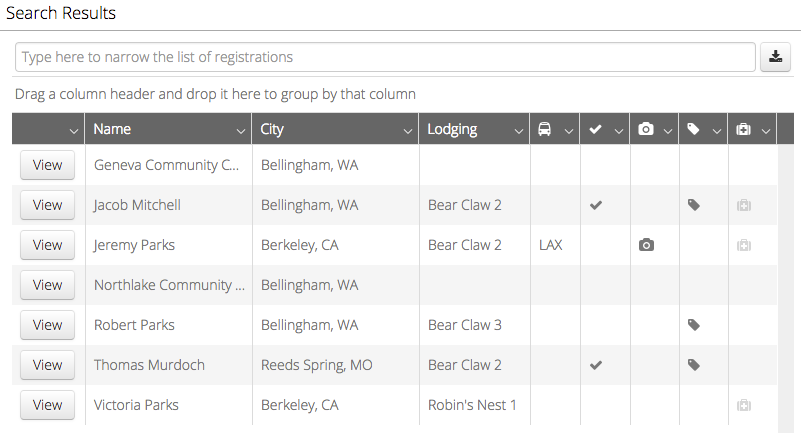
- Filter Bar – Use the filter bar at the top to search for a specific individual.
- Name / City / Lodging –
- Icons – From left to right the icons represent different information.
 Transportation
 Check In Status
 Photo Uploaded
 Wristband Assigned
 Medication Check-In
- View – Once you have found the Attendee you wish to check in, select View.
Day Camp
If you are using Check-In for a Day Camp (i.e. checking in and out multiple times during the same Event), and you assigned wristbands to Attendees, follow these steps to speed up the process:
- Select the
 icon next to the Filter bar.
 - Select Alt ID.
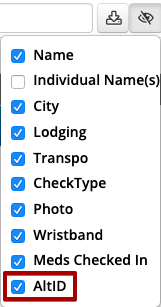
- Now, in the Filter Bar you can scan the Attendee’s wristband to pull up the Attendee’s record.
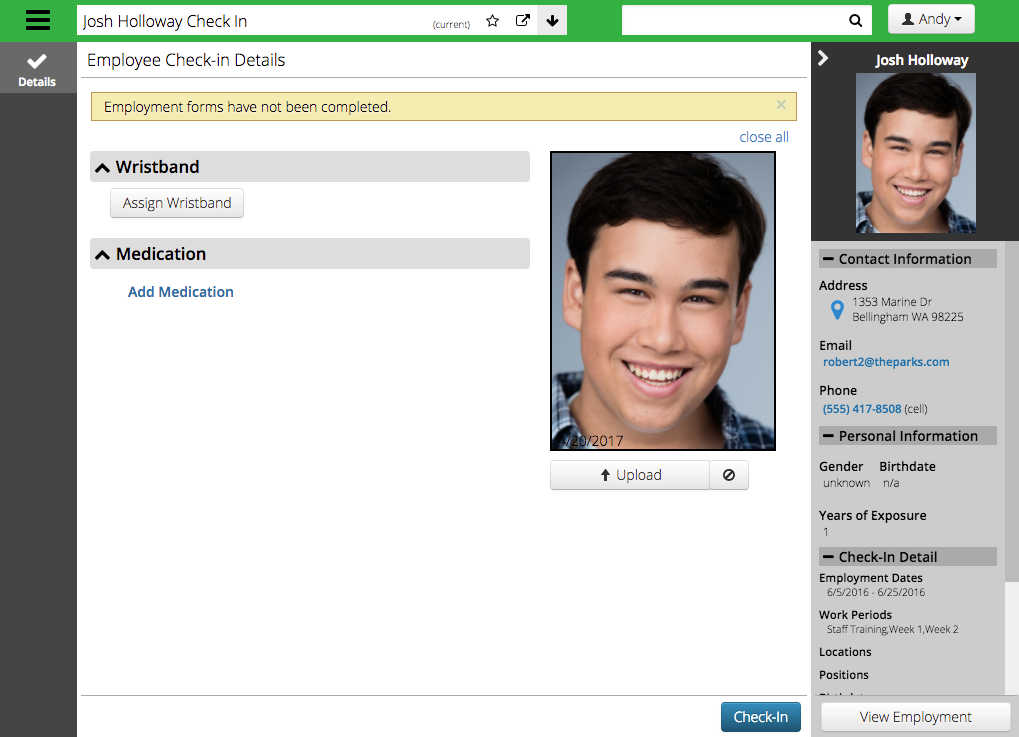
Attendee Check-In Details
This screen allows you to perform many different tasks as well as look up information for the Attendee.
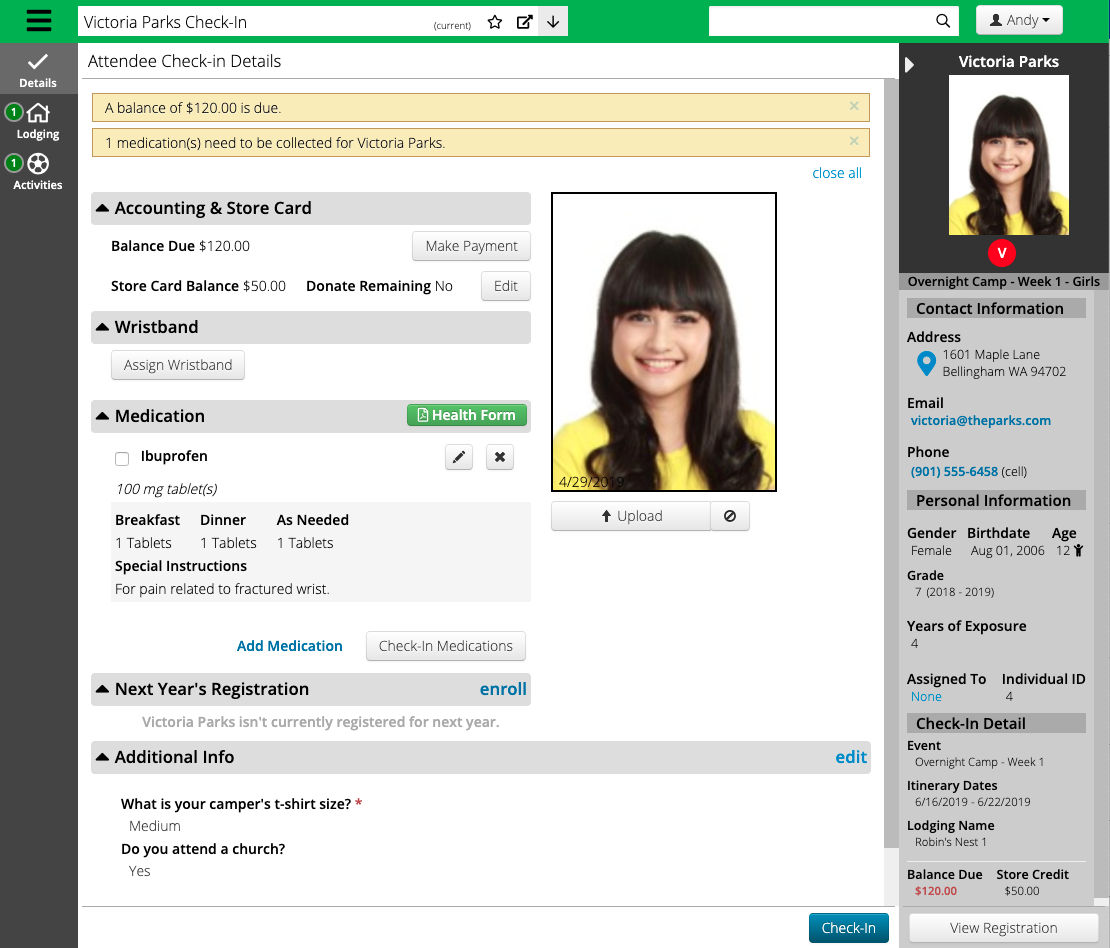
Notifications
The yellow bars at the top of the screen display important notifications for this Attendee.
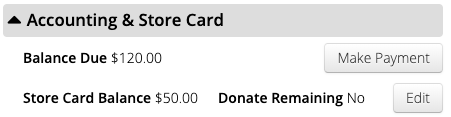
Accounting & Store Card
Select Make a Payment to pay off a balance. Select Edit to add credit to a Store Card.
Wristband
Select Assign Wristband, scan a barcode and then select Assign. The barcode can then can be scanned when using SalesLink or Health Center to look up the Attendee.

Once a wristband is assigned, you can either remove it or re-assign it.
![]()
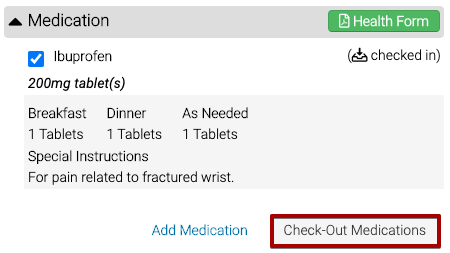
Medication
There are several different task that can be completed in this section.
Check-In
- To check-in a medication, select on the check box next to the medication and select Check-In Medications. Filter by Checked-In Medications under Scheduled Medications.
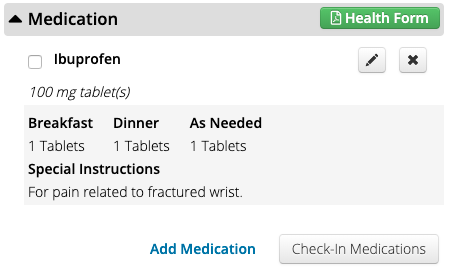
- Select Add Medication to add a new one.
 Select to edit an existing medication.
 Select to remove an existing medication.
- Select Health Form to download a PDF of the Attendee’s Health Form.
Check-Out
- Select the Medication and then select Check-Out Medication.
Next Year’s Registration
During Check-Out, look to see if the Attendee is registered for next year. If not, select Enroll to open the Registration Wizard to register the Attendee for an Event in the future.

Additional Info
Any Attributes that has Show on Registration will appear in this section. If you need to fill out an Attribute, select on Edit.
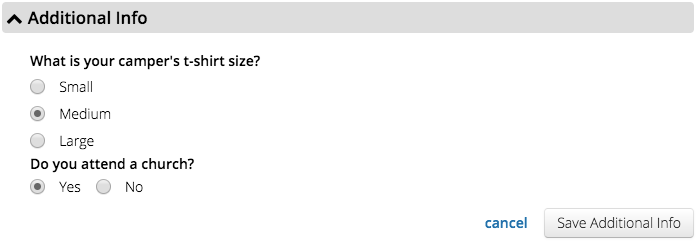
Once the Attributes have been updated, select Save Additional Info to view the results.

Photo Upload
Follow these steps to upload a photo:
- Select Upload.
- Take a photo with your device.
- Move the box to crop the face of the Attendee.
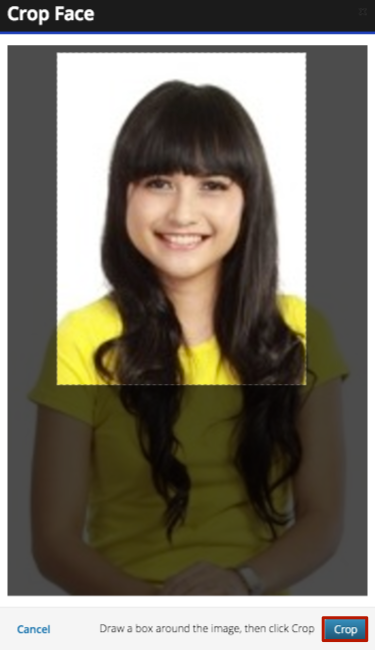
- Select Crop to save the photo.
Check-In / Check-Out
Select the Check-In button to check the Attendee in and return to the Attendee Check-In screen. Once they are checked-in, the button will change to Check-Out which allows to check them out.
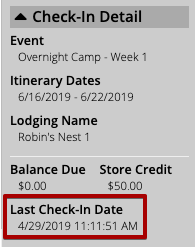
Once an Attendee is Checked-In, the Check-In Detail in the Summary will display the Last Check-In Date.
View Registration
Select View Registration in the Summary to open up the Attendee’s registration.
Reservations
Icons with numbers next to them indicate Reservations for the Attendee. Select the icon to view a list of Reservations.

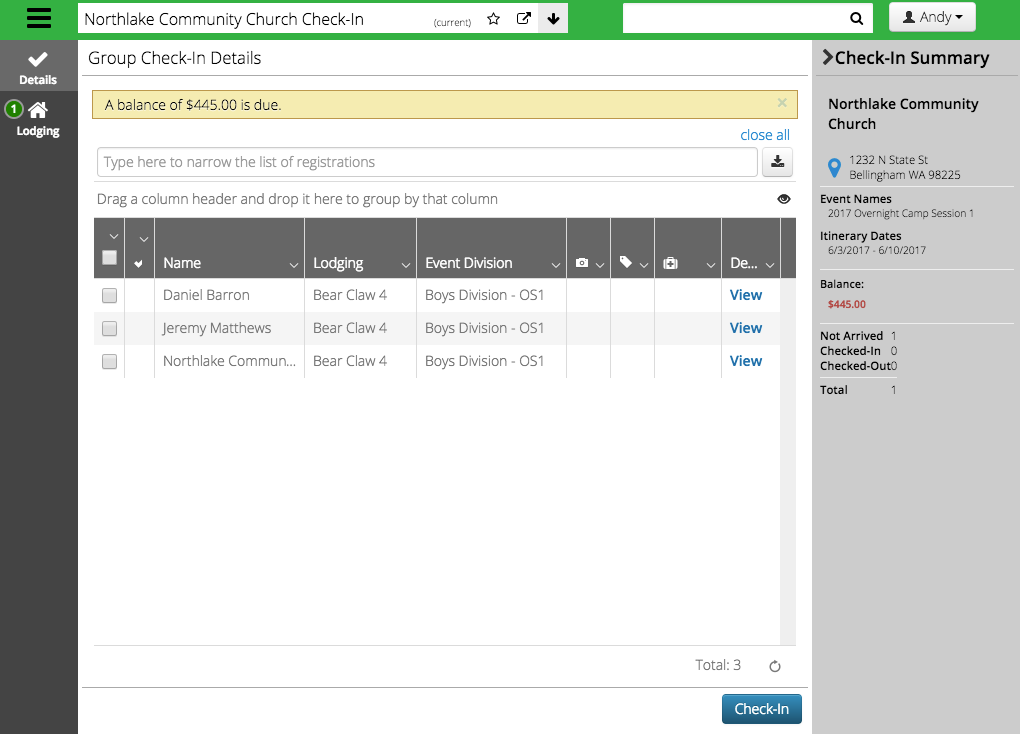
Group Check-In Details
To check-in a Group, select their name from the results and select View. On the Group Check-In Details page, you will see a list of named Attendees. Check the box next to their name and select Check-In.
Staff Check-In Details
When checking in Staff, you can assign a wristband, check-in medication and upload a photo.
Notifications
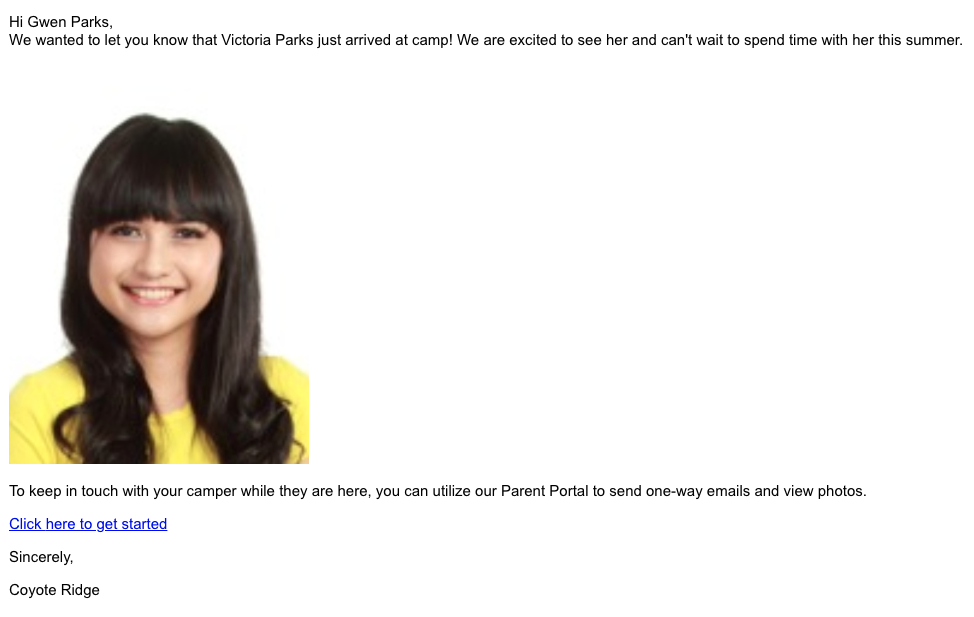
Once the check-in is performed, the Guest Check-In Automated Email will be sent to all Administrators of the Family. How do I edit Automated Emails?
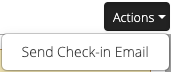
After the Attendee is Checked In, you can manually send the Guest Check-In Email by going to Actions > Send Check-in Email.
Application Settings
There are several settings that are used to control the Guest Check-In Automated Email which can be found Application Settings > Registration.
- SendAttendeeCheckinEmail – Uncheck to turn off emails.
- CheckinPhotoOverride – Changes the default photo that is sent when no photo is uploaded by enter a URL.
- CheckinPhotoPad – Set the number of minutes after check-in to send the email.
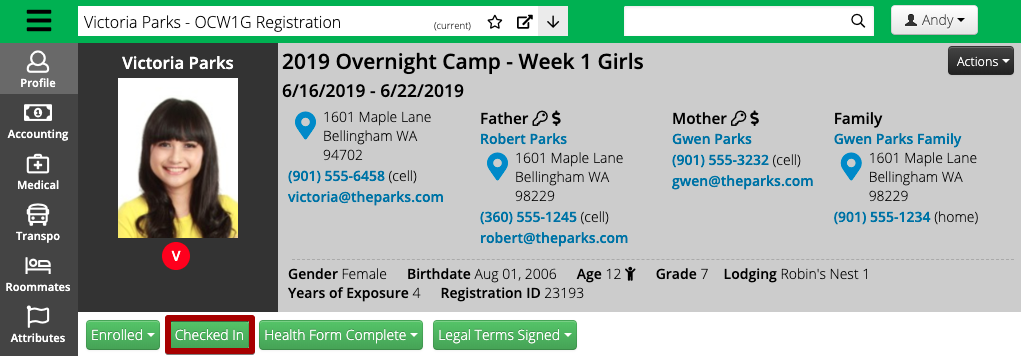
CT6
On the Registration Profile screen, you can see when an Attendee is Checked-In.
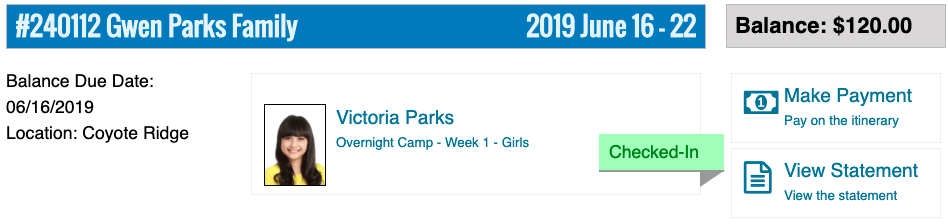
Registration Site
A parent can login to the Registration Site to see the Checked-In status of their camper.
Security Privileges
The following security privileges are needed in order to access different parts of Check-In.
- Check-In – Access Management Section
- Perform Check-In – Preform Attendee Check-In and Out
- Assign Wristbands – Allow Modifications
- Upload Photos – Upload Photos