What is UPS WorldShip?
Save time and money by connecting WorldShip to SalesLink. Process shipments easily, respond to your customers faster, and reduce costly errors by integrating WorldShip today.
What will the integration accomplish?
In Worldship:
- It allows you to use the Keyed Import feature that allows you to type in a ShipmentID from the outstanding orders screen, and it will automatically fill in the name, address and package information into WorldShip. So, all they have to do is review the imported data and click Process Shipment.
In CircuiTree:
-
The Shipping manager will look at the local UPS database to see which shipments have been processed by the WorldShip End of Day procedure. For the packages that it finds, it will send the Web Store Order Shipment Notification automated email that will give the recipient a tracking number for the package.
Download UPS WorldShip
- Go to the following site to download the latest version of UPS WorldShip. Click on Download WorldShip Now.
Set Export Files
- Open CircuiTree and go to SalesLink > Shipping Manager.
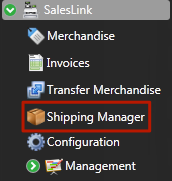
- When clicking on Shipping Manager for the first time, the Options box will appear. If it does not display, go to Actions > Options.
- Click the checkbox next to Integrate with UPS WorldShip.
- Select a location for the export files:
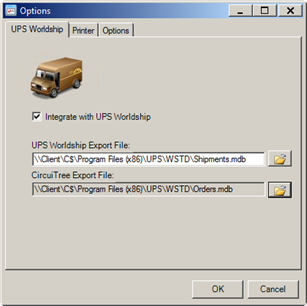
- UPS WorldsShip Export File – location of the database that WorldShip will automatically export after the End of Day process.
- CircuiTree Export File – database that WorldShip will look at for Keyed Import.
Import Shipment Data
- Use the following document to enable Keyed Import by using the Import/Export Wizard in UPS WorldShip.
- Make sure to select Small Package Shipments as the type of data to import.
- Use the location that you specified in the CircuiTree Export File for the DATA file location (Orders.mdb).
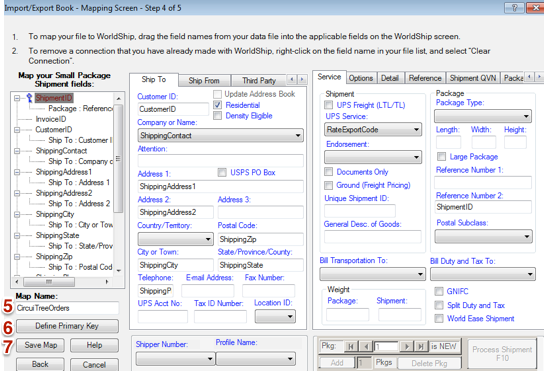
- Map the following fields.
| ODBC Data Source Field | WorldShip Field (Container::Field) |
|---|---|
| CustomerID | Ship To::Customer ID |
| Residential | Ship To::Residential Indicator |
| ShippingContact | Ship To::Company or Name |
| ShippingAddress1 | Ship To::Address 1 |
| ShippingAddress2 | Ship To::Address 2 |
| ShippingZip | Ship To::Postal Code |
| ShippingCity | Ship To::City or Town |
| ShippingState | Ship To::State/Province/County |
| ShippingPhone | Ship To::Telephone |
| ShipmentID | Shipment Information::Reference 2 (Reference Numer 2 on Reference tab) |
| RateExportCode | Shipment Information::Service Type (UPS Service on Service tab) |
- Click Primary Key and set to OrderShipmentID.
- Fill in the Map Name with CircuiTree Orders.
- Click Save Map.
Setup End of Day Procedure
Next, you will want to setup an Export to be run after the End of Day procedure. This will allow CircuiTree to send tracking number emails. We will use the Import/Export Wizard to help fill out some of the fields. However, some of the fields will need to be mapped outside of the wizard.
- Go through the Import/Export Wizard using the instructions in the following document:
- In Step #3, choose Export Small Package Shipments as the type of data to export.
- in Step #4, use the location that you specified in the UPS WorldShip Export File [defOut.mdb]. Use the ShipmentData table.
- Map the following fields:
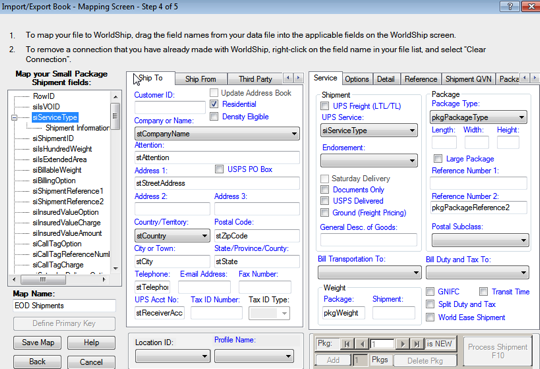
- In the Map Name field, enter EOD Shipments.
- Click Save Map.
- On the next screen, select Exit to WorldShip and click Finish.
Create / Edit Map
- In WorldShip, click Create / Edit Map.
- Select the map that was just created in the wizard, EOD Shipments.
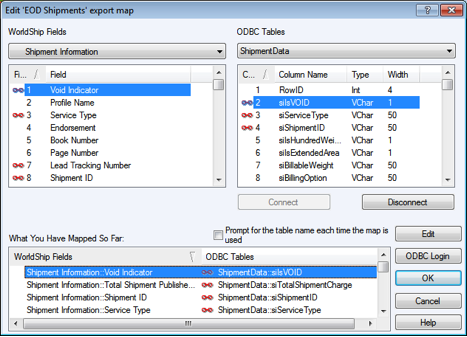
- Map the following fields in the Shipment Information section. Fields in green are needed for CircuiTree integration.
- Press the Field column header to sort the fields alphabetically, if needed.
- The fields that start with Package:: are listed under the Package information group. Click on the drop down in the top left of the screen where it says Shipment Information and change it to Package.
- The fields that start with Ship To:: are in the Ship To section. Most of these fields will have been mapped with the wizard.
| UPS WorldShip Fields | ODBC Database Fields |
|---|---|
| Shipment Information::Lead Tracking Number | pkgTrackingNumber |
| Shipment Information::Number of Packages | siNumberOfPackages |
| Shipment Information::Service Type | siServiceType |
| Shipment Information::Shipment ID | siShipmentID |
| Shipment Information::Total Shipment Published Charge | siTotalShipmentCharge |
| Shipment Information::Void Indicator | siIsVOID |
| Package::Reference 2 | pkgPackageReference2 |
| Package::Package Type | pkgPackageType |
| Package::Weight | pkgWeight |
| Ship To::Attention | stAttention |
| Ship To::Company or Name | stCompanyName |
| Ship To::Address 1 | stStreetAddress |
| Ship To::City or Town | stCity |
| Ship To::State/Province/County | stState |
| Ship To::Postal Code | stZipCode |
| Ship To::Country/Territory | stCountry |
| Ship To::Telephone | stTelephone |
| Ship To::Receiver UPS Account Number | stReceiverAccountNumber |
- When finished, click OK to save the changes and exit.
Testing
- To text the export, click Batch Export. This will export the last few weeks of information into the database.
- Go to SaleLink > Shipping Manager and select Import from UPS.
- This will read the data that was just entered, remove orders that were shipped and send customers a tracking number email.
Setup Export
- In WorldShip, go to Automatic Export > Export During End of Day > More. Select the new export that you just created.
- Go to Keyed Export > More and select the new import that you created.
- To test, in the Enter Import Key dialog box, enter a ShipmentID of an outstanding order shown in SalesLink > Shipping Manager.
