Overview
The Donations and Merchandise feature allows administrators to offer optional donations and merchandise during the registration checkout process. These options appear at the end of checkout, are included in the final payment total, and are applied once per order or itinerary regardless of the number of campers. Research has shown that offering add-ons at checkout can help increase overall purchase value.
Key Capabilities
- Optional donations during checkout with preset and custom amounts
- Merchandise sales during checkout with quantity selection
- Event-based configuration for donations and merchandise visibility
- Flat-rate shipping configuration for merchandise
- Real-time order total updates including donation, merchandise, and shipping
- Exclusion of donations from discounts and promo codes
Before You Begin
- Determine whether donations and/or merchandise should be enabled
- Define default donation amounts and messaging
- Identify which events should include these options
- Prepare merchandise items and shipping methods
Configuration
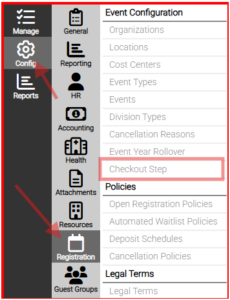
Step 1: Access Checkout Settings
- Navigate to: Config → Registration → Checkout Step
- Enable Donations and/or Merchandise as needed.
Step 2: Configure Donations
- Enable or disable donation prompt at checkout
- Setting to “Asked” is enabling the feature, Skipped is disabling the feature
- Select for which Event Reg Type(s) (Child, Family, Group, Self)
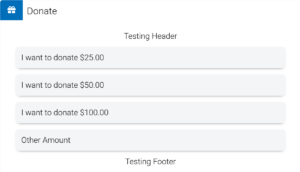
- Add optional header and footer messaging
- Assign Fund, Campaign, and Appeal
- Set up to three default donation amounts
- Allow custom donation amount entry
- Define which events will display donations
- Note: currently only one set of donation settings criteria is supported.
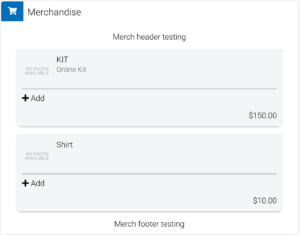
Step 3: Configure Merchandise
- Enable or disable merchandise at checkout
- Setting to “Asked” is enabling the feature, Skipped is disabling the feature
- Select for which Event Reg Type(s) (Child, Family, Group, Self)
- Add optional header and footer messaging
- Add merchandise items for sale
- Define which events will display merchandise
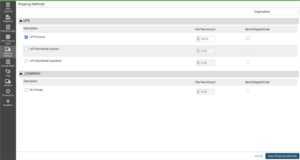
Step 4: Configure Shipping: Optional
- Optional: Add one or more shipping methods
- Assign flat-rate pricing to each method
- If only one method is available, it may be auto-applied
- If shipping cost is zero, shipping may not display to users
- An additional option for setting shipping cost per item sold is also an option
- Note: you can add shipping per item and/or per order. Shipping per item is set on the inventory item creation not in the shipping methods section under Saleslink config.
How It Works
- Donations and merchandise are added once per order
- All charges are included in the final payment transaction
- Donations are tracked in the overall Donation Search screens
- Note: this is not tracked in the registration details
- Merchandise orders are tracked in the Order Details search screen and the Shipping Manager
- Note: This is not tracked in the registration details. Also, these are not tracked as Pre-orders. They are treated as if the customer came to your webstore and purchased not as part of a registration.
- Shipping costs are applied based on selected method
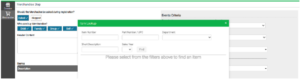
Example of the Donation Search screen with a new tab to show this is tied to the Check-out Process.

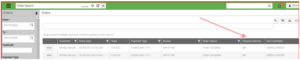
Example of an Order Search screen with the new column of Itinerary Merchandise indicating that this was sold during check-out.
Confirmation Email Updates – Optional
- Review your existingautomated registrationconfirmation email templates
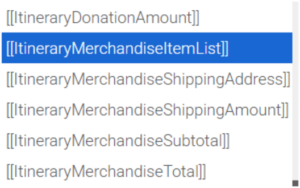
• Locate the new merge fields available for donations and merchandise – image below
• Update messaging to reflect the expanded transaction details that you would like to add
• Test the confirmation email to ensure all new fields display correctly