Contents
Types
There are two different types of Transportation:
- Charter – Provides a scheduled pickup once per location. For example,
- Shuttle – Provides an unlimited number of pickups per location. For example, a shuttle may pick up multiple times from the airport and return to camp.
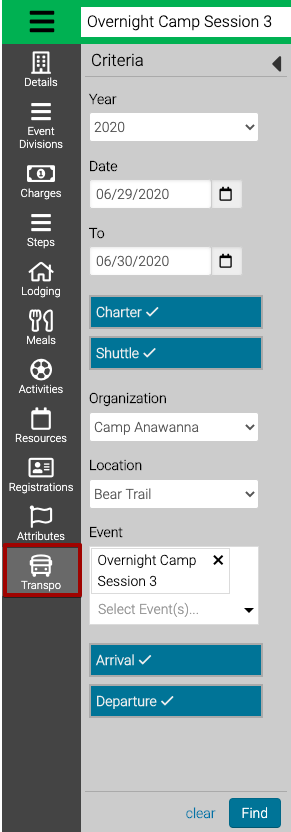
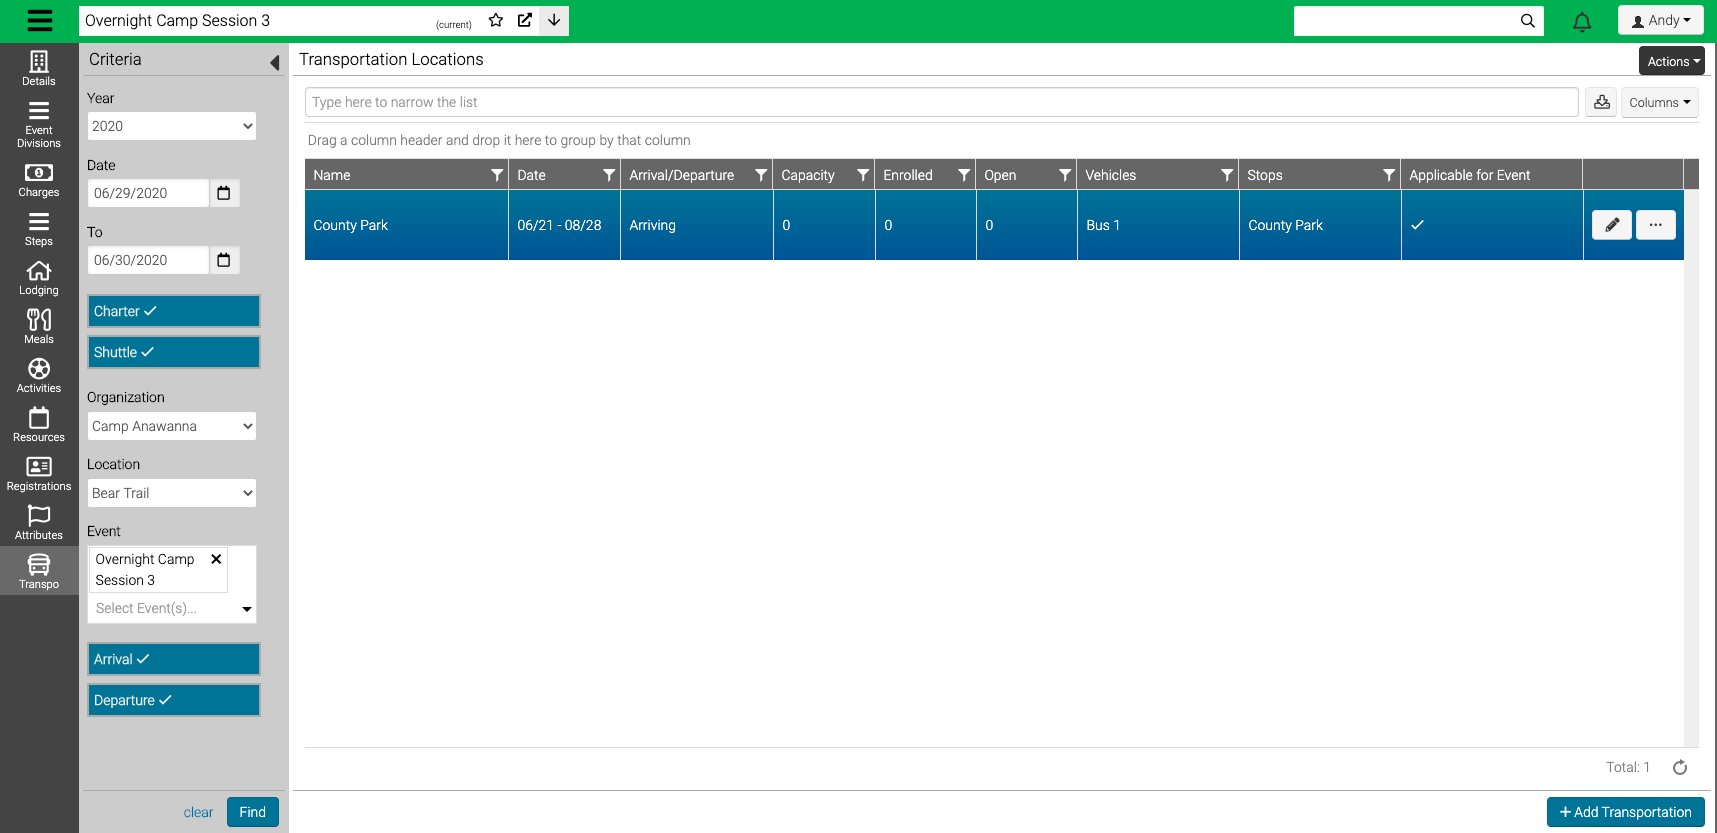
- Go to Manage > Registration > Transportation and select Search.
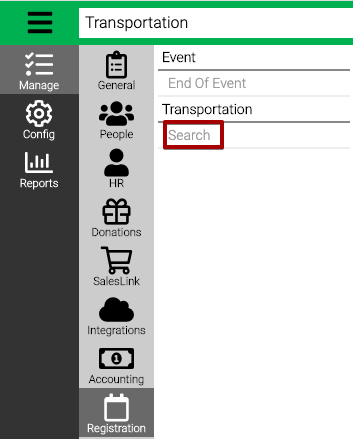
- Use the Criteria to filter the list and then select Find.
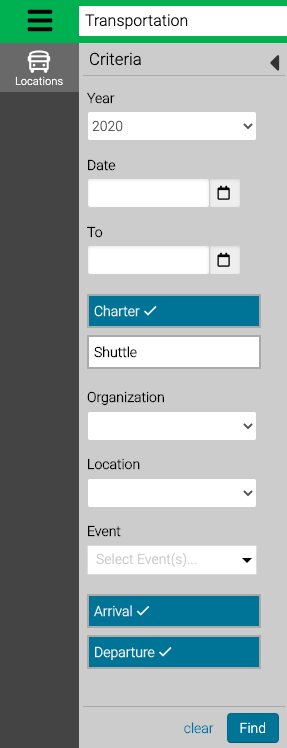
- Year – Select an Event Year.
- Date – Enter a date range for when Transportation is available.
- Charter – Select to display Charters.
- Shuttle – Select to display Shuttles.
- Organization – Select an Organization.
- Location – Select a Location.
- Event – Type in the name of an Event to filter the list and then select.
- Arrival / Departure – Select to show arrivals or departures (or both).
Add Charter
- From the Transportation Search screen, in the lower right hand corner, select Add Transportation.
- Fill out the information in the fields.
![]()
- Type – Select Charter – Provides a scheduled pickup once per location.
- Direction – Select a direction:
- Arriving – All vehicles transport attendees to the event from the trip locations.
- Departing – All vehicles transport attendees from the event to the trip locations.
- Date – Select a date for the Charter.
- Vehicles – Enter the information for the vehicle.
- Name – Enter a name, if none is added it will be autogenerated.
- Capacity – Enter the number of spots that are reservable in the vehicle.
- Unlimited – Select to allow unlimited reservations.
- Add Vehicle – Select to add another vehicle.
- Vehicle Locations – Enter the details for either a Pickup (Arriving) or Dropoff (Departure) location where the vehicle will be making stops.
- Location – Select a location or add a new one.
- Charge – Enter a charge for the reservations if needed.
- Load Time – The load time for this location. This information is displayed to attendees.
- Load Details – Any details for loading at this location. This information is displayed to attendees.
- Add Location – Select to add another location.
- AR Category – Select an AR Category for the charge.
- Select Save.
Add Shuttle
- From the Transportation Search screen, in the lower right hand corner, select Add Transportation.
- Fill out the information in the fields.
![]()
Quick Tip – Items denoted with Reg Site will be shown on the Registration Site to customers.
- Type – Select Shuttle – Provides an unlimited number of pickups or dropoffs per location.
- Direction – Select a direction:
- Arriving – All vehicles transport attendees to the event from the trip locations.
- Departing – All vehicles transport attendees from the event to the trip locations.
- Start / End Date – Select a date range the the Shuttle is available.
- Vehicles – Enter the information for the vehicle.
- Name – Enter a name, if none is added it will be autogenerated.
- Unlimited – Always selected as Shuttle provide unlimited pickups or dropoffs.
- Add Vehicle – Select to add another vehicle.
- Vehicle Locations – Enter the details for either a Pickup (Arriving) or Dropoff (Departure) location where the vehicle will be making stops.
- Location – Select a location or add a new one.
- Charge – Enter a charge for the reservations if needed. Reg Site
- Load Time – The load time for this location. This information is displayed to attendees. Reg Site
- Load Details – Any details for loading at this location. This information is displayed to attendees. Reg Site
- Add Location – Select to add another location.
- AR Category – Select an AR Category for the charge.
- Select Save.
Add Location
Enter the information for the Pickup or Dropoff locations that your vehicle will be making on its route.
- Under Vehicle Locations, select the drop down and then select Add Location.
![]()
- Enter the information in the fields.
![]()
Quick Tip – Items denoted with Reg Site will be shown on the Registration Site to customers.
- Name – Enter a name for the Location.
- Abbreviation – Enter an abbreviation to be used for reporting and places where the full name doesn’t fit.
- Description – Enter a description of the Location. Reg Site
- Address Name – Enter a name for the address. Reg Site
- Address / City / State / Zip – Enter an address. Reg Site
- Require Flight Information – If checked, you will be prompted to select an airport. In order for customers to complete their reservation, they will need to add their flight information. Reservations that are started but not completed will have the status of On Hold. Reg Site
- Apply Cancellation Fee – Check box to apply a cancellation fee if the reservation is cancelled.
- Notes – Add internal notes.
- Select Save.
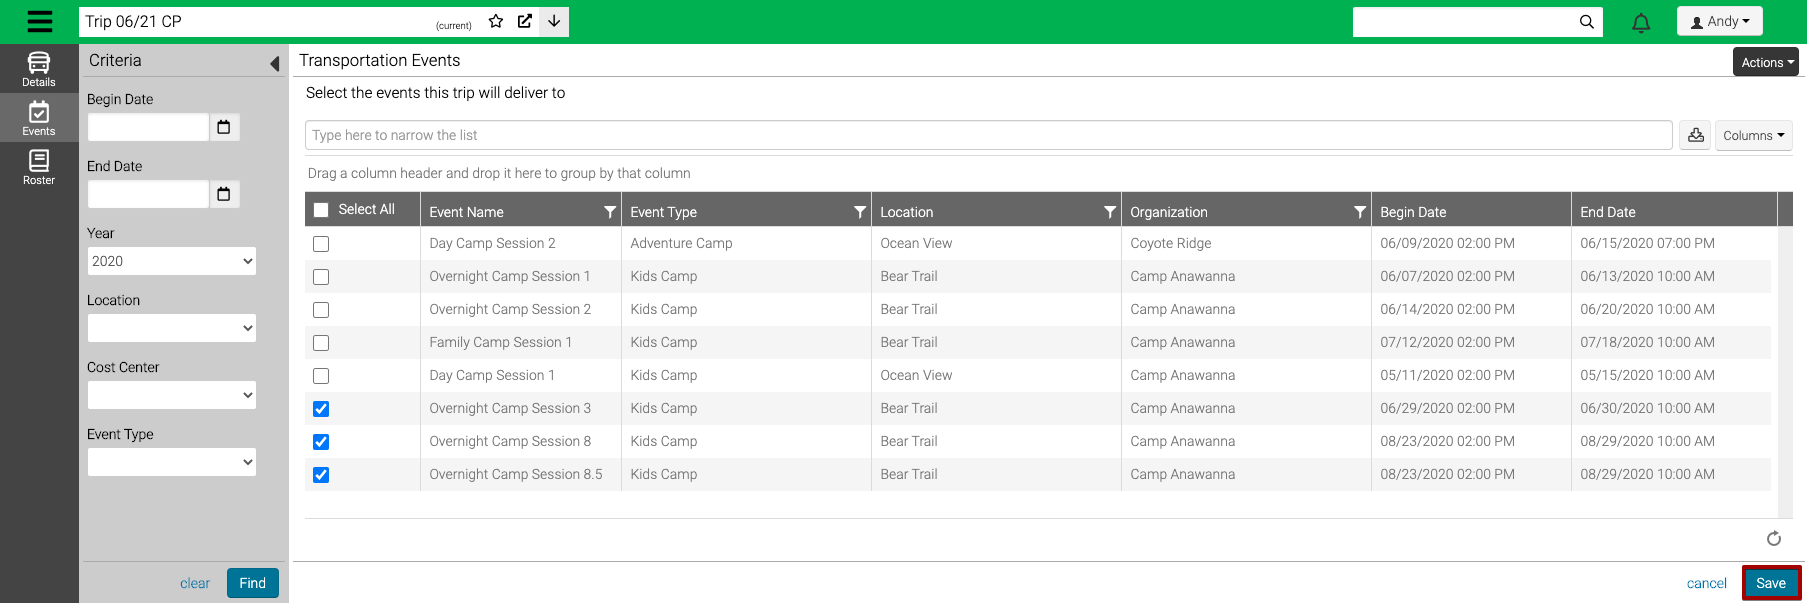
Events
The next step is to associate Events that the Trip is available for.
- Select Events.
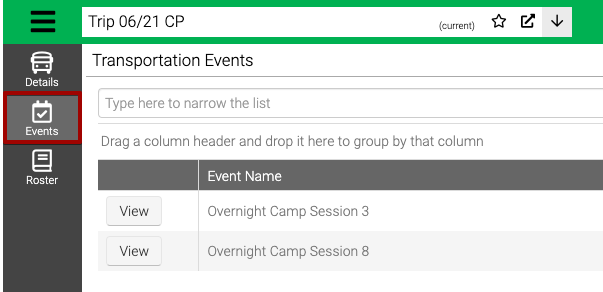
- Select View to go to an Event. To add or remove Events, in the lower right hand corner, select Edit.
- Use the Criteria to filter the list and then select Find.
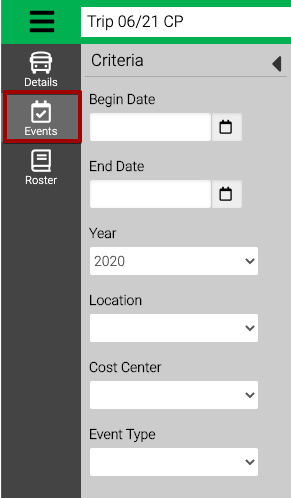
- Begin / End Date – Enter the date range of the Event.
- Year – Enter the Event Year.
- Location – Select a Location.
- Cost Center – Select a Cost Center.
- Event Type – Select an Event Type.
- Select the checkbox next to the Event and then select Save.
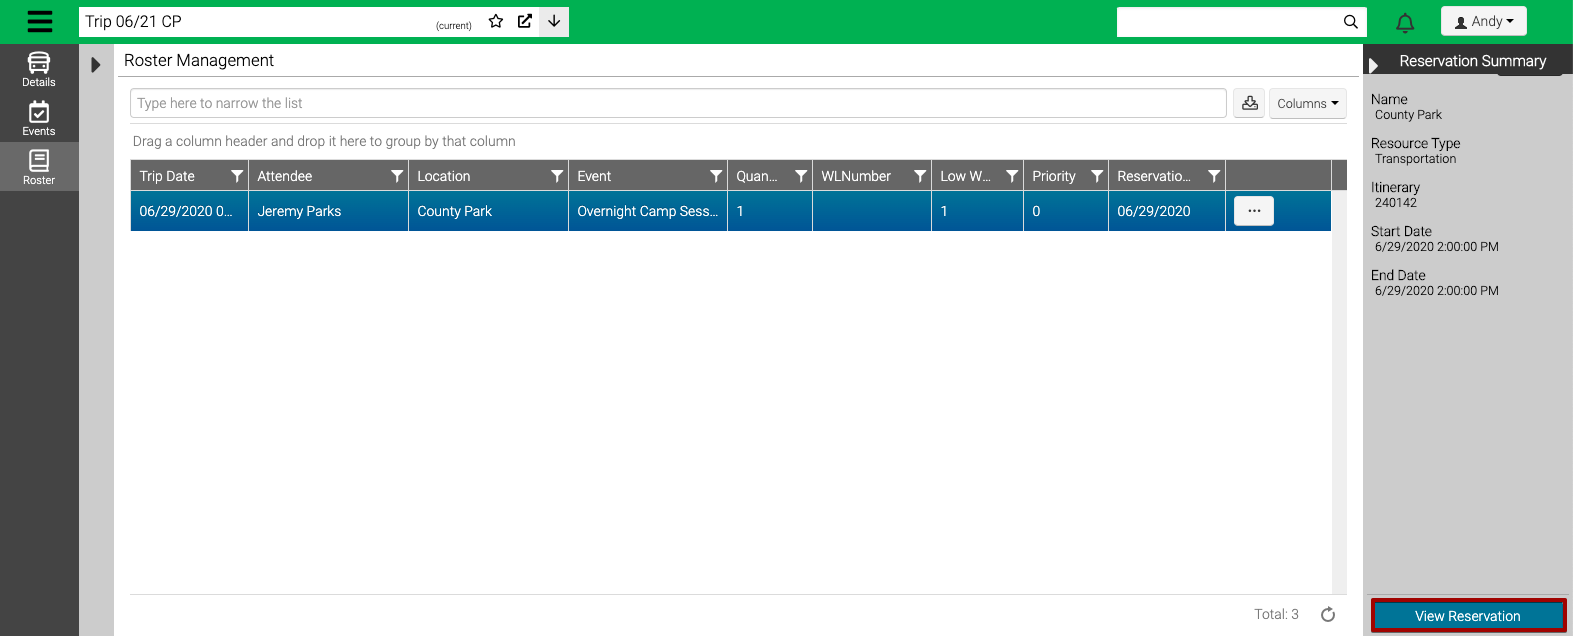
Roster
View a list of Attendees that have reserved transportation for the trip.
- Select Roster.
- Use the Criteria to filter the list and then select Find.
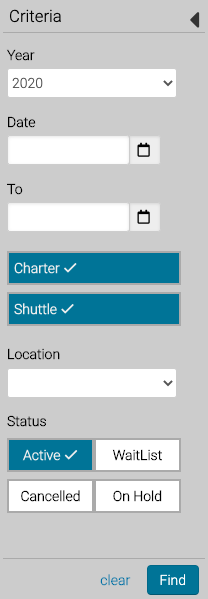
- Year – Pre-fills to the current year.
- Date – Enter a date range.
- Charter / Shuttle – Select the type of Transportation.
- Location – Select from the list of Transportation Locations.
- Status – Select a status:
- Active – Reservations that are active.
- WaitlList – Reservations that are on the waitlist.
- Cancelled – Reservations that are cancelled.
- On Hold – A reservation that has been started but airline information has not been submitted.
- To view a specific Reservation, select a row and then in the Summary select View Registration.
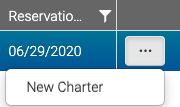
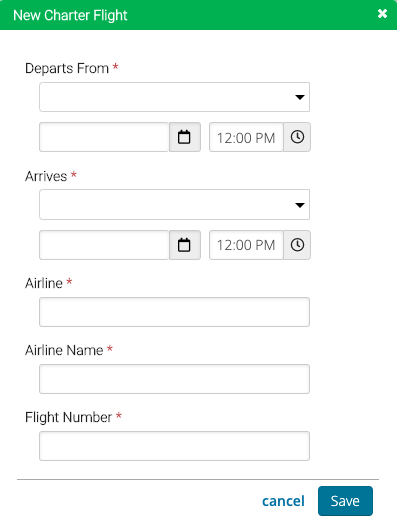
Add Charter Flight
- To add a Charter, select
 and then select New Charter.
- Enter the information in the fields and select Save.
Add From Event
You can also add Transportation directly to an Event.
- Go to Config > Registration > Events and search for an Event and select View.
- Select Transpo.
- Use the Criteria to filter the list of Trips and then select Find.
- Applicable for Event – If checked, then the Trip is applicable for the current Event.
- Select Add Transportation to add a new Trip.